Beware that this post is related to an SDK in maintenance mode
More Info: Consider nRF Connect SDK for new designs

Implement nRF-SDK BLE DFU transport layer in nRF connect

Hi,

We have developed a product that is using nrf sdk and are moving towards replacing the nrf-SDK with the new connect SDK and one of the main features we have is to perform a DFU of the nRF firmware as well as performing a DFU of an external STM32 microcontroller. We achieve this by performing the DFU as the buttonless_dfu example for nRF and for the external device we mark it as "external" when we create a .zip dfu packet so the bootloader will only place it in the bank and then in our application we perform the DFU of the external STM32.

We have our own developed APP in both IOS and Android for performing the OTA dfu using nRF API's.

What we want to achieve is to move over to nrf connect without modifying our APP and retain all the OTA DFU funcionality.

It is my understanding that the BLE transport layer is new for nRF connect (using the SMP protocol) so to achieve this we need to implement the old BLE transport layer in nRF connect and then use Zephyrs "Flash Image" API's to write the firmware to the bank/slot.

A couple of questions:

1. I have a hard time finding exhaustive documentation for implementing the transport layer, i.e. documentation of the BLE service and commands. What I have found is the following:

A higher level flow chart of the DFU process:
https://infocenter.nordicsemi.com/index.jsp?topic=%2Fcom.nordic.infocenter.sdk5.v15.0.0%2Flib_bootloader_dfu_process.html

Documentation (from nRF sdk 11, so quite old) of the characteristics from the "sender" of the firmware:
https://infocenter.nordicsemi.com/index.jsp?topic=%2Fcom.nordic.infocenter.sdk5.v11.0.0%2Fbledfu_transport_bleservice.html

Is there exhaustive documentation somewhere we can use to implement the transport layer ble service on the nRF side?

2. Can the old transport layer be "paused" or data be put on hold for a while to perform incremental DFU writes to the external microcontroller? I.e. receive X number of bytes, wait until they been written to the external device and the receive another X bytes and repeat until DFU is finished. It seems possible looking at the documentation as the "receive firmware" operation in the transport layer requires a response and my guess is that we could delay the response until we have written the bytes to the external microcontroller.

Note: Re-writing/changing the app is currently not an option unless it would require a minimal effort but we'd really prefer not to.

Best Regards and thanks in advance,
Andreas

Parents
  • Andreas3T said:
    We need BLE connection in our application as well so this would require both the softdevice and nrf connects BLE stack, right?

    Yes.

    Andreas3T said:
    I don't think that would leave us with enough FLASH for the DFU of our external microcontroller and we don't have an external memory unit.

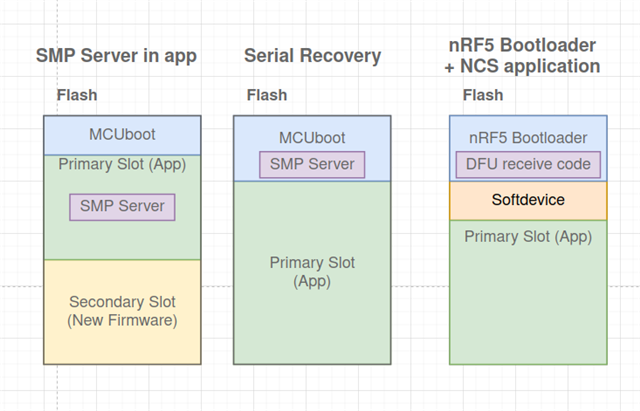
    If you need OTA for MCUboot, you will have less space available for the application, as the SoftDevice Controller + Host is a part of the application and therefore have to be in each slot. See the image below for an illustration:

     \

    For some tips on how to do Legacy DFU for the nRF Connect SDK:

    Have a look at the DFU Transport protocol.

    And for the BLE-specific DFU, see DFU->BLE. For the service, see DFU BLE Service.

    For source code, look at "nRF5_SDK_17.1.0_ddde560/components/libraries/bootloader/dfu".
    For BLE-specific DFU, see "nRF5_SDK_17.1.0_ddde560/components/libraries/bootloader/ble_dfu/"

    I found that our Serial LTE Modem example has this file named dfu_host_legacy.c.

    Maybe MCUboot Design can give some insight into MCUboot.
    For more nRF Connect SDK-specific MCUboot details, see Using MCUboot in nRF Connect SDK.
    And specifically, check out MCUboot output build files for an explanation of how our build system automatically generates files for DFU.
    If you want to see the exact commands that generate these files, you can build from the command line with "west -vvv build ..."

    The official MCUboot example we have is the SMP Server sample. However, I have a collection of my unofficial bootloader samples on my GitHub. These are, of course, not as thoroughly tested as the official ones.

    If you are new to the nRF Connect SDK, I can recommend our https://academy.nordicsemi.com/.

    If you have to handle the received image manually, have a look at the DFU Target library.

    I hope that this was helpful.

    Regards,
    Sigurd Hellesvik

Reply
  • Andreas3T said:
    We need BLE connection in our application as well so this would require both the softdevice and nrf connects BLE stack, right?

    Yes.

    Andreas3T said:
    I don't think that would leave us with enough FLASH for the DFU of our external microcontroller and we don't have an external memory unit.

    If you need OTA for MCUboot, you will have less space available for the application, as the SoftDevice Controller + Host is a part of the application and therefore have to be in each slot. See the image below for an illustration:

     \

    For some tips on how to do Legacy DFU for the nRF Connect SDK:

    Have a look at the DFU Transport protocol.

    And for the BLE-specific DFU, see DFU->BLE. For the service, see DFU BLE Service.

    For source code, look at "nRF5_SDK_17.1.0_ddde560/components/libraries/bootloader/dfu".
    For BLE-specific DFU, see "nRF5_SDK_17.1.0_ddde560/components/libraries/bootloader/ble_dfu/"

    I found that our Serial LTE Modem example has this file named dfu_host_legacy.c.

    Maybe MCUboot Design can give some insight into MCUboot.
    For more nRF Connect SDK-specific MCUboot details, see Using MCUboot in nRF Connect SDK.
    And specifically, check out MCUboot output build files for an explanation of how our build system automatically generates files for DFU.
    If you want to see the exact commands that generate these files, you can build from the command line with "west -vvv build ..."

    The official MCUboot example we have is the SMP Server sample. However, I have a collection of my unofficial bootloader samples on my GitHub. These are, of course, not as thoroughly tested as the official ones.

    If you are new to the nRF Connect SDK, I can recommend our https://academy.nordicsemi.com/.

    If you have to handle the received image manually, have a look at the DFU Target library.

    I hope that this was helpful.

    Regards,
    Sigurd Hellesvik

Children
Related