
In this example we are using the nRF Connect for Cloud Device API, which is a free service for protyping IoT products and is built on top of AWS IoT, to store dust sensor readings.
The API is device-agnostic and can store data from any kind of device.
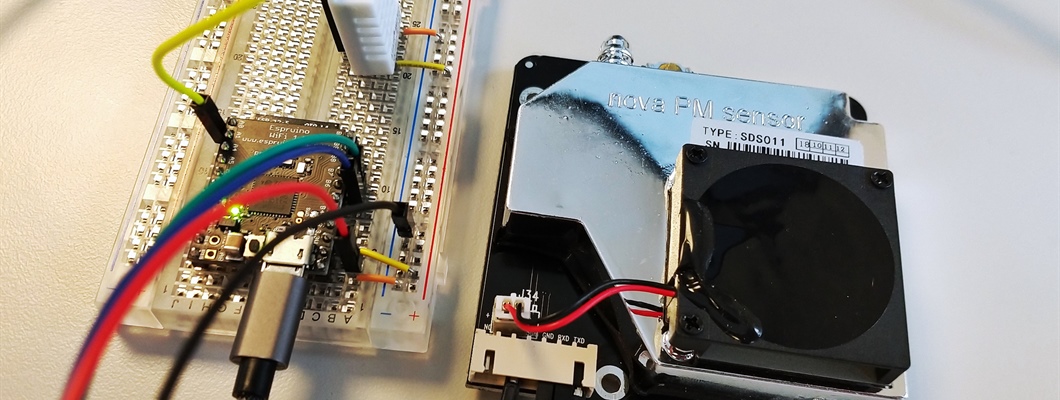
In this example we use an Espruino Wifi (firmware version 2v01). The Espruino will connect to the AWS IoT MQTT broker using TLS, and regularly publish temperatore and dust sensor readings.
You can find the source code for the Espruino Wifi app here.
Prepare your account
Go to nrfcloud.com and register a new account.
Head over to the handbook and acquire your API token, you need to replace it in the following examples with the YOUR_API_KEY string.
I will use httpie in the following examples.
Fetch the information about the MQTT broker to use:
http https://api.nrfcloud.com/v1/account \
  Authorization:"Bearer YOUR_API_KEY"
The response looks like this:
{
    "mqttEndpoint": "a2n7tk1kp18wix-ats.iot.us-east-1.amazonaws.com",
    "mqttTopicPrefix": "prod/4583e834-2804-42c7-a940-8c79f2ce9cba/",
    "topics": {
        "alerts": "prod/4583e834-2804-42c7-a940-8c79f2ce9cba/a/alerts",
        "connections": "prod/4583e834-2804-42c7-a940-8c79f2ce9cba/a/connections",
        "gateways": "prod/4583e834-2804-42c7-a940-8c79f2ce9cba/a/gateways",
        "messagesPrefix": "prod/4583e834-2804-42c7-a940-8c79f2ce9cba/m/",
        "notifications": "prod/4583e834-2804-42c7-a940-8c79f2ce9cba/a/alerts/notifications"
    }
}
Prepare the Espruino
(1) Connect the temperature sensor and set the correct pin you used. See https://www.espruino.com/DHT22 for more information on connecting the sensor.
(2) Connect the SDS011 sensor and set the correct pins you used. See https://luftdaten.info/en/construction-manual/#komponenten-schaltung for more information on connecting the sensor.
(3) Insert your Wifi SSID and password.
(4) use the
mqttEndpoint(in this examplea2n7tk1kp18wix-ats.iot.us-east-1.amazonaws.com) in thetlsOptions.
(5) use the
messagesPrefix(in this exampleprod/4583e834-2804-42c7-a940-8c79f2ce9cba/m/) formessagesPrefix.
Request a certificate which will be used on the Espruino to connect to the AWS IoT MQTT broker (pick e.g. a random UUID for deviceId):
echo -n 123456 | http POST https://api.nrfcloud.com/v1/devices/<deviceId>/certificates \
  Authorization:"Bearer YOUR_API_KEY"
The response looks like this:
{
    "certificate": "-----BEGIN CERTIFICATE-----\nMIIDWTCCAkGgAwIBAgIUAeQBZU0oobXj155fi9lcFL3W7MIwDQYJKoZIhvcNAQEL\n-----END CERTIFICATE-----\n",
    "id": "arn:aws:iot:us-east-1:363127674753:cert/ed03de0b2444e013b57c472efca90397c0001c647f6836cc342852dc71a0e3bc",
    "privateKey": "-----BEGIN RSA PRIVATE KEY-----\nMIIEpAIBAAKCAQEAw1/JGTfQUAB1ofzLsb9cITmTB4ave+2nQb3qMioeWF5VK982\n-----END RSA PRIVATE KEY-----\n",
    "publicKey": "-----BEGIN PUBLIC KEY-----\nMIIBIjANBgkqhkiG9w0BAQEFAAOCAQ8AMIIBCgKCAQEAw1/JGTfQUAB1ofzLsb9c\n-----END PUBLIC KEY-----\n"
}
(7) insert the
privateKey(it starts with-----BEGIN RSA PRIVATE KEY-----in this example)
Important: replace the newlines and the leading and ending markers before pasting the value:
- -----BEGIN CERTIFICATE-----\nMIIDWTCCAkGgAwIBAgIUAeQBZU0oobXj155\nfi9lcFL3W7MIwDQYJKoZIhvcNAQEL\n-----END CERTIFICATE-----\n
+ MIIDWTCCAkGgAwIBAgIUAeQBZU0oobXj155fi9lcFL3W7MIwDQYJKoZIhvcNAQEL
(8) insert the
certificate(it starts with-----BEGIN CERTIFICATE-----in this example)
Start the Espruino
Now save the app to the Espruino. In order to save memory please enable Modules uploaded as functions, JavaScript compiler, and select Direct to Flash (execute code at boot) as the Save on Send option.
The Espruino should now connect to your WiFi and to the AWS IoT MQTT broker.
After the first connect
After the first connect, the Espruino needs to be associate with your account:
echo -n 123456 | http PUT https://api.nrfcloud.com/v1/association/<deviceId> \
 Authorization:"Bearer YOUR_API_KEY"
After the association
Running onInit()...
Connecting to WiFi
{
  "ip": "192.168.50.67",
  "mac": "5c:cf:7f:c0:ca:47"
 }
Connecting to a2n7tk1kp18wix-ats.iot.us-east-1.amazonaws.com
tls connected
Connecting to MQTT
mqtt connected
pm2.5: 0.2	pm10: 0.3
pm2.5: 0.3	pm10: 0.3
temp: 22.9	rh: 19.1
pm2.5: 0.3	pm10: 0.3
pm2.5: 0.3	pm10: 0.3
pm2.5: 0.3	pm10: 0.3
pm2.5: 0.3	pm10: 0.3
pm2.5: 0.3	pm10: 0.3
pm2.5: 0.2	pm10: 0.2
pm2.5: 0.2	pm10: 0.2
prod/4583e834-2804-42c7-a940-8c79f2ce9cba/m/14c6fcb2-9480-437a-aae2-a9c2784b05aa
{"temp":{"temp":22.9,"rh":19.1},"dust":{"pm2_5":0.2,"pm10":0.2}}
If everything worked the green LED will be on and after 60 seconds the Espruino will publish the first reading on MQTT.
Fetch historical messages
Using the API you can now request the messages your device has sent:
http https://api.nrfcloud.com/v1/messages \
  Authorization:"Bearer YOUR_API_KEY" \
  inclusiveStart==2018-01-01T00:00:00.000Z \
  exclusiveEnd==2099-01-01T00:00:00.000Z \
  topics==prod/4583e834-2804-42c7-a940-8c79f2ce9cba/m/14c6fcb2-9480-437a-aae2-a9c2784b05aa
Remember to replace the value for topics in this example with your device topic: topics==${messagesPrefix}/${thingId}.
{
  "items": [
    {
      "topic": "prod/4583e834-2804-42c7-a940-8c79f2ce9cba/m/14c6fcb2-9480-437a-aae2-a9c2784b05aa",
      "deviceId": "14c6fcb2-9480-437a-aae2-a9c2784b05aa",
      "receivedAt": "2019-03-12T14:48:50.500Z",
      "message": {
        "temp": {
          "temp": 22.9,
          "rh": 18.7
        },
        "dust": {
          "pm2_5": 0.2,
          "pm10": 0.5
        }
      },
      "tenantId": "4583e834-2804-42c7-a940-8c79f2ce9cba"
    },
    {
      "topic": "prod/4583e834-2804-42c7-a940-8c79f2ce9cba/m/14c6fcb2-9480-437a-aae2-a9c2784b05aa",
      "deviceId": "14c6fcb2-9480-437a-aae2-a9c2784b05aa",
      "receivedAt": "2019-03-12T14:47:50.302Z",
      "message": {
        "temp": {
          "temp": 22.9,
          "rh": 19.1
        },
        "dust": {
          "pm2_5": 0.2,
          "pm10": 0.2
        }
      },
      "tenantId": "4583e834-2804-42c7-a940-8c79f2ce9cba"
    }
  ],
  "total": 107,
  "nextStartKey": "Dnf..."
}
That's it! You can now leave your device running and can build for example a web app, which shows displays this data.
Happy connecting!
Top Comments