Table of Contents
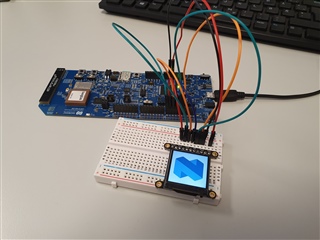
This blog post demonstrates how to get a LVGL sample up and running on the nRF9160 DK using Adafruit 1.3" 240x240 Wide Angle TFT LCD Display with MicroSD - ST7789. Follow the wiring guide and the steps in the blog post and get your display going! In an ideal world, we would be able to use the st7789v shield for waveshare 240x240, but since the nRF9160 DK does not have a device tree node label for arduino_spi, we need to implement a workaround. For the details on how the project configuration and overlay files were derived, check out my other blog post.
Hardware
Components
- nRF9160 DK
- 1.3" 240x240 TFT LCD Display using a ST7789V driver
- 8 jumper wires
- breadboard
Wiring
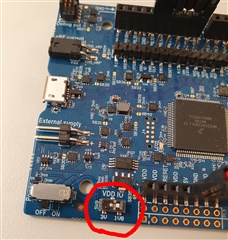
Important: The display operates with 3.3V logic, so on the nRF9160 DK, you must ensure that a tiny switch, SW9 (which sets VDD IO) is set at 3V!
Following the generic ST7789V shield pin assignment, we wire the connection as such:
| nRF9160 DK pin | Display pin |
| P0.08 | RST |
| P0.09 | D/C |
| P0.10 | TCS |
| P0.11 | SI |
| P0.12 | SO |
| P0.13 | SCK |
| GND | GND |
| 5V | Vin |
Software
After having wired up your DK, we need to perform some steps on the software side!
Prerequisites
nRF Connect SDK (NCS) installation. The attached project contains working files for both NCS v1.6.0 and NCS v2.2.0.
No guarantees can be made for other versions of NCS but it might work.
Steps
- Download the attached project
- Extract it into a valid west workspace (that is, a folder from which you can call the command
west buildfrom command line) - Connect your nRF9160 DK (with the screen already wired up) to your computer
- Build and flash the project to the DK
Incorporating this into other projects
The process of making this display work with your own project is a bit different if you NCS v1.6.0 or NCS v2.2.0. The steps are given for each of the SDK versions below.
For reference, the new project you want to configure the display for is named YourProject.
Using the ncs v1.6.0 sample
- Ensure that the LVGL and display-specific settings from the provided ZIP's config file (
prj.conf) is inYourProject's config file - Ensure that the overlay from the provided ZIP is also included (that is,
boards/nrf9160dk_nrf9160ns.overlay)- If
YourProjectalready has an overlay file (nrf9160dk_nrf9160ns.overlay), you could copy-paste the contents of the provided overlay file toYourProject'snrf9160dk_nrf9160ns.overlay - If
YourProjectdoes not have an overlay file, then you could copy the whole file intoYourProjectfolder. This will automatically be detected by CMake when you hit build!
- If
- Be sure to include
device.h,drivers/display.handlvgl.hin the C-file in which you want to program using LVGL.
Using the NCS v2.2.0 sample
- Ensure that the LVGL and display-specific settings from the provided ZIP's config file (
prj.conf) is inYourProject's config file - Set the SHIELD variable for building by doing one of these things:
- Place the line
set(SHIELD st7789v_waveshare_240x240)intoYourProject'sCMakeLists.txt - Pass the st7789v shield as an argument to the build like this:
west build -- -DSHIELD=st7789v_waveshare_240x240
- Place the line
Note on the source code structure
The source code might not look like ordinary LVGL code (which uses lv_init, lv_disp_draw_buf_init etc) because this part of LVGL is abstracted away by Zephyr, as seen in lvgl.c in Zephyr. The source code is also based on the LVGL sample provided by Zephyr, with changes made so that it works with the nRF9160 DK when following this tutorial.
Top Comments
-

HEXFFFFFFFF
-
Cancel
-
Vote Up
-1
Vote Down
-
-
More
-
Cancel
-

Embla Flatlandsmo
in reply to HEXFFFFFFFF
-
Cancel
-
Vote Up
+1
Vote Down
-
-
More
-
Cancel
Comment-

Embla Flatlandsmo
in reply to HEXFFFFFFFF
-
Cancel
-
Vote Up
+1
Vote Down
-
-
More
-
Cancel
Children