Building a Bluetooth application on nRF Connect SDK - Part 3 Optimizing the connection

Building a Bluetooth application on nRF Connect SDK - Part 3 Optimizing the connection

This is part 3 of the series Building a Bluetooth application on nRF Connect SDK

You can find other parts here:

Part 1 - Peripheral Role.

Part 2 - Central Role.

In Part 1 we covered the generic architecture, the peripheral role and GATT Server. In Part 2 we discussed the Central Role and the GATT client. 

Part 3 will analyze the options to optimize the connection for latency, power consumption, and throughput. We provided an NUS throughput demo that you can use as a reference design. 


1. Control the connection parameters. 

1.1 Background

We start with a short description of the connection parameters: 

  • Interval: defines the interval of the connection. How frequently the master/central will send a connection event packet to slave. The unit of connection interval is 1.25ms. 

  • Latency: Slave latency. The slave/peripheral can skip waking up and respond to the connection event from master to slave. The latency is the number of connect event the slave can skip. This is to save power on the slave side. When it has no data it can skip some connection events. But the sleeping period should not be too long so that the connection will timeout.

  • Timeout: How long would the master keeps sending connection event without a response from the slave before the connection is terminated.

2.2 Controlling the connection parameters

In a Zephyr Bluetooth LE central application, if you don't set the connection parameter when initializing scanning, the default connection parameter will be used: 

Connection Interval: min30-max50 ms Latency: 0 Timeout: 4 s. (BT_LE_CONN_PARAM_DEFAULT)

This values are good for many applications; it's a good balance between shorter latency and not too power-hungry. But if you need to change that, you can either set your own connection parameter as an input to the bt_scan_init() or modify the definition of BT_LE_CONN_PARAM_DEFAULT in conn.h. 

An example of setting your own connection parameters with low latency (you can use this in bt_scan_init() and bt_conn_le_create() ):

//minimum connection interval = maximum connection interval = 6*1.25 = 7.5ms
//slave latency = 15
//Connection timeout = 30 * 10 = 300ms
#define BT_LE_MY_CONN_PARAM BT_LE_CONN_PARAM(6, 6, 15, 30)
 
To update the connection parameters after the connection is established, you can call bt_conn_le_param_update(). Note that the max interval will take effect, not the min interval. 

On the peripheral side, if you leave CONFIG_BT_GAP_AUTO_UPDATE_CONN_PARAMS=y, the connection parameters request will be sent automatically 5 seconds after the connection is established. The reason it's sent 5 seconds after is to leave enough time for the connection running at lower latency (30-50ms for example) to complete service discovery quickly. If you immediately set the connection interval to says 1000ms, it will take pretty long to finish service discovery. The default connection parameters are similar to the ones on central with the exception of the connection timeout is set at 420ms. You can redefine this value in your project config/KConfig: 

CONFIG_BT_PERIPHERAL_PREF_MIN_INT
CONFIG_BT_PERIPHERAL_PREF_MAX_INT
CONFIG_BT_PERIPHERAL_PREF_LATENCY
CONFIG_BT_PERIPHERAL_PREF_TIMEOUT
If you define CONFIG_BT_GAP_AUTO_UPDATE_CONN_PARAMS=n, the request will not sent automatically and you need to call bt_conn_le_param_update(). Note that this is only a request and the central decides if it accept the request or not. Some phones may not accept the lowest connection interval (7.5ms) so be wise to request the interval, if you try to get too short interval you may end up not having the request accepted and stay with too long connection interval. 
The request is not sent immediately after your request, there is a predefined delay that you may want to configure: 
CONFIG_BT_CONN_PARAM_UPDATE_TIMEOUT, by default it's 5 seconds. 
static struct bt_le_conn_param *conn_param = BT_LE_CONN_PARAM(INTERVAL_MIN, INTERVAL_MAX, 0, 400);
static int update_connection_parameters(void)
{	
	int err;
	err = bt_conn_le_param_update(current_conn, conn_param);
		if (err) {
			LOG_ERR("Cannot update conneciton parameter (err: %d)", err);
			return err;
		}
	LOG_INF("Connection parameters update requested");
	return 0;
}
//callback
static void conn_params_updated(struct bt_conn *conn, uint16_t interval, uint16_t latency, uint16_t timeout)
{
	LOG_INF("Conn params updated: interval %d unit, latency %d, timeout: %d0 ms",interval, latency, timeout);
}

2. Optimize the connection for throughput - NUS throughput example 

2.1 Background

If you want to send a large amount of data in a short period of time, you would need to optimize the connection for throughput. Besides the connection interval there are three other important parameters:
- PHY: The data rate on the PHY layer of the connection. Using 2Mbps can double your speed with the trade-off of a shorter range. 
- ATT_MTU: This is the maximum transmission unit on ATT layer. This is the size limitation of an ATT packet. The size of a characteristic can be longer than the ATT_MTU. Note that the notification can only be send in one ATT packet when the write and read can be send in several ATT packets using long write and long read (read with offset). 
- Data length: The length of the radio packet sending over the air (excluding MAC, PHY overhead). Don't get confused with the ATT_MTU. One single ATT packet can be split into several radio packets (L2CAP fragmented packets). If you can avoid that it can improve the throughput largely. The delay between radio packets are significant, so this parameter is very important to improve throughput. It's not possible to combine multiple ATT packets into one radio packet. It's why ATT_MTU should also be configured correspondent to the Data length. Optimally, ATT_MTU = Data length - 4 (4 bytes overhead on Link-layer).

2.2 NUS throughput example


In nRF Connect SDK we has a throughput example that you can use to benchmark the BLE throughput with different configurations, including configuration of interval, ATT_MTU, data length and PHY. However, the example requires you to run the firmware on both sides of the connection and it may not be the same if you only control one side of the connection, for example when connecting to a phone. 
 
In the scope of this guide, we have created an NUS Throughput example based on the peripheral_uart sample to simulate a normal application that can be connected by a phone or any central device and have a good throughput in such conditions. 
In main.c code you can find how you can request the update on PHY, ATT_MTU and Data length: 
 
static void request_mtu_exchange(void)
{	int err;
	static struct bt_gatt_exchange_params exchange_params;
	exchange_params.func = MTU_exchange_cb;

	err = bt_gatt_exchange_mtu(current_conn, &exchange_params);
	if (err) {
		LOG_WRN("MTU exchange failed (err %d)", err);
	} else {
		LOG_INF("MTU exchange pending");
	}

}

static void request_data_len_update(void)
{
	int err;
	err = bt_conn_le_data_len_update(current_conn, BT_LE_DATA_LEN_PARAM_MAX);
		if (err) {
			LOG_ERR("LE data length update request failed: %d",  err);
		}
}

static void request_phy_update(void)
{
	int err;

	err = bt_conn_le_phy_update(current_conn, BT_CONN_LE_PHY_PARAM_2M);
		if (err) {
			LOG_ERR("Phy update request failed: %d",  err);
		}
}
 
Note that you need the following configuration to be able to use the above APIs: 
 
#GATT_CLIENT needed for requesting ATT_MTU update
CONFIG_BT_GATT_CLIENT=y
#PHY update needed for updating PHY request
CONFIG_BT_USER_PHY_UPDATE=y
#For data length update
CONFIG_BT_USER_DATA_LEN_UPDATE=y
#This is the maximum data length with Nordic Softdevice controller
CONFIG_BT_CTLR_DATA_LENGTH_MAX=251
#These buffers are needed for the data length max. 
CONFIG_BT_BUF_ACL_TX_SIZE=251
CONFIG_BT_BUF_ACL_RX_SIZE=251
#This is the maximum MTU size with Nordic Softdevice controller
CONFIG_BT_L2CAP_TX_MTU=247
 
Important note when developing on nRF5340: If your SoC has multiple cores, it's important that you add the configs to the core's configuration. Usually, for Bluetooth LE application, the netcore would run on hci_rpmsg image. So you need to either configure the hci_rpmsg sample directly or you can add the configurations into hci_rpmsg.conf and place the file inside a child_image folder in your application project. Don't forget to re-flash the core after you update the firmware for it. 

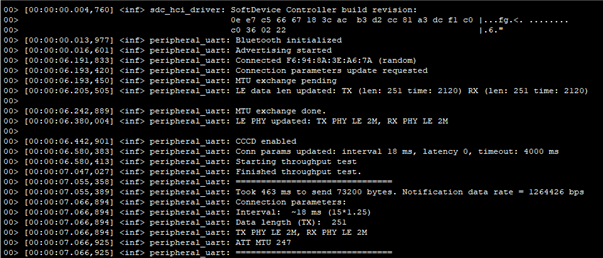
The example's main task is to send 300 notification packets as fast as possible, each packet has the maximum size of the allowed data length (24 bytes by default).

The application requests connection parameters update 300ms after the connection is established. After the CCCD is enabled and the connection parameter is updated it will start transmitting notifications on the NUS TX characteristic (calling bt_nus_send()).
The application will not start sending notifications if the connection interval is not what is expected (no negotiation mechanism implemented) so you may want to customize the requesting interval if the phone doesn't support it. Most phone would supports connection interval above 15ms.
Note that having the shortest connection interval doesn't necessary mean you will have highest possible throughput. With Data length extension in which the radio packet can be longer and with the fact that many phones now support multiple packets in one single connection event, it's more important than the device can utilize the most out of the radio period given to it. 
To test the application, you simply need to connect it to any central and on the central you need to enable CCCD. The test will start immediately after that. You can find the test result in either RTT logging or in UART logging: 
I would recommend to use a sniffer to capture the on-air activities to find the best options/configuration. 

The following sniffer trace shows the communication with a 18.75ms connection interval (2Mbps, 251 bytes DLE, 247 byte ATT MTU). We had 12 notifications (243 bytes payload each) sent in a single connection interval. The throughput was 1264 kbps (2Mbps PHY). 
Next is another trace with the connection interval of 7.5ms having only 4 notifications per connection event and the throughput of 1058kbps (at 2Mbps PHY). 
You can find that it's not always true that a shorter connection interval has higher throughput. 
Notice the amount of ~2ms idle at the end of the connection event. As far as I know it's a reserved idle radio period that the central reserves. It doesn't change when you change the connection interval. I noticed this behavior on Zephyr and also on some phones. A longer connection interval will help increase the duty cycle of the radio hence increasing throughput. Of course, the trade-off is that you have higher chance to drop the whole (long) connection event if there is a corrupted packet and higher latency if you want to start the transmission. 
 
In this example, the application sends as quick as possible 300 notification packets in a simple loop. What we noticed from the test was that bt_gatt_notify_cb() will not return -ENOMEM when the buffer is full. Instead, the function that requests the notification buffer will wait with K_FOREVER for the buffer to be available. This is different from the legacy Softdevice. In Softdevice, if we queue the notification and receive NRF_ERROR_RESOURCES (buffer full), we will need to wait for the BLE_GATTS_EVT_HVN_TX_COMPLETE to retry again. In nRF Connect SDK, it's a blocking function instead, and we need to keep the data alive until the function is returned. Note that unlike bare-metal applications (e.g nRF5 SDK) blocking function in RTOS won't keep the CPU in a busy loop.
 
Download the example here: 
Tested with SDK v2.5.2 :
For SDK v1.9.x:


The central application is provided as the reference, you don't need to use the central to test the throughput, it would work with any central, but the throughput may not be as high as what you can get if you have control over both sides of the connection. It works with the stock central_uart example in the SDK but the ATT_MTU is limited to 24 bytes by default. 

3. Optimize the connection for low power consumption

(TBD)
We will provide the current measurements on common use cases with different connection parameters configurations. Basically to achieve low power consumption, what you should do is to keep the connection interval at the beginning short to finish service discovery as quick as possible. After that you can switch to a longer interval. If you need to transmit a large amount of data you can switch to shorter connection interval and switch back to longer connection interval after that.

Further reading

1. Accessory Design Guidelines for Apple Devices. At chapter 40 you can find the recommended connection parameters that work best with Apple device. 

  • Hi Rj Fang, please create a devzone Q&A case and put a link to this blog. It's easier to discuss on the ticket than here.

  • Hi Hung,

    This is really detailed and helpful guide! Thank you!

    I just had one question: In the screentshot you post, data length is always 273 neatly but when I was testing on my end, the data length varies, randomly range from (130-280) although I was always sending 244 bytes and on the central device it received 244 bytes neatly. Also, on the right columns of your screenshot it shows "Rcvd handle value notification" but on my side it is "Encrypted packet decrypted incorrectly". Is this the reason of  various data length? Thank you!

    Best,