

This tutorial is aimed at implementing the nRF Desktop application on the nRF52840 Development Kit (DK) using the nRF Connect SDK, thereby allowing it to work either as a gaming mouse, keyboard, or dongle.
Table of Contents
1. Introduction:
1.1. What is nRF Desktop?
The nRF Desktop is a Human Interface Device (HID) reference design that connects to a host via Bluetooth® Low Energy, USB, or both. This application can run on a desktop mouse, gaming mouse, keyboard, or connection dongle depending on how it is configured. The reference design includes both software and hardware implementations. The software for the nRF Desktop is by default embedded in the nRF Connect SDK, while the hardware (HW) kit is described here (where it is also possible to download the schematic). This tutorial aims to help you test the nRF Desktop application without having access to the full HW kit, by using simple DevKits. The nRF Desktop application can also be helpful for those designing other types of Bluetooth LE applications, since it implements many complex modules that can potentially be reused for other applications. Full nRF Desktop documentation is available here.
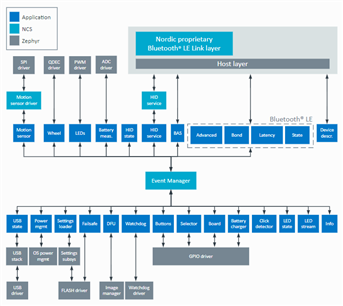
1.2. Firmware Architecture
The architecture of the nRF Desktop application is based on the Common Application Framework (CAF). Thus the application uses individual modules that communicate with each other using application events which are controlled by the Event Manager. One application event can be submitted by multiple modules and can have multiple listeners.
Depending on the device required (mouse, keyboard, dongle), the set of modules also differ. Hence, not all modules are required for every device. The code has been designed to be very modular, with one codebase that can be configured to be used for different boards or types of devices. Depending on your hardware, different configuration build types can be selected to configure the application to work for different use-cases.
The nRF Desktop application is intended to run on hardware such as a computer mouse or a keyboard. However, if these devices are not available to you, the application also supports the nRF52840 DK as a gaming mouse, keyboard or dongle or the nRF52833 DK as a dongle. This tutorial will show how you can configure the nRF Desktop application for a specific build type and to test it on the nRF52840 DK, to emulate a mouse, keyboard or dongle.
Application configured as Gaming mouse
1.3. nRF Desktop using an nRF52840DK
When using an nRF52840 DK, the nRF Desktop application is by default configured to function as a gaming mouse. It can be configured to function as a keyboard as well as a dongle by including the required configuration (.conf) files which have the set modules required for that application. These files can be found in the specific folder for the DK (nrf_desktop/configuration/nrf52840dk_nrf52840): gaming mouse (prj.conf), keyboard (prj_keyboard.conf) and dongle (prj_dongle.conf).
Passing the correct configuration file to the compiler when building the project enables you to make the DK function as whichever HID peripheral you require. Once you are familiar with the code, it is possible to create new configuration files as well, to enable or disable specific features.
The samples in this blog post are tested with nRF Connect SDK v1.8.0 and the nRF52840 DK.
2. Requirements
This example requires the following:
-
- 1 nRF52840 DK (if configuring the DK as a dongle, at least one extra nRF52840 DK is required depending on the number of peripherals you wish to connect to the dongle)
- nRF Command Line Tools – download here
- nRF Connect SDK (v1.8.0 was used for this blog) - download here
3. Building and Running:
The application can be built and run in 3 separate ways which are all supported by the nRF Connect SDK:
- Visual Studio Code (VS Code)
- SEGGER Embedded Studio
- Command Line Interface
NOTE: nRF Connect SDK is IDE agnostic, i.e. you can use any IDE, however we only support the IDEs listed above.
If configuring the application as a dongle, build one nRF52840 DK with the dongle configuration and the other with the configuration of the required peripheral (mouse or keyboard).
3.1. Using Visual Studio Code (VS Code)
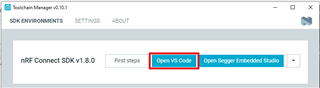
- Open VS Code via the Toolchain Manager application in nRF Connect for Desktop. We are using the latest version of nRF Connect SDK, which is recommended.
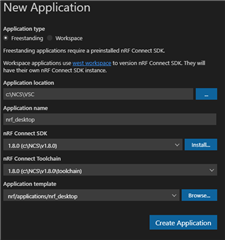
- Go to the nRF extension in the VS Code homepage and select “Create a new application from sample” from the welcome page. Select the Application type “Freestanding”. Select the “Application location” anywhere outside your current west workspace (the current west workspace is the directory where nRF Connect SDK is located) and provide a suitable “Application name”. Select the nRF Desktop application in the “Application template” and then create the application.
- In the left window on the screen, you should see the “Applications” field and the name of your application underneath. Select the icon to the right of the application name to add build configuration.

- From the “Add Build Configuration” page, select the board, in this case the “nrf52840dk_nrf52840” and then in “Extra CMake arguments” specify the build like below
-DCONF_FILE=<build_type>
where <build_type> can be:
- - prj.conf (gaming mouse, default for nRF52840 DK)
- - prj_keyboard.conf (keyboard)
- - prj_dongle.conf (dongle)
-
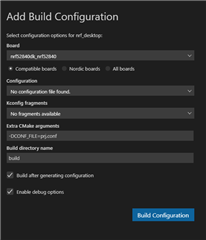
- Select “Enable debug options” and then generate config.
- In the “Actions” section, select “Pristine Build” to remove the contents of the build directory before building, since we have added extra CMake arguments. Then select “Erase and Flash”.
- Proceed to section 4. Testing.

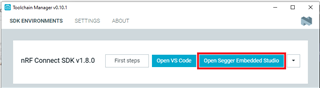
3.2. Using SEGGER Embedded Studio
- Open SEGGER Embedded Studio via the Toolchain Manager application in nRF Connect for Desktop. We are using the latest version of nRF Connect SDK, which is recommended.
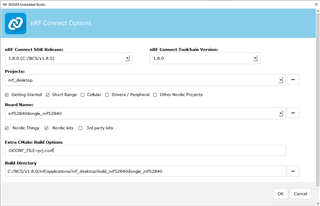
- Go to File -> Open nRF Connect SDK Project. Under “Projects:”, scroll down to “Short Range | Bluetooth Applications” and select “nrf_desktop”. Under “Board Name:”, specify the board name, in this case the “nrf52840dk_nrf52840”. You can change the name of the build directory if you do not wish to use the default name.
- Select “Extended Settings” and mention the build type like below:
-DCONF_FILE=<build_type>
where <build_type> can be:
- - prj.conf (gaming mouse, default for nRF52840 DK)
- - prj_keyboard.conf (keyboard)
- - prj_dongle.conf (dongle)
- Select “Clean Build Directory” then click OK to open the project.
- To build and run the project, go to “Build” and select “Build and Run”.
- Proceed to section 4. Testing.
3.3. Using Command Line Interface
- Open command prompt via the Toolchain Manager, by opening the drop-down menu next to the required nRF Connect SDK version.

- Navigate to the location of the nRF Desktop application. The application can be found in <version>\nrf\applications\nrf_desktop

- To select the build type when building the application from the command line, add the following command after the ‘west build’ command like this
west build -b nrf52840dk_nrf52840 -d build -- -DCONF_FILE=<build_type>
where <build_type> can be:
- - prj.conf (gaming mouse, default for nRF52840 DK)
- - prj_keyboard.conf (keyboard)
- - prj_dongle.conf (dongle)

- Flash the application onto the DK using the following command
west flash

4. Testing:
Now that we have configured the nRF Desktop application to fit our use-case and flashed it to the nRF52840 DKs, the testing can be done as follows.
What makes this configuration act as a gaming mouse is the fact that the LLPM (Low Latency Packet Mode) is enabled (see CONFIG_BT_CTLR_LLPM=y, allowing the mouse to decrease the connection interval of the Bluetooth LE connection down to 1ms when connected to another device (e.g. dongle) supporting the same feature.
The gaming mouse in the nRF Desktop can support three communication channels: Bluetooth LE to PC/mobile, Bluetooth LE to dongle using Nordic LLPM feature (1ms report rate), USB. In this section, only standard Bluetooth LE to PC and USB are explored. For demonstrating LLPM, a new tutorial covering advanced features will be released later.
4.1. Gaming mouse
These steps describe how to test the nRF52840 as a gaming mouse over a Bluetooth LE connection to a PC/mobile/tablet.
- Once the program is flashed to the device, LED 1 lights up and LED 2 starts breathing (blinking slowly) indicating that the device is advertising.
- Now, the device will be visible as a Bluetooth device ("Mouse nRF52 Desktop") on your computer or mobile phone. From the PC/mobile, select the device and establish the connection.
- Once the connection is established, LED 2 becomes stable indicating a connection.
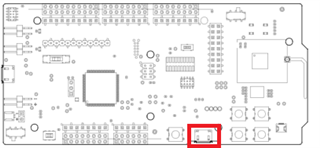
- To test the DK as a mouse, use the four buttons on the kit to move the cursor around on your computer:
- Button 1: the cursor moves up
- Button 2: the cursor moves right
- Button 3: the cursor moves down
- Button 4: the cursor moves left
To test the USB connection, perform the following steps:
- From your PC or mobile phone, disconnect the Bluetooth LE link
- Unplug the DK from the standard USB port used during flashing.
- Now, connect the DK to the PC via the secondary USB port labeled "nRF USB port". This port is directly connected to the USB interface on the nRF52840SoC and will power the DK and send USB HID data directly to the SoC.

- Push the buttons to move the cursor like described above.
To prepare the DK for a new connection to the dongle over Bluetooth LE (which is presented in section 4.3), you must unpair the device from your PC/mobile:
- Make sure the DK is powered via the primary USB port (programming port)
- Disable Bluetooth LE on your PC/mobile
- Turn off the DK using the dedicated ON/OFF switch.
- While turning ON the DK, press the Button 1 for more than 5 seconds
The device will Erase the peers if the previous peer (PC/mobile) is not found. LED 1 lights up and LED 2 starts breathing (blinking slowly) indicating that the device is advertising, ready for new connection.
4.2. Keyboard
These steps describe how to test the nRF52840 as a keyboard over a Bluetooth LE connection.
- Once the program is flashed to the device, LED 1 lights up and LED 2 starts breathing (blinking slowly) indicating that the device is advertising.
- Now, the device will be visible as a Bluetooth device ("Keyboard nRF52 Desktop") on your computer or mobile phone. From the PC/mobile, select the device and establish the connection.
- Once the connection is established, LED 2 becomes stable indicating a connection.
- To test the DK as a keyboard, use the four buttons on the kit and observe the typing on your computer:
- Button 1: prints ‘a’
- Button 2: prints ‘b’
- Button 4: prints ‘ nordic’ continuously. Press it again to stop it.
- Press and hold button 3 in combination with any other button to enable ‘Caps Lock’ on the keyboard.
flash the application to the DK again.
To test the USB connection, perform the following steps:
- From your PC or mobile phone, disconnect the Bluetooth LE link
- Unplug the DK from the standard USB port used during flashing.
- Now, connect the DK to the PC via the secondary USB port labeled "nRF USB port". This port is directly connected to the USB interface on the nRF52840SoC and will power the DK and send USB HID data directly to the SoC.
- Push the buttons to move the cursor like described above.
To prepare the DK for a new connection to the dongle over Bluetooth LE (which is presented in section 4.3), you must unpair the device from your PC/mobile:
- Make sure the DK is powered via the primary USB port (programming port)
- Disable Bluetooth LE on your PC/mobile
- Turn off the DK using the dedicated ON/OFF switch.
- While turning ON the DK, press the Button 1 for more than 5 seconds
The device will Erase the peers if the previous peer (PC/mobile) is not found. LED 1 lights up and LED 2 starts breathing (blinking slowly) indicating that the device is advertising, ready for new connection.
4.3. Dongle
These steps describe how to test the nRF52840 as a dongle over a Bluetooth LE connection.
- Once the program is flashed to the device, LED 1 lights up and LED 2 starts breathing (blinking slowly) indicating that the device is scanning.
- Now, connect the nRF52840 DK configured as a dongle to the computer via the micro USB output on the DK named "nRF USB port".
You can observe that LED 1 lights up.
- The device will now be visible as a device ("Dongle nRF52 Desktop") on your computer and you can observe that LED 2 starts breathing, meaning it’s scanning.
- Next, configure another nRF52840 DK as either a gaming mouse or a keyboard. The device cannot have any previously established bonds as described in the end of sections 4.1 or 4.2. Turn the device on and LED 2 will start breathing indicating that it’s advertising. Do not establish a connection from the computer or mobile phone.
- As soon as the dongle DK scans the advertising packets from the mouse/keyboard DK, they will connect automatically. Wait for the DKs to connect to each other.
- Once the connection is established, LED 2 becomes stable on both the devices, indicating a connection.
- Test the nRF52840 DK configured as gaming mouse or keyboard, as described in sections 4.1 or 4.2, pushing the buttons to simulate a mouse or keyboard
NOTE: if you have three DKs available (one as a dongle, one as a keyboard and one as a gaming mouse), you can have both the gaming mouse and the keyboard advertising at the same time. When the dongle turns on for first time, it will scan and connect to both peripherals and keep scanning. However, the dongle stops scanning as soon as one of the connected devices is used. To start scanning for both bonded and non-bonded Bluetooth Peripherals, Short-press Button 1 (less than 0.5 seconds). The scan is interrupted if another peripheral connected to the dongle is in use. On the contrary, Long-press Button 1 (more than 5 seconds). to initialize peer erase. When LED2 starts blinking rapidly, double-press Button 1 to confirm the operation. After the confirmation, all the Bluetooth bonds are removed for the dongle. It is now possible to connect new devices.
5. What next?
The nRF Desktop includes many interesting features that can be tested and can be used when building HID devices, or other applications. These can become topics for future blogs and tutorials. Meanwhile, it is worth mentioning a selection of features here:
- Nordic Low Latency Packed Mode. When enabled on both dongle and device (mouse or keyboard), after establishing the initial Bluetooth Low Energy connection, the connection interval is reduced to 1ms. If two devices are connected to the same dongle, each will have a 2ms report rate. When testing LLPM on a DK, powering the DK from a coin cell battery should be avoided.
- Motion simulation. It is possible to simulate a mouse moving automatically. This can be used to test LLPM on a DK. Background (Silent) DFU using HID configuration channel
- QoS to avoid congested RF channels
- 8dBm Tx power (valid on nRF52820, nRF52833, nRF52840). It can be set by replacing CONFIG_BT_CTLR_TX_PWR_0 with CONFIG_BT_CTLR_TX_PWR_PLUS_8 in the .config settings
- Python Script for PC “HID Configurator”. It can be used to perform DFU, rebooting the device, getting information about the firmware, reading blocked channels to avoid Wi-Fi interference, playing LED stream, etc.
-

Mykhaylo
-
Cancel
-
Vote Up
0
Vote Down
-
-
More
-
Cancel
Comment-

Mykhaylo
-
Cancel
-
Vote Up
0
Vote Down
-
-
More
-
Cancel
Children