
Before we begin
Table of context
-
- Before we begin
- The "Hello world" example
- Advertising
- RSSI
- Addresses
- Address types
- Advertising types
- Bonding
- Advertising data
- Scan response data
Change Log 2018.08.24: Updated tutorial to suit SDK V15..0.0
Equipment and software
To complete this tutorial you will need the following:
-
- [nRF52 DK Kit](https://www.nordicsemi.com/eng/Products/Bluetooth-low-energy/nRF52-DK)
- [nRF52 Dongle or an additional development kit](https://www.nordicsemi.com/Software-and-Tools/Development-Kits/nRF52840-Dongle)
- [SEGGER Embedded Studio(SES)](https://www.segger.com/products/development-tools/embedded-studio/)
- [nRF Connect](https://www.nordicsemi.com/eng/Products/Bluetooth-low-energy/nRF-Connect-for-Desktop). You can also use the nRF Connect application that is found in Google Play on Android or the App store for iPhone.
- [SDK V15.0.0](https://developer.nordicsemi.com/nRF5_SDK/nRF5_SDK_v15.x.x/) **NOTE! This tutorial is written for SDK V15.0.0. Example files for SDK 11, SDK V8.x.0 and SDK V9.0.0 can also be found on github, but the APIs are different.** https://github.com/NordicPlayground/nrf51-ble-tutorial-advertising/tree/SDK11
- [Softdevice S132 V6.x.x](https://www.nordicsemi.com/eng/Products/S132-SoftDevice).
- [Example files found on github](https://github.com/NordicPlayground/nrf51-ble-tutorial-advertising).
Other kits, dongles and software versions might work as well, but this is what I have used. This tutorial will not cover how to install and setup the software. Please search the forum if you run into trouble before posting questions here.
Necessary prior knowledge
It is expected that you have basic knowledge of how to use SES, nRF Connect and how to download your application to your kit. Please browse the Tutorial section and the Infocenter to find guides on how to use your equipment and compile your first BLE application. Here is an excellent blogpost that I highly recommend you read. It provides a more in depth explanation on how advertising works and is a natural supplement to this tutorial.
If you run into troubles please browse devzone, look for documentation on our Infocenter, and read the user guides for your kits. I urge you to post any questions you might have on the forum and not below the tutorial. This makes it is easier for other users and Nordic employees to see and search for your question and you will actually most likely get a faster response(!).
The “Hello world” example
First thing first: download the example code from github. It is based on the template example found in the SDK V15.0.0, but stripped of all code that is not necessary for our purpose. There is still quite a lot of code left though, which is used to initiate and utilize processes running in the background. The code is not essential for this tutorial and can be left as is. If you are curious of what it is anyway then here are some links to documentation on some of the modules that are used in the code:
- The Peer Manager. This is a module that handles bonded connections, which includes controlling encryption and pairing procedures. Since this tutorial is about advertising and not connections it is not really relevant. Still I chose to leave it in the code as it is extensively used in more advanced examples, so I figured you might just as well get used to it being there and it doesn't do any harm.
- The Button Support Package (bsp). This module is used to handle the LEDs and the buttons. In this example you will notice that an LED is blinking when your board is advertising. After 180 seconds the board will stop advertising and go to sleep. Then you can push Button 1 and the board will wake up and start advertising again. All this is handled by the bsp module.
To compile the example download the files and copy the folder "nrf52-ble-tutorial-advertising" to "your_SDK_folder\examples\ble_peripheral". Your main.c file should then be found in the folder "your_SDK_folder\examples\ble_peripheral\nrf52-ble-tutorial-advertising". If you need help with this please have a look at this thread on devzone: Compiling github projects. Open the project file "ble_app_template_pca10040_s132" and hit “Build”. It should compile without any errors or warnings.
Advertising
Now, let us have some fun right away. Make sure you have programmed the correct SoftDevice to your nRF5x DK kit and compiled the example successfully. Then hit the download button in SES and load the example onto your kit as well. Open nRF Connect and start discovery using your nRF52 Dongle as master emulator. A device named “HelloWorld” should show up in the list of discovered devices as shown in the picture below.
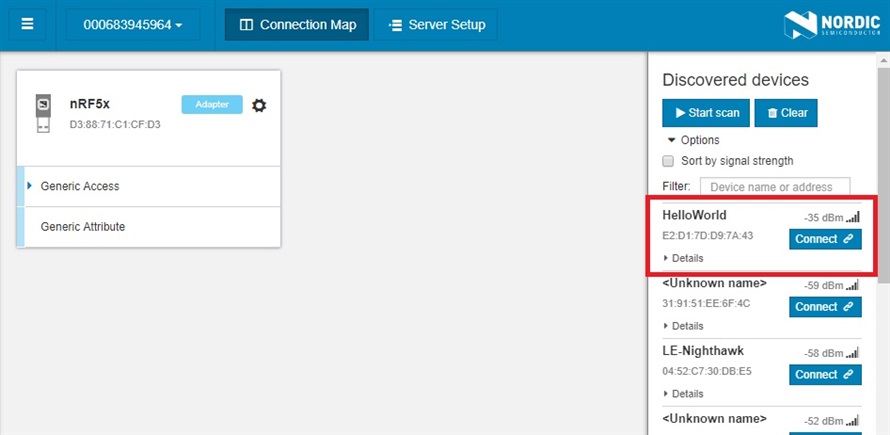
What you see in the picture is:
-
- The device name as defined in our main.c file. Try to search for
#define DEVICE_NAMEin your code and change the string to something of your own choice (just don’t make it too long). Now compile and download your application again and see how your device name has changed. - The Bluetooth Device Address. Similar to a Media Access Control address (MAC address), but not necessarily universally unique.
- The Received Signal Strength Indicator (RSSI). This is a value of how good your signal strength is. Move your kit around or lay your hand over the PCB antenna on your kit and see how the RSSI changes.
- The device name as defined in our main.c file. Try to search for
The Advertising packet
Now expand the "HelloWorld" device tree by clicking on the little cross to the left. You should see something similar to the next image.
For this tutorial we are interested in the Address type and the Advertising type:
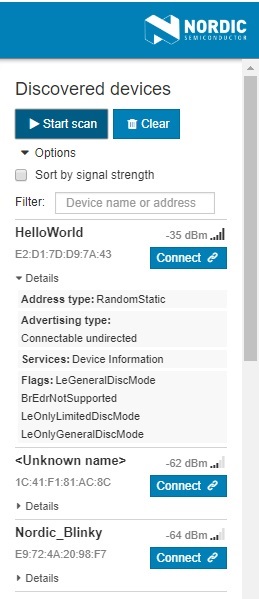
Address Type
Address type as defined in the Bluetooth Core specification. See this post on devzone for more on address types. The default address type in our example is “Random static address”. Try to go into gap_params_init() in main.c and add these four lines at the end of the function:
ble_gap_privacy_params_t prvt_conf;
memset(&prvt_conf, 0, sizeof(prvt_conf));
prvt_conf.privacy_mode = BLE_GAP_PRIVACY_MODE_DEVICE_PRIVACY;
prvt_conf.private_addr_type = BLE_GAP_ADDR_TYPE_RANDOM_PRIVATE_RESOLVABLE ;
prvt_conf.private_addr_cycle_s = 0;
err_code = sd_ble_gap_privacy_set(&prvt_conf);
APP_ERROR_CHECK(err_code);
This will set the address type to “Private Resolvable address”.The Address type will still show up as “Random”, but try to reset your board a few times. You should see that after each reset your device shows up with a different address in the device list. This functionality might be handy in certain situations demanding higher security. Remove the lines again to change the address type back to “Random static address”.
Advertising Type
To keep it simple there are two advertising types; connectable and non-connectable. Non-connectable might be useful if you just need one-way communication and only need to broadcast a couple of bytes. One use case for this might for example be location awareness. If you want to send more data to a specific device, on the other hand, you need a connectable device. Examples here might be a heart rate sensor connected to an app on your phone or a Bluetooth headset.
Advertising Data
Now to the fun part! Go to the advertising_init() function. The advertising data fields contained in the `advdata` variable are the fields where you can configure your first advertising packet. The advertising packet in this example already contains your full device name. It also contains flags defining some of the advertising options. The flag field is mandatory, but we will discuss it here.
Search for the definition of the ble_advdata_t advertising data structure in your project files (right click on ble_advdata_t and click "Go To Definition Of 'ble_advdata_t'. This works on all functions and variables). When you find it you can see that it is a list of options and data structures with some very brief descriptions. There are quite a few options, but it is important to know that an advertising packet can consist of no more than 31 bytes, so you might need to select your data with care. Here is a useful discussion on advertising bytes.
First let us play with the name and pretend that we need a really long one. Find the "DEVICE_NAME" define again and change the string to “ThisIsAReallyLongName”. Compile and download the code and make sure your new name shows in the device list. This name consumes a lot of our precious 31 byte long advertising packet. So let us say we want to keep our long name, but only advertise the first few letters of it. The advertising_init() function should now look something like this:
static void advertising_init(void)
{
    ret_code_t             err_code;
    ble_advertising_init_t init;  // Struct containing advertising parameters
    // Build advertising data struct to pass into @ref ble_advertising_init.
    memset(&init, 0, sizeof(init));

    init.advdata.name_type               = BLE_ADVDATA_FULL_NAME;
    init.advdata.include_appearance      = true;
    init.advdata.flags                   = BLE_GAP_ADV_FLAGS_LE_ONLY_GENERAL_DISC_MODE;
    init.advdata.uuids_complete.uuid_cnt = sizeof(m_adv_uuids) / sizeof(m_adv_uuids[0]);
    init.advdata.uuids_complete.p_uuids  = m_adv_uuids;

    init.config.ble_adv_fast_enabled  = true;
    init.config.ble_adv_fast_interval = APP_ADV_INTERVAL;
    init.config.ble_adv_fast_timeout  = APP_ADV_DURATION;

    init.evt_handler = on_adv_evt;

    err_code = ble_advertising_init(&m_advertising, &init);
    APP_ERROR_CHECK(err_code);

    ble_advertising_conn_cfg_tag_set(&m_advertising, APP_BLE_CONN_CFG_TAG);
}
Change the advertising name type to:
init.advdata.name_type = BLE_ADVDATA_SHORT_NAME; // Use a shortened name
Then right below this add the line:
init.advdata.short_name_len = 6; // Advertise only first 6 letters of name
Compile and download again. In the “Discovered devices” list your device should now show up with the name “ThisIs”, the first 6 letters of the full name. However, if you connect to your device by clicking “Select device”, “Connect” and then “Discover services” you will see that the full name is still there. In our case, this frees up 15 bytes in the advertising packet.
Manufacturer Specific Data
One of the most interesting fields in the advertising data structure might be the p_manuf_specific_data field. This is a field where you can place whatever data you want. So copy the advertising_init() function below:
static void advertising_init(void)
{
    ret_code_t             err_code;
    ble_advertising_init_t init;  // Struct containing advertising parameters
    // Build advertising data struct to pass into @ref ble_advertising_init.
    memset(&init, 0, sizeof(init));

    ble_advdata_manuf_data_t                  manuf_data; //Variable to hold manufacturer specific data
    uint8_t data[]                            = "SomeData!"; //Our data to advertise
    manuf_data.company_identifier             =  0x0059; //Nordics company ID
    manuf_data.data.p_data                    = data;
    manuf_data.data.size                      = sizeof(data);
    init.advdata.p_manuf_specific_data = &manuf_data;

    init.advdata.name_type = BLE_ADVDATA_FULL_NAME; // Use a shortened name
    init.advdata.short_name_len = 6; // Advertise only first 6 letters of name
    init.advdata.flags                   = BLE_GAP_ADV_FLAGS_LE_ONLY_GENERAL_DISC_MODE;
    init.advdata.uuids_complete.uuid_cnt = sizeof(m_adv_uuids) / sizeof(m_adv_uuids[0]);
    init.advdata.uuids_complete.p_uuids  = m_adv_uuids;

    init.config.ble_adv_fast_enabled  = true;
    init.config.ble_adv_fast_interval = APP_ADV_INTERVAL;
    init.config.ble_adv_fast_timeout  = APP_ADV_DURATION;

    init.evt_handler = on_adv_evt;

    err_code = ble_advertising_init(&m_advertising, &init);
    APP_ERROR_CHECK(err_code);

    ble_advertising_conn_cfg_tag_set(&m_advertising, APP_BLE_CONN_CFG_TAG);
}
Now compile, download and check your nRF Connect. You can see that there is a new field in the “Advertising Data” list called “ManufacturerSpecificData”. It contains a cryptic string of hexadecimal numbers. The first two numbers are the company ID (0x0059) with the least significant byte first. The company ID is a unique 16-bit value assigned to Bluetooth SIG members. It is not allowed to broadcast a custom company ID value without being a member. If you are curious you can see a list of the Bluetooth SIG member IDs here. As described at the bottom of the page the value 0xFFFF "may be used in the internal and interoperability tests before a Company ID has been assigned. This value shall not be used in shipping end products". When you are ready for shipping you will need to apply for a Bluetooth SIG membership to get your own unique ID. "Adopter level" membership is free, but you will need to be associated with a valid company. The next 10 bytes in the manufacturer specific data field are the actual data. If you compare with an ASCII table you will recognize the string “SomeData!”, most significant byte first this time. The last two zeroes at the end represent a termination character in the string.
Challenge 1: Try to add and populate the "p_tx_power_level" field in "advdata" with a value of your own choice and see what happens in nRF Connect. This field is meant to advertise the transmit power of your device. This value might, e.g., enable other units to roughly estimate the distance to your device. (Keep in mind that you will have to use one of the valid tx power levels mentioned in the nRF52832 Product Specification. It is also important to know that this doesn't change the actual transmit power, just the information that is advertised).
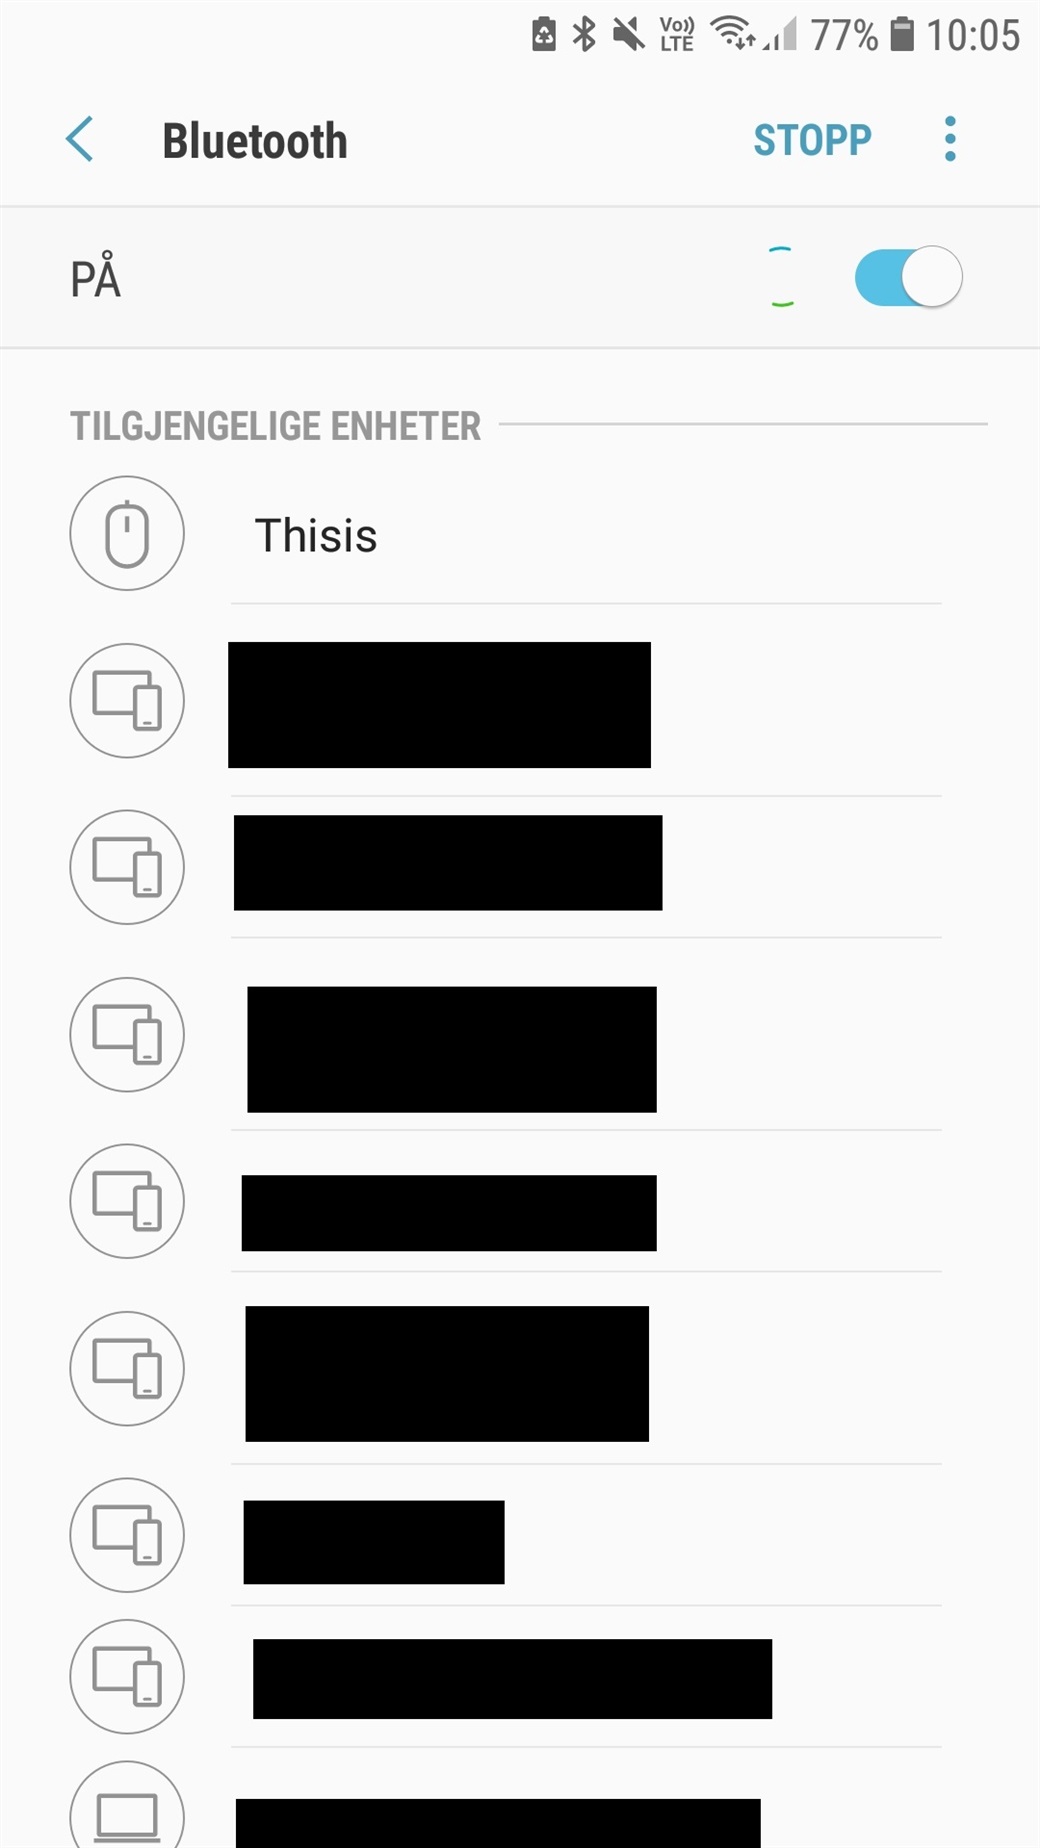
Challenge 2: Set the "include_appearance" field in "advdata" to "true" and see what happens in nRF Connect. Then search for sd_ble_gap_appearance_set(BLE_APPERANCE_) in your main file and change the ‘BLE_APPERANCE_’ to “BLE_APPEARANCE_HID_MOUSE” and see what happens. The appearance feature might be useful to developers of e.g. mobile phone apps. If you have a BLE enabled phone (or a laptop) your kit should now show up with the name "ThisIs" and a computer mouse icon if you search for BLE devices.
Tips: Your advertisement packet is already getting dangerously full so you might want to shorten your manufacturer data size or device name.
This is what I can see on my phone:
Scan response data
But what if you really, really want to advertise more than 31 bytes? Then there is a solution for you and that is the Scan response data. This is an optional "secondary" advertising payload which allows scanning devices that detect an advertising device to request a second advertising packet. This allows you to send two advertising frames with a total payload of 62 bytes.
Challenge: In your code do the following:
-
- Declare a new "ble_advdata_manuf_data_t" type variable called "manuf_data_response".
- Populate "manuf_data_response" with data as we did with the first advertising packet.
- Populate "init.srdata.name_type" with name type "BLE_ADVDATA_NO_NAME".
- Populate "init.srdata.p_manuf_specific_data" with your new manufacturer specific data.
- Compile, download and see what happens.
This should make your device look something like this in nRF Connect:
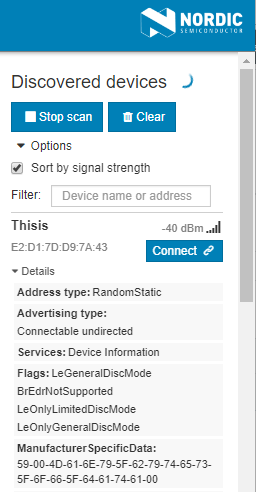
In case you need help your advertising_init() function should now look similar to this:
static void advertising_init(void)
{
    ret_code_t             err_code;
    ble_advertising_init_t init;
    memset(&init, 0, sizeof(init));

//Set manufacturing data
    ble_advdata_manuf_data_t                  manuf_data; //Variable to hold manufacturer specific data
    uint8_t data[]                            = "SomeData!"; //Our data to advertise
    manuf_data.company_identifier             =  0x0059; //Nordics company ID
    manuf_data.data.p_data                    = data;
    manuf_data.data.size                      = sizeof(data);
    init.advdata.p_manuf_specific_data = &manuf_data;

//Build advertising data struct to pass into @ble_advertising_init

    init.advdata.name_type               = BLE_ADVDATA_SHORT_NAME; // Use a shortened name
    init.advdata.short_name_len = 6; // Advertise only first 6 letters of name
    init.advdata.include_appearance      = true;
    init.advdata.flags                   = BLE_GAP_ADV_FLAGS_LE_ONLY_GENERAL_DISC_MODE;
    init.advdata.uuids_complete.uuid_cnt = sizeof(m_adv_uuids) / sizeof(m_adv_uuids[0]);
    init.advdata.uuids_complete.p_uuids  = m_adv_uuids;
    int8_t tx_power                   = -4;// Set Power Level
    init.advdata.p_tx_power_level = &tx_power;

    // Prepare the scan response manufacturer specific data packet
    ble_advdata_manuf_data_t  manuf_data_response;
    uint8_t                     data_response[] = "Many_bytes_of_data";
    manuf_data_response.company_identifier  = 0x0059;
    manuf_data_response.data.p_data         = data_response;
    manuf_data_response.data.size           = sizeof(data_response);
    init.srdata.name_type = BLE_ADVDATA_NO_NAME;
    init.srdata.p_manuf_specific_data = &manuf_data_response;

    init.config.ble_adv_fast_enabled  = true;
    init.config.ble_adv_fast_interval = APP_ADV_INTERVAL;
    init.config.ble_adv_fast_timeout  = APP_ADV_DURATION;

    init.evt_handler = on_adv_evt;

    err_code = ble_advertising_init(&m_advertising, &init);
    APP_ERROR_CHECK(err_code);

    ble_advertising_conn_cfg_tag_set(&m_advertising, APP_BLE_CONN_CFG_TAG);
}
Summary
And there you go. Your first nRF5x DK kit advertising its name, various options, and a small payload. Once again I recommend that you take a look at this blog post: Bluetooth Smart and the Nordic's Softdevices - Part 1 GAP Advertising. The next step will be to add services and characteristics: BLE Services, a beginner's tutorial
Top Comments