I implemented parts of the BLE-MIDI service along with a small example application. I wanted to share it here on the blog, in case someone would find it useful. The intended audience is primarily someone looking to send MIDI data over Bluetooth LE. I think anyone curious about custom services and application prototyping can also find value in this blog post.
In addition to the music oriented nature of MIDI, The MIDI protocol allows the System Exclusive Messages (SysEx) to contain all sorts of custom data. This enables many use cases.
The implementation follows the “Specification for MIDI over Bluetooth Low Energy” as described in this link.
Useful Links
Topology of BLE-MIDI
Proof of concept with the nRF Connect Bluetooth Low Energy application
Development Notes
Using the Service
Example Application
Testing
Download
Useful Links
There is a ton of information out there that can be hard to filter. I wanted to share a few links that I found useful.
“An Intro to MIDI” by the MIDI association". This link gives a quick idea of what MIDI is and what it can do, but it can be skipped if you are only here for the BLE part.
“MIDI Code” by Juan P Bello. This link gives a great understanding of the lower level bits and bytes of MIDI protocol. (Similar pages can be found by the midi organization themselves.)
“MIDI BLE Tutorial” by Sparkfun. This is an excellent in-depth tutorial that leverages an Arduino library together with our very own nRF52.
“Bluetooth GATT: How to Design Custom Services & Characteristics [MIDI device use case]” A nice tutorial that talks about adding custom services. (However, there is no part of the BLE-MIDI protocol implemented apart from the characteristics themselves).
Topology of BLE-MIDI
We will not recall the entire BLE-MIDI specification here. But we will mention a few points.
The Service (MIDI Service) has one Characteristic (MIDI Data). A client can subscribe to notifications from the MIDI Data characteristic to receive BLE packets with MIDI messages from the server. A client can send MIDI messages to a server by writing to the MIDI Data characteristic.
MIDI would normally be a stream of messages, but Bluetooth LE is packet based with a minimum of 7.5 ms connection interval. The biggest modification BLE-MIDI makes to MIDI, is that timestamps are added to help interleave and deinterleave MIDI messages in this time sensitive protocol.
Each BLE-MIDI packet begins with a Header byte, and the different status bytes in the MIDI protocol must be prepended with Timestamp bytes. Inside a packet, time is a 13 bit variable, where Header contains the 6 most significant bits, and Timestamp contains the 7 least significant bits.
The BLE-MIDI service I implementation acts as a Server, and is used by the example application which is a Peripheral.
Proof of concept with the nRF Connect Bluetooth Low Energy application
Before continuing with any coding, a good place to start is to use the nRF Connect PC application to quickly verify that we have understood the BLE-MIDI protocol formatting. I made a server that I connected to Garage Band on an iPhone. Garage Band supports BLE-MIDI, so we can verify that the communication works by sending something tangible such as a music note that we can hear.
Steps to recreate this are as follows:
In nRF Connect, under “launch app”, select Bluetooth Low Energy
Inside Bluetooth Low Energy application, open a device port to a connected Nordic Development kit or USB dongle. Go to the “Server Setup” tab instead of the default “Connection Map” view.
Add a new service with the MIDI Service UUID 03B80E5AEDE84B33A7516CE34EC4C700
Add a new characteristic under the MIDI Service, with the MIDI Data UUID 7772E5DB38684112A1A9F2669D106BF3
Set properties of the service: Read, Write without response, and Notify
Add a new descriptor with the Client Characteristic Configuration (CCCD) UUID 2902
Click “Apply to device” and return to the Connection Map tab. Our connected Dev Kit should display the MIDI Service in addition to the Generic Access and Generic Attribute. Click the arrow on the left of the UUID to expand the service and verify that the MIDI Data and the CCCD is also present.
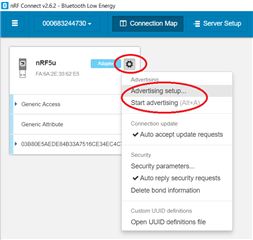
Under options (the small cog next to the graphic representation and “Adapter” designation), click “Advertising setup” and add a recognizable name ("Complete Local Name") in the advertising data (“MIDI” in my case). Add the MIDI Service UUID ("UUID 128-bit complete list") to the Scan response data. This will let the Garage Band application know that we are a relevant BLE-MIDI device.

Apply the advertising data, close the Advertising setup. Under options, select “Start advertising”.
On iOS, open the Garage Band app, go to “Song Settings”, “Advanced”, “Bluetooth MIDI Devices”.
If the steps above were done correctly, You should see the our nRF Connect Server appear as “MIDI” in the list of Bluetooth MIDI Devices. Connect to it and then go back to the main screen (“Advanced”, “Settings”, “Done”).
In the nRF Connect Connection Map view, we can see that the iPhone has connected to us!
Verify that the iPhone wrote 01 00 to the Client Characteristic Configuration. This means Garage Band is waiting for MIDI Messages. These BLE-MIDI packets can be entered in the data field of our MIDI Data characteristic. But what do we put here? Looking at the BLE-MIDI spec, we see that a MIDI message can have a format like this.
[Header Byte, Timestamp Byte, Status Byte, Data Byte 1, Data Byte 2]
In this Message, the Header format is 0b10xxxxxx, where x is the time bits, and the Timestamp format is 0b1xxxxxxx, where x is the time bits.
For simplicity, we will not care about the time bits in the Header and Timestamp (assume the time is 0) so both will be 0x80.
Next is the status byte. When sending a note, the status is shared by Message (4 most significant bits) and Channel (4 least significant bits).
Status to turn a note on is 0b1001xxxx, combined with channel number 1 which is 0bxxxx0000.
This results in the status being 0x90.
Next are the data bytes. The meaning of the databytes depend on what the status message is. For "Note On" status byte like above, Data 1 will be Note, and Data 2 will be the Velocity the note is pressed. We set data 1 a middle C note 0b00111100 (0x3C). We set data 2 at max velocity Velocity 0x01111111 (0x7f)
So there we have our test MIDI message, sure enough, entering this (8080903C7F) into the MIDI Data characteristic on nRF Connect, resulted in the note being played on Garage Band.
Since iOS follows the BLE-MIDI spec, it will allow multiple complete messages and running status.
Adding an E and G note (to create a complete C chord) can look like below.
Here, the second note of the C chord (E) was a second complete message.
The last note in the Chord (G) only had two data byte and no status or timestamp.
This implies to Garage Band that the previous status (note on, channel 0) still applies.
Sending the packet above (8080903C7F8090407F447F) resulted in a C chord being played. Great Success! Now we can go on to write the service.
Development Notes
MIDI-BLE is a custom service, and I used our popular Nordic UART Service as a starting point. The design is very simple and has the following four functions.
ble_midis_init()
ble_midi_data_len_set()
ble_midis_on_ble_evt()
ble_midi_msgs_send()
ble_midis_init()
Similar to our other Services in the nRF5 SDK, there is a service instance struct (in this case ble_midis_t) that stores the data of the service and must be passed to any of the functions called.
BLE-MIDI has two Vendor Specific UUIDs
#define MIDIS_SERVICE_UUID {{0x00, 0xC7, 0xC4, 0x4E, 0xE3, 0x6C, 0x51, 0xA7, \
0x33, 0x4B, 0xE8, 0xED, 0x5A, 0x0E, 0xB8 ,0x03}}
#define MIDIS_CHAR_UUID {{0xF3, 0x6B, 0x10, 0x9D, 0x66, 0xF2, 0xA9, 0xA1, \
0x12, 0x41, 0x68, 0x38, 0xDB, 0xE5, 0x72, 0x77}}
Many custom services will let the characteristics of a service use the same UUID base as the Service UUID. But BLE-MIDI has generated a separate random 128-bit UUID for the characteristic. Note that we call sd_ble_uuid_vs_add() twice in inside ble_midis_init().
Included in the initialization struct is a callback function to main, but they are not leveraged in this application example. (Events for when notifications are enabled, and an RX event that currently only contains the raw BLE MIDI packet, and not the parsed midi messages). These could be expanded upon if developing the code further.
ble_midi_data_len_set()
This is not a mandatory API, but it will allow you to send longer MIDI packets. Default MTU length is 20 bytes, while the maximum supported by our SoftDevice is 256. The example application calls this API after an MTU exchange has taken place, and lines up the new max size of the MIDI packets to match that agreed MTU.
ble_midis_on_ble_evt()
Like other Services, the MIDI Service must be registered with the SoftDevice Handler library to receive application level Bluetooth LE events. The Service will filter relevant events and disregard events meant for other modules.
ble_midi_msgs_send()
This function can be called once we are in a connection, and after the connected client has enabled notifications on the MIDI Data characteristic. This function takes a variable sized buffer of bytes that form MIDI messages. Each MIDI packet gets prepended with a Header byte.
Using the fact that the first bit in each byte is 0 for data, and 1 for status, we can also prepend every Status byte with a Timestamp. Take the example buffer below to the left.
The buffer will be encoded to become the BLE-MIDI packet below to the right.


Using the Service
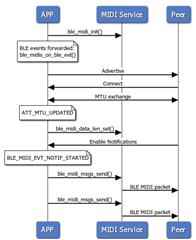
See message sequence chart below. Initialize using ble_midi_init() after the SoftDevice has been initialized, but before advertising is started.
At any point, if the MTU is updated, you can call ble_midi_data_len_set() to update the BLE-MIDI packet length.
When a peer is connected and notifications are enabled by that peer, Use ble_midi_msgs_send() to send BLE-MIDI packets.

Example Application
An example project was created and tested with Segger Embedded Studio, but projects using Keil, IAR and GCC should work fine, as they do for the rest of the SDK. One project was made for nRF52840 (tested on the PCA10056 devkit) and one was made for nRF5232 (tested on the PCA10040 devkit).
The service files ble_midi.c and ble_midi.h are located together with the other BLE services (<SDK>\components\ble\ble_services\ble_midi). And the project together with the other BLE peripheral projects (<SDK>\examples\ble_peripheral\app_ble_midi).
Button assignments
Button 1-3: Send channel messages, in this case 3 different chords
Button 4: Send an example buffer of SysEx data.
Testing
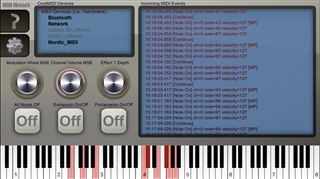
Example was tested with MIDI Wrench version 1.3.7 running on iPhone 7 (iOS Version 12.2).
It was also briefly tested with Garage band (iOS) and MIDI Berry (Windows 10) to hear the chords from button 1-3. nRF Connect mobile or PC applications can be used for testing, assuming you know how the MIDI data should be interpreted in this raw form.
Testing with Midi Wrench
- Compile and program the application. Observe that LED 1 is blinking. This indicates that the application is advertising.
- Connect a peer device, such as the iPhone with MIDI wrench. MIDI Wrench is downloadable from the iOS App Store. Observe that LED 1 is on, indicating that it is in a connection.
- In MIDI Wrench, go to settings -> MIDI Devices -> Bluetooth MIDI and select “Nordic_MIDI”. Go back to settings and select done.
- In the MIDI Wrench main screen, observe that pressing Button 1-4 on the devkit sends channel data, real-time data and System Exclusive data.

Testing with nRF Connect
- Compile and program the application. Observe that LED 1 is blinking. This indicates that the application is advertising.
- using nRF Connect, scan and connect to the device ("BLE_MIDI"). Observe that LED 1 is on, indicating that it is in a connection. Enable notifications on the MIDI Data characteristic.
- On the devkit, press buttons 1-4 and observe that the different chords are notified to nRF Connect. In the screenshot below, Button 1 was pressed and the value AF-E0-90-3C-7F-40-7F-E0-FB-E0-90-43-7F was notified on the MIDI Data characteristic.
Download
I uploaded the project here as a zip, and also copied it to GitHub.
They will work together with nRF5 SDK 15.3
ble_app_midi is to be placed in <SDK15.3>\examples\ble_peripheral\
ble_midi is to be placed in <SDK15.3>\components\ble\ble_services\


Top Comments
-

christiantrebb
-
Cancel
-
Vote Up
0
Vote Down
-
-
More
-
Cancel
Comment-

christiantrebb
-
Cancel
-
Vote Up
0
Vote Down
-
-
More
-
Cancel
Children