
Purpose
This document will explain the Mesh Demo and the motivations behind the design decisions.
Please find attached PDF file at the bottom of this tutorial for high-resolution version of this tutorial.
Architecture
The mesh network realized in this demo has the following points to show:
- Create a mesh network with two groups of nRF52832 Development Kits (DKs). The two groups are on the same mesh network (common network key) but they cannot decode the other group’s messages because they have separate application keys yet all nodes in this network will participate in relaying data for all nodes. The purpose of creating and bifurcating two groups such as this is to demonstrate data isolation.
- Get one node from one group to be able to “move” to the other group and be part of the new group. This will demonstrate dynamic reconfiguration of the nodes in the mesh network.
- Finally, overall demonstrate that the real power of a mesh network lies not just in radio range-extension but in being able to dynamically define the mesh network topology intricately.
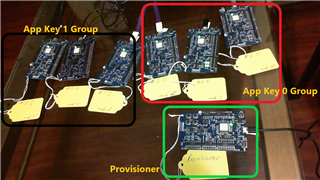
Picture above shows the division of the mesh network. The Provisioner is attached to the PC via USB and allows for PyACI to send commands to it.
 A diagram of a mesh node's capabilities built into its firmware; please see BLE Mesh Profile document for definition of Elements.
In this demo, we only use the Generic On/Off Server on Element 1. In a mesh network, a server controls access to a resource. In this case, the resource is the LED. We will command the Generic On/Off Server via a Generic On/Off Client. In this case, the Client will be the same as the Provisioner but they do not have to be. In other words, another node in the mesh network with the proper network and application key can successfully command the server to switch the LED on and off. The Provisioner is a special node that assigns each node its role. So, in this instance, a provisioner assigns which application key and which group an unprovisioned node belongs to. Nodes can be erased and re-provisioned as needed.
Installation
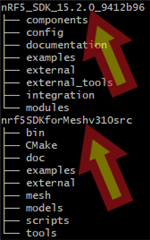
Please install Mesh SDK 3.1.0 and SDK 15.2. Please follow the instructions here to install the toolchain and Segger Embedded Studio SES.
The following diagram illustrates the directory structure:
Within the Mesh SDK 3.1.0 source code, the example source code used lies in the <Mesh SDK 3.1.0>/examples/light_switch/:
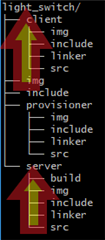
Open the Segger Embedded Studio (SES) project file in the <Mesh SDK 3.1.0>/examples/light_switch/server/.
With the DK connected to the PC, erase the node with the following command (not necessary step but good precautionary step):

Now launch SES and flash the project to the DK. Repeat steps for all DK nodes.
Provisioning
This section will provide information how to set up a mesh network from scratch.
These steps will guide one to set up a 6 node mesh network with 3 nodes bound to Application Key 0 and 3 nodes bound to Application Key 1. However, this methodology can be extended to any number of nodes.
- All nodes should be programmed with the firmware as shown in the Installation section. Please keep in mind that the nodes save their provisioning data on the on-board flash. This information can be erased so the node is unprovisioned again by pressing button 4 on the DK.
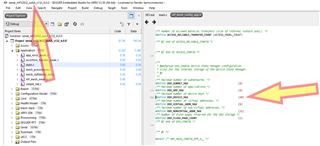
- Connect a nRF52-DK to the PC; launch SES with the project in <Mesh SDK 3.1.0>/examples/serial/. Open the nrf_mesh_config_app.h file in <Mesh SDK 3.1.0>/examples/serial/include/ and modify DSM_DEVICE_MAX to surpass or equal the maximum number of nodes you intend to provision using the nRF52-DK provisioner:
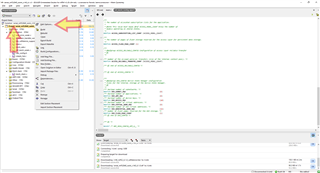
- Right-click (or left-click if using left-handed input device) on the Project ‘serial…’ line to launch the context menu and then click on Options:
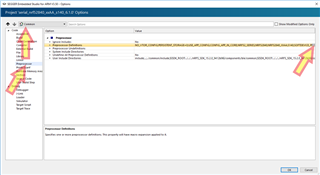
- Choose “Common” from drop-down menu, then click on Preprocessor, and we must change the PERSISTENT_STORAGE=0 to 1 so click on the ellipses on the Preprocessor Definitions line:
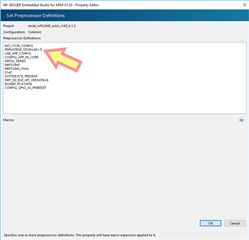
- Change the PERSISTENT_STORAGE=0 to PERSISTENT_STORAGE=1 and click OK:
- Compile, flash, and run the firmware on the nRF52-DK Provisioner.
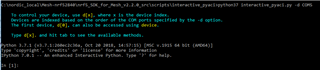
- Follow instructions here to install Python 3 and launch the PyACI tool under <Mesh SDK 3.1.0>/scripts/interactive_pyaci/:
- Now we will provision each node one-at-a-time. Turn off all nodes except one which would be provisioned.
- We need to start with a fresh JSON file which will hold the database of the mesh network. This file resides in the <Mesh SDK 3.1.0>/scripts/interactive_pyaci/database/ directory.
Note that this file can be edited by humans since it is human-readable. Copy “example_database.json.backup” to “example_database.json” in the same folder. Overwrite, if needed. This will be a necessary step each time only when provisioning a brand new network. - Now we will provision the first node. In PyACI shell, type in the highlighted input; example output shown for clarity (not highlighted):
In [1]: db = MeshDB("database/example_database.json")
In [2]: db.provisioners
Out[2]: [{'name': 'BT Mesh Provisioner', 'UUID':
_UUID(b'\x00\x00\x00\x00\x00\x00\x00\x00\x00\x00\x00\x00\x00\x00\x00\x00'),
'allocated_unicast_range': [{'low_address': 0010, 'high_address': 7fff}],
'allocated_group_range': [{'low_address': c000, 'high_address': feff}]}]
In [3]: p = Provisioner(device, db)
In [4]: 2018-11-13 02:31:25,175 - INFO - COM5: Success
2018-11-13 02:31:25,181 - INFO - COM5: Success
2018-11-13 02:31:25,186 - INFO - COM5: SubnetAdd: {'subnet_handle': 0}
2018-11-13 02:31:25,197 - INFO - COM5: AppkeyAdd: {'appkey_handle': 0}
2018-11-13 02:31:25,202 - INFO - COM5: AppkeyAdd: {'appkey_handle': 1}
In [4]:
In [4]: p.scan_start()
In [5]: 2018-11-13 02:31:40,555 - INFO - COM5: Success
2018-11-13 02:31:51,343 - INFO - COM5: Received UUID
0059ffff00000000a5cb9cc547cdcea9 with RSSI: -48 dB
In [5]:
In [5]: p.scan_stop()
In [6]: 2018-11-13 02:32:03,714 - INFO - COM5: Success
In [6]:
In [6]: p.provision(name="Light bulb #1")
In [7]: 2018-11-13 02:32:15,090 - INFO - COM5: Provision: {'context': 0}
2018-11-13 02:32:15,102 - INFO - COM5: Link established
2018-11-13 02:32:15,144 - INFO - COM5: Received capabilities
2018-11-13 02:32:15,146 - INFO - COM5: Number of elements: 3
2018-11-13 02:32:15,149 - INFO - COM5: OobUse: {'context': 0}
2018-11-13 02:32:15,368 - INFO - COM5: ECDH request received
2018-11-13 02:32:15,384 - INFO - COM5: EcdhSecret: {'context': 0}
2018-11-13 02:32:15,749 - INFO - COM5: Provisioning complete
2018-11-13 02:32:15,753 - INFO - COM5: Address(es): 0x10-0x12
2018-11-13 02:32:15,754 - INFO - COM5: Device key:
ef48f9898373a1cef29db185ee4058b4
2018-11-13 02:32:15,756 - INFO - COM5: Network key:
18eed9c2a56add85049ffc3c59ad0e12
2018-11-13 02:32:15,759 - INFO - COM5: Adding device key to subnet 0
2018-11-13 02:32:15,766 - INFO - COM5: Adding publication address of root
element
2018-11-13 02:32:15,783 - INFO - COM5: DevkeyAdd: {'devkey_handle': 8}
2018-11-13 02:32:15,786 - INFO - COM5: AddrPublicationAdd: {'address_handle':
0}
2018-11-13 02:32:15,853 - INFO - COM5: Provisioning link closed
In [7]: cc = ConfigurationClient(db)
In [8]: cc.force_segmented = True
In [9]: device.model_add(cc)
In [10]: cc.publish_set(8, 0)
In [11]: cc.composition_data_get()
In [12]: 2018-11-13 02:33:01,420 - INFO - COM5: Success
2018-11-13 02:33:01,521 - INFO - COM5.ConfigurationClient: Received composition data (page 0x00): {
"cid": "0059",
"pid": "0000",
"vid": "0000",
"crpl": 40,
"features": {
"relay": 0,
"proxy": 2,
"friend": 2,
"low_power": 2
},
"elements": [
{
"index": 0,
"location": "0000",
"models": [
{
"modelId": "0000"
},
{
"modelId": "0002"
},
{
"modelId": "1000"
},
{
"modelId": "1001"
}
]
},
{
"index": 1,
"location": "0000",
"models": [
{
"modelId": "1000"
},
{
"modelId": "1001"
}
]
}
]
}
In [12]: cc.appkey_add(0)
In [13]: 2018-11-13 02:33:09,562 - INFO - COM5: Success
2018-11-13 02:33:09,642 - INFO - COM5.ConfigurationClient: Appkey status: AccessStatus.SUCCESS
2018-11-13 02:33:09,645 - INFO - COM5.ConfigurationClient: Appkey add 0 succeded for subnet 0 at node 0010
In [13]:
In [13]: cc.appkey_add(1)
In [14]: 2018-11-13 02:33:13,850 - INFO - COM5: Success
2018-11-13 02:33:13,936 - INFO - COM5.ConfigurationClient: Appkey status: AccessStatus.SUCCESS
2018-11-13 02:33:13,939 - INFO - COM5.ConfigurationClient: Appkey add 1 succeded for subnet 0 at node 0010
In [14]:
In [14]: cc.model_app_bind(db.nodes[0].unicast_address, 0, mt.ModelId(0x1000)) #bind to appkey0
In [15]: 2018-11-13 02:33:24,401 - INFO - COM5: Success
2018-11-13 02:33:25,361 - INFO - COM5.ConfigurationClient: Model app bind status: AccessStatus.SUCCESS
2018-11-13 02:33:25,367 - INFO - COM5.ConfigurationClient: Appkey bind 0 to model 1000 at 0010
In [15]:
In [15]: cc.model_subscription_add(db.nodes[0].unicast_address, 0xc001, mt.ModelId(0x1000)) #Add to group 0xC001
2018-11-13 02:33:35,254 - INFO - COM5: Success
In [16]: 2018-11-13 02:33:36,299 - INFO - COM5.ConfigurationClient: Model subscription status: AccessStatus.SUCCESS
2018-11-13 02:33:36,306 - INFO - COM5.ConfigurationClient: Added subscription 'c001' to model 1000 at element 0010 - We will now provision the second node. We will leave the first node switched on since it has already been provisioned and its LED should be off. Switch on the second node.
- In the same PyACI shell from step 6 above, we type in the highlighted Python commands:
In [16]: p.scan_start()
In [17]: 2018-11-13 03:01:21,404 - INFO - COM5: Success
2018-11-13 03:01:22,906 - INFO - COM5: Received UUID 0059ffff00000000d4164b7a7253618c with RSSI: -46 dB
In [17]:
In [17]: p.scan_stop()
2018-11-13 03:01:32,809 - INFO - COM5: Success
In [18]:
In [18]: p.provision(name="Light bulb #2")
In [19]: 2018-11-13 03:01:55,598 - INFO - COM5: Provision: {'context': 0}
2018-11-13 03:01:55,609 - INFO - COM5: Link established
2018-11-13 03:01:55,665 - INFO - COM5: Received capabilities
2018-11-13 03:01:55,666 - INFO - COM5: Number of elements: 3
2018-11-13 03:01:55,669 - INFO - COM5: OobUse: {'context': 0}
2018-11-13 03:01:55,879 - INFO - COM5: ECDH request received
2018-11-13 03:01:55,890 - INFO - COM5: EcdhSecret: {'context': 0}
2018-11-13 03:02:00,318 - INFO - COM5: Provisioning complete
2018-11-13 03:02:00,321 - INFO - COM5: Address(es): 0x13-0x15
2018-11-13 03:02:00,325 - INFO - COM5: Device key: f2efd4734a036568fda5d6f499292071
2018-11-13 03:02:00,331 - INFO - COM5: Network key: 18eed9c2a56add85049ffc3c59ad0e12
2018-11-13 03:02:00,337 - INFO - COM5: Adding device key to subnet 0
2018-11-13 03:02:00,340 - INFO - COM5: Adding publication address of root element
2018-11-13 03:02:00,361 - INFO - COM5: DevkeyAdd: {'devkey_handle': 9}
2018-11-13 03:02:00,362 - INFO - COM5: AddrPublicationAdd: {'address_handle': 1}
2018-11-13 03:02:00,422 - INFO - COM5: Provisioning link closed
In [19]:
In [19]: cc.publish_set(9, 1)
In [20]: cc.composition_data_get()
In [21]: 2018-11-13 03:02:23,056 - INFO - COM5: Success
2018-11-13 03:02:23,143 - INFO - COM5.ConfigurationClient: Received composition data (page 0x00): {
"cid": "0059",
"pid": "0000",
"vid": "0000",
"crpl": 40,
"features": {
"relay": 0,
"proxy": 2,
"friend": 2,
"low_power": 2
},
"elements": [
{
"index": 0,
"location": "0000",
"models": [
{
"modelId": "0000"
},
{
"modelId": "0002"
},
{
"modelId": "1000"
},
{
"modelId": "1001"
}
]
},
{
"index": 1,
"location": "0000",
"models": [
{
"modelId": "1000"
},
{
"modelId": "1001"
}
]
}
]
}
In [21]:
In [21]: cc.appkey_add(0)
In [22]: 2018-11-13 03:02:44,436 - INFO - COM5: Success
2018-11-13 03:02:44,515 - INFO - COM5.ConfigurationClient: Appkey status: AccessStatus.SUCCESS
2018-11-13 03:02:44,519 - INFO - COM5.ConfigurationClient: Appkey add 0 succeded for subnet 0 at node 0013
In [22]:
In [22]: cc.appkey_add(1)
In [23]: 2018-11-13 03:02:48,471 - INFO - COM5: Success
2018-11-13 03:02:48,562 - INFO - COM5.ConfigurationClient: Appkey status: AccessStatus.SUCCESS
2018-11-13 03:02:48,568 - INFO - COM5.ConfigurationClient: Appkey add 1 succeded for subnet 0 at node 0013
In [23]:
In [23]: cc.model_app_bind(db.nodes[1].unicast_address, 0, mt.ModelId(0x1000)) #bind to appkey0
In [24]: 2018-11-13 03:03:02,567 - INFO - COM5: Success
2018-11-13 03:03:02,632 - INFO - COM5.ConfigurationClient: Model app bind status: AccessStatus.SUCCESS
2018-11-13 03:03:02,636 - INFO - COM5.ConfigurationClient: Appkey bind 0 to model 1000 at 0013
In [24]:
In [24]: cc.model_subscription_add(db.nodes[1].unicast_address, 0xc001, mt.ModelId(0x1000)) #Add to group 0xC001
In [25]: 2018-11-13 03:03:11,058 - INFO - COM5: Success
2018-11-13 03:03:11,189 - INFO - COM5.ConfigurationClient: Model subscription status: AccessStatus.SUCCESS
2018-11-13 03:03:11,192 - INFO - COM5.ConfigurationClient: Added subscription 'c001' to model 1000 at element 0013 - Switch on the third node. Now we will provision it, same as above, now shown for brevity without the output:
In [27]: p.scan_start()
In [28]: p.scan_stop()
In [29]: p.provision(name="Light bulb #3")
In [30]: cc.publish_set(10, 2)
In [31]: cc.composition_data_get()
In [32]: cc.appkey_add(0)
In [33]: cc.appkey_add(1)
In [34]: cc.model_app_bind(db.nodes[2].unicast_address, 0, mt.ModelId(0x1000)) #bind to appkey0
In [35]: cc.model_subscription_add(db.nodes[2].unicast_address, 0xc001, mt.ModelId(0x1000)) #Add to group 0xC001 - Now we will provision the fourth node so switch that node on and it should signal unprovisioned state. However, we will bind it to Application Key 1 instead of Application Key 0. We will note a pattern here that we can use to provision any number of devices:
As seen above, the provision function opens a provisioning link with the device. As a result, we see the devkey_handle of 11 and address_handle of 3. We then plug in the devkey_handle as the first parameter of the publish_set function and address_handle as the second parameter of the publish_set function, as seen above. This is the same pattern that we followed to provision the previous three nodes. The handles here are used as a shortcut to refer to devices, as opposed to having to specify their Mesh address.
Similarly, when we call the model_app_bind function, we specify the unique increasing node index number and the application key to bind to:
The node index is simply a number which provides an index into the JSON database file that PyACI creates for a Mesh network. For all intents and purposes, when provisioning a number of devices, this index number simply increments by one for each new node and always starts with 0. In this case, we used 3 because we used 2 in the previous node provision. The second parameter of 1 specifies which application key to bind the node to so the node will respond only to messages encrypted with that particular application key.
Summary commands for provisioning the fourth node are:
In [36]: p.scan_start()
In [37]: p.scan_stop()
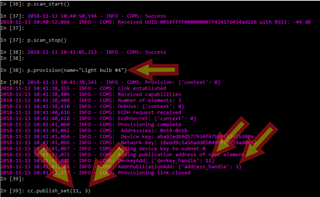
In [38]: p.provision(name="Light bulb #4")
In [39]: cc.publish_set(11, 3)
In [40]: cc.appkey_add(1)
In [41]: cc.appkey_add(0)
In [46]: cc.composition_data_get()
In [47]: cc.model_app_bind(db.nodes[3].unicast_address, 1, mt.ModelId(0x1000)) #bind to appkey1
In [48]: cc.model_subscription_add(db.nodes[3].unicast_address, 0xc001, mt.ModelId(0x1000)) #Add to group 0xC001 - Switch on the fifth node and provision as before. It will follow the same pattern explained in step 10. Here is the summary of commands:
In [49]: p.scan_start()
In [50]: p.scan_stop()
In [51]: p.provision(name="Light bulb #5")
In [52]: cc.publish_set(12, 4)
In [53]: cc.composition_data_get()
In [54]: cc.appkey_add(1)
In [55]: cc.appkey_add(0)
In [56]: cc.model_app_bind(db.nodes[4].unicast_address, 1, mt.ModelId(0x1000)) #bind to appkey1
In [57]: cc.model_subscription_add(db.nodes[4].unicast_address, 0xc001, mt.ModelId(0x1000)) #Add to group 0xC001 - Switch on the sixth node and provision as before. It will follow the same pattern explained in step 10. Here is the summary of commands:
In [58]: p.scan_start()
In [59]: p.scan_stop()
In [60]: p.provision(name="Light bulb #6")
In [61]: cc.publish_set(13, 5)
In [62]: cc.composition_data_get()
In [63]: cc.appkey_add(0)
In [64]: cc.appkey_add(1)
In [65]: cc.model_app_bind(db.nodes[5].unicast_address, 1, mt.ModelId(0x1000)) #bind to appkey1
In [67]: cc.model_subscription_add(db.nodes[5].unicast_address, 0xc001, mt.ModelId(0x1000)) #Add to group 0xC001 - Now we will test the mesh network to see if it is working. To do this, we will send a group message out bound to Application Key 0 to turn on nodes 1, 2, and 3. The message will go to all the nodes that we have added to the group address 0xC001 but only the nodes with the correct application key will respond by turning on their LED:
As seen above, we use the address_handle for the group message to pass to publish_set function as its second parameter and the application key to bind to as its first parameter (Application Key 0, in this case).
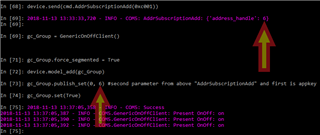
Summary of commands and output for this step:
In [68]: device.send(cmd.AddrSubscriptionAdd(0xc001))
In [69]: 2018-11-13 13:33:33,720 - INFO - COM5: AddrSubscriptionAdd: {'address_handle': 6}
In [69]:
In [69]: gc_Group = GenericOnOffClient()
In [71]: gc_Group.force_segmented = True
In [72]: device.model_add(gc_Group)
In [73]: gc_Group.publish_set(0, 6) #second parameter from above "AddrSubscriptionAdd" and first is appkey
In [74]: gc_Group.set(True)
In [75]: 2018-11-13 13:37:05,358 - INFO - COM5: Success
2018-11-13 13:37:05,387 - INFO - COM5.GenericOnOffClient: Present OnOff: on
2018-11-13 13:37:05,390 - INFO - COM5.GenericOnOffClient: Present OnOff: on
2018-11-13 13:37:05,392 - INFO - COM5.GenericOnOffClient: Present OnOff: on - Observe the LED on nodes bound to Application Key 0 to illuminate:
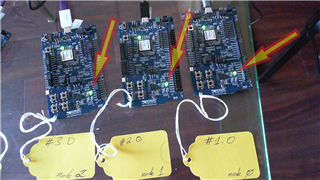
- Turn off the LEDs on Application Key 0 nodes by issuing command:
In [75]: gc_Group.set(False)
In [76]: 2018-11-13 14:11:13,148 - INFO - COM5: Success
2018-11-13 14:11:13,170 - INFO - COM5.GenericOnOffClient: off
2018-11-13 14:11:13,179 - INFO - COM5.GenericOnOffClient: off
2018-11-13 14:11:13,227 - INFO - COM5.GenericOnOffClient: off - Now test nodes bound with Application Key 1 to see if they illuminate properly:
In [76]: gc_Group.publish_set(1, 6) #second parameter from above "AddrSubscriptionAdd" and first is appkey
In [77]: gc_Group.set(True)
In [78]: 2018-11-13 14:15:10,181 - INFO - COM5: Success
2018-11-13 14:15:10,203 - INFO - COM5.GenericOnOffClient: Present OnOff: on
2018-11-13 14:15:10,206 - INFO - COM5.GenericOnOffClient: Present OnOff: on
2018-11-13 14:15:10,230 - INFO - COM5.GenericOnOffClient: Present OnOff: on - Observe the LED on nodes bound to Application Key 1 to illuminate:
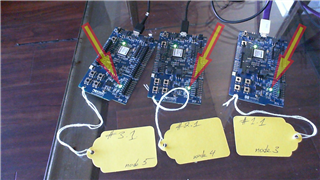
- Turn off the LEDs on Application Key 1 nodes by issuing command:
In [78]: gc_Group.set(False) - Now we shall look at “moving” one node from one group to another. Recall that we have provisioned each node with both Application Key 0 and Application Key 1. This means that both application keys are available to each node but we “bind” each node with either Application Key 0 or Application Key 1. We will unbind a node from Application Key 1 to Application Key 0:
 This command will point the Configuration Client object (cc) to node 3 because recall that 11 is its device_key and 3 is its address_handle and we want to perform a configuration operation on that node. Then we unbind node 3 from Application Key 1 to Application Key 0 thereby allowing the node to be part of Application Key 0 Group. Here are the commands and the outputs.
In [81]: cc.publish_set(11, 3)
In [83]: cc.model_app_unbind(db.nodes[3].unicast_address, 1, mt.ModelId(0x1000))
In [84]: 2018-11-13 16:39:23,402 - INFO - COM5: Success
2018-11-13 16:39:23,450 - INFO - COM5.ConfigurationClient: Model app bind status: AccessStatus.SUCCESS
2018-11-13 16:39:23,455 - INFO - COM5.ConfigurationClient: Appkey unbind 1 to model 1000 at 0019
In [84]:
In [84]: cc.model_app_bind(db.nodes[3].unicast_address, 0, mt.ModelId(0x1000))
In [85]: 2018-11-13 16:39:37,512 - INFO - COM5: Success
2018-11-13 16:39:37,547 - INFO - COM5.ConfigurationClient: Model app bind status: AccessStatus.SUCCESS
2018-11-13 16:39:37,552 - INFO - COM5.ConfigurationClient: Appkey bind 0 to model 1000 at 0019 - Now we will send a group message to illuminate nodes with Application Key 1:
In [85]: gc_Group.set(True)
In [86]: 2018-11-13 16:39:54,319 - INFO - COM5: Success
2018-11-13 16:39:54,333 - INFO - COM5.GenericOnOffClient: Present OnOff: on
2018-11-13 16:39:54,340 - INFO - COM5.GenericOnOffClient: Present OnOff: on
Here we can see that node 3 is no longer responding to the command we sent to illuminate its LED because we have changed its binding from Application Key 1 to Application Key 0: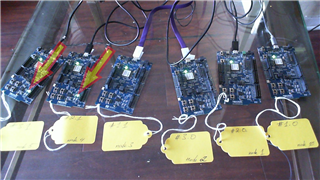
- Now we will switch off Application Key 1 nodes and switch on Application Key 0 nodes:
In [88]: gc_Group.set(False) #Turn off AppKey0 nodes’ LED
In [89]: 2018-11-13 16:42:31,181 - INFO - COM5: Success
2018-11-13 16:42:31,202 - INFO - COM5.GenericOnOffClient: off
2018-11-13 16:42:31,207 - INFO - COM5.GenericOnOffClient: off
2018-11-13 16:42:31,209 - INFO - COM5.GenericOnOffClient: off
2018-11-13 16:42:31,254 - INFO - COM5.GenericOnOffClient: off
In [91]: gc_Group.publish_set(0, 6) #Switch Generic On/Off Client object to AppKey 0
In [92]: gc_Group.set(True) #Turn on AppKey0 nodes’ LED
In [93]: 2018-11-13 17:36:37,824 - INFO - COM5: Success
2018-11-13 17:36:37,856 - INFO - COM5.GenericOnOffClient: Present OnOff: on
2018-11-13 17:36:37,858 - INFO - COM5.GenericOnOffClient: Present OnOff: on
2018-11-13 17:36:37,867 - INFO - COM5.GenericOnOffClient: Present OnOff: on
2018-11-13 17:36:37,874 - INFO - COM5.GenericOnOffClient: Present OnOff: on
Observe now that node 3 is now grouped together with Application Key 0 Group: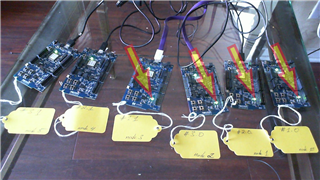
- Now we bind node 3 back to Application Key 1, as it was originally, and then turn on Application Key 0 Group:
In [93]: gc_Group.set(False)
In [93]: 2018-11-13 16:42:31,181 - INFO - COM5: Success
2018-11-13 16:42:31,202 - INFO - COM5.GenericOnOffClient: off
2018-11-13 16:42:31,207 - INFO - COM5.GenericOnOffClient: off
2018-11-13 16:42:31,209 - INFO - COM5.GenericOnOffClient: off
2018-11-13 16:42:31,254 - INFO - COM5.GenericOnOffClient: off
In [94]: cc.model_app_unbind(db.nodes[3].unicast_address, 0, mt.ModelId(0x1000)) #unbind node 3 from Appkey0
2018-11-13 18:00:09,068 - INFO - COM5: Success
In [95]: 2018-11-13 18:00:09,132 - INFO - COM5.ConfigurationClient: Model app bind status: AccessStatus.SUCCESS
2018-11-13 18:00:09,139 - INFO - COM5.ConfigurationClient: Appkey unbind 0 to model 1000 at 0019
In [95]:
In [95]: cc.model_app_bind(db.nodes[3].unicast_address, 1, mt.ModelId(0x1000)) #bind node 3 to Appkey1
In [96]: 2018-11-13 18:00:29,008 - INFO - COM5: Success
2018-11-13 18:00:29,072 - INFO - COM5.ConfigurationClient: Model app bind status: AccessStatus.SUCCESS
2018-11-13 18:00:29,077 - INFO - COM5.ConfigurationClient: Appkey bind 1 to model 1000 at 0019
In [96]: gc_Group.set(True) #Illuminate Appkey0 Group
In [97]: 2018-11-13 18:00:38,334 - INFO - COM5: Success
2018-11-13 18:00:38,356 - INFO - COM5.GenericOnOffClient: Present OnOff: on
2018-11-13 18:00:38,358 - INFO - COM5.GenericOnOffClient: Present OnOff: on
2018-11-13 18:00:38,361 - INFO - COM5.GenericOnOffClient: Present OnOff: on
As a result, we see that now node 3 is no longer illuminated because we have bound it back to Application Key 1: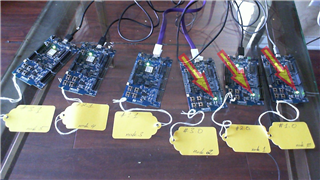
- Now we turn off Application Key 0 Group LEDs and turn on Application Key 1 Group LEDs to show that node 3 is now back to being part of Application 0 Group:
In [97]: gc_Group.set(False) #Turn off AppKey0 Group LEDs
In [98]: gc_Group.publish_set(1,6) #Set address to AppKey1 Group
In [99]: gc_Group.set(True) #Turn on AppKey1 Group LEDs
As a result, we see that node 3 is back into the Application Key 1 Group: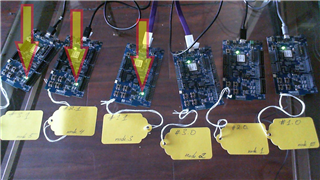
- Now we will demonstrate network access to one single node by illuminating its LED:
In [101]: device.send(cmd.AddrPublicationAdd(db.nodes[1].unicast_address))
In [102]: 2018-11-13 19:14:47,860 - INFO - COM5: AddrPublicationAdd: {'address_handle': 1}
In [103]: gc_Uni = GenericOnOffClient()
In [104]: gc_Uni.force_segmented = True
In [105]: device.model_add(gc_Uni)
In [107]: gc_Uni.publish_set(0,1) #first is appkey index, second is from AddrPublicationAdd()
In [108]: gc_Uni.set(True) #Turn on single node
In [109]: gc_Uni.set(False) #Turn off single node
When switched on, we see only node 1 illuminated:
Profiling
Profiling allows one to measure the message latency in the mesh network.
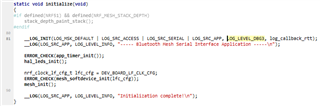
- To enable profiling, enable debug logging in the serial provisioner firmware referred to in the Provisioning section, step 2. This is done by editing main.c in the SES project and enabling debug logging (highlighted):
- Launch the Segger RTT Client to see log output.
- Compile and run the firmware on the DK in Debug mode.
- Send a message to the mesh network (see Provisioning section for sending messages). For instance:
In [103]: gc_Uni = GenericOnOffClient()
In [104]: gc_Uni.force_segmented = True
In [105]: device.model_add(gc_Uni)
In [107]: gc_Uni.publish_set(0,1)
In [108]: gc_Uni.set(True)
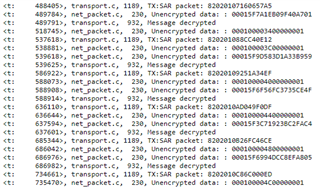
Note that when we set force_segmented to True, messages are sent with ACK requested whereas setting for_segmented to False results in messages sent without an ACK requested. - Observe RTT output with RTC tick count on the left:
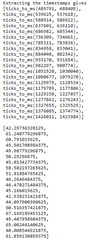
- For transforming ticks displayed in the RTT output to milliseconds, use the following Python function: ticks_to_ms = lambda a, b: abs(a-b) * 1000000 / 32768 / 1000
- Extracting the timestamps will give output:
-

Muhammad
-
Cancel
-
Vote Up
0
Vote Down
-
-
Sign in to reply
-
More
-
Cancel
Comment-

Muhammad
-
Cancel
-
Vote Up
0
Vote Down
-
-
Sign in to reply
-
More
-
Cancel
Children