
The content of this blog was based on the documentation of BLE Secure DFU example, Bootloader module library and Buttonless DFU service from our SDK. Here we provide you step by step instructions to make it easier to follow and test Secure DFU.
Secure DFU is the DFU bootloader provided from nRF5 SDK v12. The older bootloader in SDKv11 and earlier is now called Legacy DFU. Secure DFU is not backward compatible with Legacy DFU.
Contents
Step C. Generate DFU .zip packet
Step E. Update new application firmware (Optional)
Appendix - Advanced features
1. Combine application, bootloader and softdevice image - Bootloader setting
4. Update softdevice and bootloader
5. Bond forwarding with buttonless DFU
What you need to prepare before we start:
-
Up-to-date nRF5 SDK (minimum SDK v12)
-
Python 3 with pip installed. See here if you don't have pip with Python.
-
Install version 4.9-2015-q3-update (or newer) of GCC compiler toolchain for ARM.
-
A nRF5x DK or your own nRF5x board
-
A phone with BLE or a PC with an extra nRF5x DK.
Step A. Generate keys
We need a pair of Public and Private Key to encrypt the signature and sign the DFU image using ECDSA_P256_SHA256.
Nordic provides nRFutil tool to generate these keys. nRFutil.exe can be downloaded from github here, the user guide is here.
Or acquired from python using pip3 install nrfutil. To check for update, call pip3 install nrfutil --upgrade (or use python -m pip install nrfutil)

A1. Generate your own private key. Type this command line:
nrfutil.exe keys generate private.key
private.key file will be generated. You will keep this key secret
A2. Generate your public key based on your private key.
nrfutil keys display --key pk --format code private.key --out_file public_key.c
After you have the public_key.c file we can move to the next step, build the bootloader.
Step B. Build the bootloader
The bootloader is located at \examples\dfu\bootloader_secure_ble
Note that there are 2 flavors. There is one with _debug surfix. You use this _debug version if you want to avoid version checking, we will come to it later. For now, we will use the normal bootloader.
B1a. Compile the uECC library.
uECC library is needed for the bootloader to decrypt the signature. uECC is an external library, can be downloaded from github here. Note: there is a license requirement comes with it. If you don't want to build and use uECC you can use Oberon library which precompiled already, see B1b.
You have to clone/download the library to the SDK folder: SDKFolder\external\micro-ecc\micro-ecc . It should look like this:
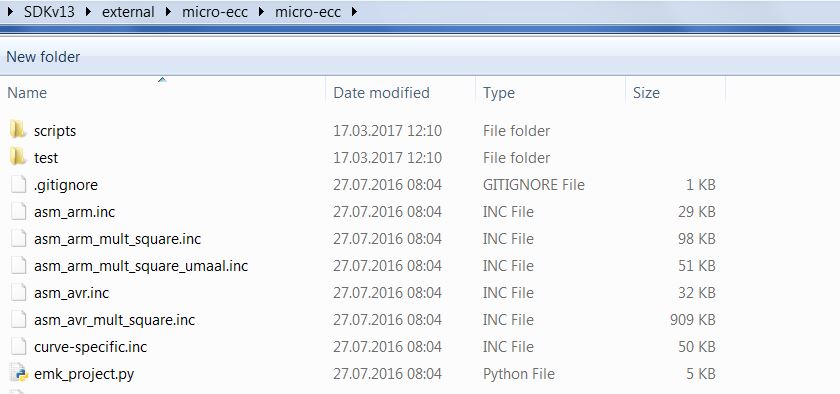
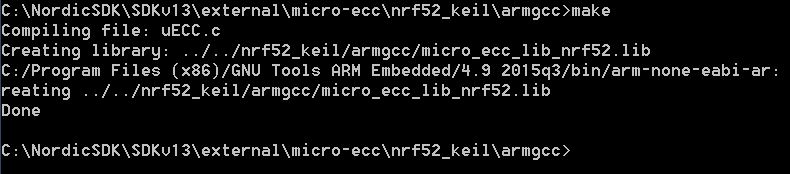
Next step, inside SDKFolder\external\micro-ecc\ choose the IDE and compiler that you want to use to build the bootloader. In my case I chose SDKFolder\external\micro-ecc\nrf52_keil\armgcc and type make to start building uECC.
Now move to step B2.
B1b. Use Oberon crypto library instead of uECC
If you don't want to use uECC you can use our precompiled Oberon instead. Using this library you don't need to download and build uECC yourself and don't have the extra license you need to acknowledge. To use Oberon, in sdk_config.h change the following:
NRF_CRYPTO_BACKEND_MICRO_ECC_ENABLED to 0
NRF_CRYPTO_BACKEND_NRF_SW_ENABLED to 0
NRF_CRYPTO_BACKEND_OBERON_ENABLED to 1
And remove micro_ecc_lib_nrf52.lib file in the project list.
After when you compile the non _debug version you will see an error that the bootloader flash image doesn't fit into the flash size. You would need to increase the size of the bootloader by moving the flash start address down 0x1000 and increase flash size of 0x1000. For example for the nRF52840 project you change IROM1 start from 0x78000 to 0x77000 and IROM1 size from 0x6000 to 0x7000. This meant your bootloader now +4kB larger. This is the draw back of using Oberon library instead of uEcc.
B2. Copy the public_key.c file generated at step A2 to your bootloader folder, or a folder of your choice and include it into your project. Remove the dummy dfu_public_key.c in the project because it's replaced by public_key.c
Now you are ready to build the bootloader.
B3. Build the bootloader. Click build. If you have done step B1, B2 correctly, the bootloader should build successfully.
Note that every time you generate a new pair of public&private key, you need to update the public_key.c file and rebuild the bootloader.
Step C. Generate DFU .zip packet
A DFU .zip packet is required for the DFU master to send new image(s) to the DFU target. The .zip file contains the image hex file(s) we want to update and the init packet, including the signature of the packet. In the main part of this guide, we only do application image update. For bootloader and softdevice update, please see the Appendix.
C1. Prepare the application hex file. Build your application and find the .hex file inside _build folder. Usually it's named nrf52832_xxaa.hex if you compile a SDK's example. Flash the application hex and verify it works normally without the bootloader (flash softdevice if needed).
C2. Generate the .zip file. Copy the private.key generated in step A1 to the same folder with your .hex application file.
In my case I use this script to generate the .zip file:
nrfutil pkg generate --hw-version 52 --application-version 1 --application nrf52832_xxaa.hex --sd-req 0x98 --key-file private.key app_dfu_package.zip
Explanation:
--hw-version: By default this should match with your chip. If you use nRF51 chip you should use "51". If you want to have your own hw-version code, you can define your in the bootloader, using #define NRF_DFU_HW_VERSION your_hw_number
--application-version: By default the start number for application version is 0. To be able to update new application, the application version should equal or greater than the one the bootloader stored. This case I use 1. Read more about version rule.
--sd-req: In my case my application runs with Softdevice S132 v4.0.2. The code number for this softdevice version is 0x98. You can find the softdevice code number by typing nrfutil pkg generate --help, or see here.
--application : Tells nrfutil that you going to update the application and an application image is provided.
Step D. Performing DFU
Now you have your DFU .zip file and the bootloader ready, it's time to actually do DFU.
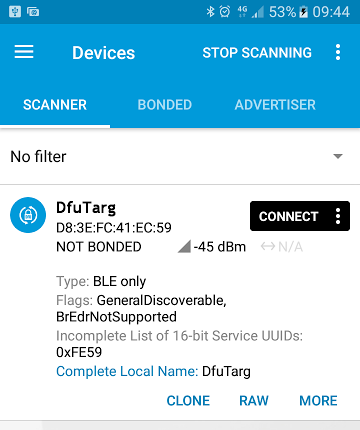
D1. Flash bootloader and softdevice. Use nRFGo Studio or nrfjprog or the IDE to flash the softdevice first, then the bootloder. Verify the bootloader start advertising as "DFUTarg".
D2. Copy the DFU .zip file you just generated in C2 to the phone or to the folder on PC of your choice.
D3. Use nRFConnect/nRFToolbox app either on the phone or on PC to connect and do an OTA DFU using the .zip file you copied (Press DFU button).
D4. Verify that the new application runs after the DFU process reaches 100%, for example it starts advertising with the name that you set in your application. If you can see that, congratulation you have done your first Secure OTA DFU!
Step E. Update new application firmware (Optional)
E1. Generate new firmware, for example modify the advertising device name, or the LED indication.
E2. Generate new DFU .zip package. Set a new application version (at least equal or higher than the original version)
E3. Switch the device to DFU mode, do DFU update and verify that new image is runnning.
Appendix - Advanced features
1. Combine application, bootloader and softdevice image - Bootloader setting
The bootloader looks into its bootloader setting to detect if a valid application is flashed on the chip or not. Boot validation will be performed when booting. If we simply program the application with the bootloader using the programmer, the bootloader won't be able to detect whether a valid app is already exist and it will enter DFU mode instead. Your application won't start. Only after a successful DFU update the bootloader would write to the bootloader setting to mark the valid app.
But in production for example, you may not want to install the application by doing OTA DFU for thousands of device which takes lots of time. The same when you are doing development. You don't want to do DFU for any change you made to your application.
To solve this, we can generate a bootloader setting manually and merge it with the bootloader to trick the bootloader to accept the pre-flashed application. We use nrfutil to generate the bootloader setting and can use mergehex.exe tool to merge the hex files. If you don't want to merge you can flash the setting first then flash the bootloader.
The script to generate bootloader setting is
nrfutil settings generate --family NRF52 --application yourApplication.hex --application-version 0 --bootloader-version 0 --bl-settings-version 1 bootloader_setting.hex
Note: For nRF52840, you use --family NRF52840.
After this command the bootloader_setting.hex will be generated. It includes the application version and the CRC that match with the yourApplication.hex provided. This should be used to overwrite the default bootloader setting in the bootloader.
--bl-settings-version: For SDK v12.0 to SDK v15.2 the bootloader setting should be 1. For SDK v15.3 and newer Bootloader setting should set to 2.
--application-version and --bootloader-version: The initial version of application and bootloader of your choice. In this case I chose 0.
--family: Device family, match with your chip. If you have nRF52840 you have to use NRF52840 instead of NRF52.
After that you can use merhex to merge bootloader with bootloader_setting.hex and additionally with the application and the softdevice if you want.
Usage:
mergehex --merge hexfile1.hex hexfile2.hex --output output.hex
Note: If your application requires UICR to be written, it's good idea to use this merge to write the application via a programmer instead of OTA. When you do OTA DFU the bootloader won't write to UICR.
After we have the merged hex, we can use one single hex to flash multiple devices and don't have to do OTA DFU to flash the application.
2. Secure Boot Validation
As mentioned in the above section, there is a boot validation performed at the booting phase of the bootloader. In SDK v15.2 and earlier, it's simply a CRC check of the application image. The signature is only used when receiving new image, not when booting. From SDK v15.3 we have implemented a more sophisticated boot validation for application, softdevice and the bootloader. The booting sequence is now considered a valid secure boot sequence. Read more about the secure boot and firmware update in the documentation here.
In short, a normal secure booting sequence starts with the MBR booting first, it then starts the bootloader. The bootloader does two task, protect it self using BPROT/ACL protection and then validate the softdevice and the application image. There are multiple option to choose from: signature validation, hash validation, CRC validation (this is the original option from SDK v12) and no validation. Full description is here.
You can choose the boot option when generating the DFU package. Use --sd-boot-validation for softdevice validation and --app-boot-validation when generating the DFU .zip package with nrfutil, you have 4 options to choose from:
- NO_VALIDATION
- VALIDATE_GENERATED_CRC
- VALIDATE_GENERATED_SHA256
- VALIDATE_ECDSA_P256_SHA256.
This also applied for bootloader setting. You can generate the bootloader setting with the same option for boot validating the application and/or the softdevice, instead of just CRC validation for application as before.
3. Buttonless DFU
The easiest way to enter DFU bootloader mode is to hold the Bootloader Button (button 4 on the DK) and reset the device. But there are chances that your device doesn't have any button or you just want to switch the application to bootloader without any physical contact. If it's the case, you need buttonless DFU, simply telling the application to switch to the bootloader via a BLE packet.
We provide the DFU Buttonless example at this folder \examples\ble_peripheral\ble_app_buttonless_dfu
You can follow the link to know how to test it. Here we try to explain how it works. The buttoless example is no different from normal application. You still needs to flash the bootloader. It's important that you make sure the bootloader works fine with normal application first before we start with the buttonless example.
The way it works is pretty simple, to switch, we write to the retention register GPREGRET a flag (BOOTLOADER_DFU_START = 0xB1) and then we do a soft reset. This is done in bootloader_start() in ble_dfu.c file.
Since the retention register keeps its value after the reset, the bootloader will check this value when it booting up after the reset and then can enter DFU mode instead of starting the normal application. This is the same as when we hold Bootloader button and trigger a reset.
Note that on SDK v12 we write to bootloader setting, instead of write to GPREGRET register. I think writing to GPREGRET is a cleaner way of doing this.
Next we find when bootloader_start() is called.
From SDK v13 we introduced DFU buttonless characteristic. The characteristic has indication and write properties. What we need to do is simply enable indication on the characteristic and write 0x01 to it. The Buttonless device will send an indication and wait for acknowledge from the DFU master. When the acknowledge from the central comes, it will call bootloader_start() (check on_hvc() function in ble_dfu.c). The connection will be dropped after that.
By the time of writing this blog, the experimental_ble_app_buttonless_dfu doesn't do any bond forwarding. So you may experience an issue if bonding is exist between the phone and the device. Please have a look at section 4. Bond forwarding bellow.
There is a github tutorial from Gaute here that you can follow to test buttonless DFU.
4. Update softdevice and bootloader
It's possible to update the softdevice, the bootloader and/or the application. We support updating the combination of these 3 images. However, not all of the combinations are possible.
The table below summarizes the support for different combinations (it's from nrfutil documentation here).
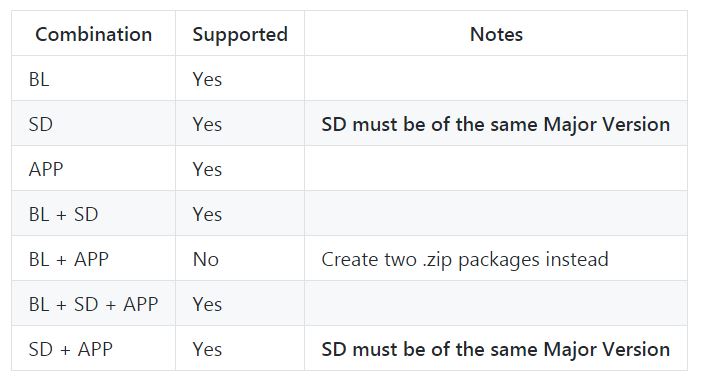
BL: Bootloader
SD: SoftDevice
APP: Application
The following code will generate a softdevice + application combination:
nrfutil pkg generate --hw-version 52 --application-version 1 --application application.hex --sd-req 0x98 --softdevice softdevice.hex --key-file private.key app_dfu_package_softdevice.zip

From nRFUtil v3.2 a --sd-id parameter is added. This is required if the package contains SD (+BL) + APP. So that the --sd-id should match the softdevice ID of the new softdevice when the --sd-req should match the softdevice ID of the old softdevice.
5. Bond forwarding with buttonless DFU
Before you move to this step, make sure you have got the Buttonless DFU no bond working as explained in Appendix 2. This part based on the latest SDK at the time of writing which was SDK v15.2. Take a look at the guide in infocenter here.
What you would need to modify are:
- In sdk_config.h in the bootloader:
- Change NRF_DFU_BLE_REQUIRES_BONDS to 1
- Change NRF_SDH_BLE_SERVICE_CHANGED to 1
- In sdk_config.h in ble_app_buttonless_dfu
- Change NRF_DFU_BLE_BUTTONLESS_SUPPORTS_BONDS to 1
- Check if NRF_SDH_BLE_SERVICE_CHANGED is not 1 then set it to 1
Compile the two projects.
Generate bootloader setting page for the ble_app_buttonless-dfu you just generated. The syntax for a nRF52832 should be:
nrfutil.exe settings generate --family NRF52 --application my_buttonless_app.hex --application-version 1 --bootloader-version 1 --bl-settings-version 1 setting.hex
The reason why we need to generate the bootloader setting is that when you enable bonding on the bootloader, the bootloader wouldn't work without any bonding. On the first time when you start if there is no bond information the bootloader wouldn't start and you have no way to DFU the button less application. So we need to create a bootloader setting so we can merge the bootloader + bootloader setting + application and flash them via SWD in one shot.
Note that if you are using SDK v15.3 or later you should use --bl-settings-version 2 , the bootloader in SDK v12-15.2 uses bootloader setting version 1.
Next step is to merge them:
mergehex -m bootloader.hex setting.hex -o bootloader_and_setting.hex
mergehex -m nrf52832_xxaa.hex bootloader_and_setting.hex -o app_bootloader_and_setting.hex
After that you can flash the app_bootloader_and_setting.hex (after flashing the softdevice). The device should start and advertise as Nordic_Buttonless. Then you can test using nRF Connect app. Observe that the app automatically bond when you enable indication, and then when you start DFU it switch to bootloader mode without changing the address (+1 the address) when switching to bootloader. And then to see that the DFU process is being done when the connection status is bonded.
6. DFU Master code
Currently we don't have an official DFU Master code running on embedded chip (for example updating an nRF52 from another nRF52 via BLE or UART/SPI). What we officially provide is source code for updating nRF52 from a PC or Mobile phone.
To help you get started with developing your own code, tech support provides some example code of very simple SPI/UART DFU masters running on a nRF52 to update another nRF52. It's compatible with the current Secure DFU protocol. The following example made for SDK v14.2 but it should work on SDK v15.x with minor modification.
Documentation for SPI DFU Master: DFU_SPI_readme.docx
SPI DFU Master code (put it into /examples/dfu/) : DFUMaster_SPI.zip
UART DFU Master code: DFUMaster_UART.zip
SPI DFU bootloader code: bootloader_secure_SPIS.zip
7. Background DFU
Example code for background DFU can be found here: https://devzone.nordicsemi.com/f/nordic-q-a/46994/background-dfu-application-source-code/187534#187534
If you have question related to this blog, please create a case in our forum with a link to this, do not post the comment here as it's not regularly monitored.
Top Comments
-

habibfarahani
-
Cancel
-
Vote Up
0
Vote Down
-
-
More
-
Cancel
Comment-

habibfarahani
-
Cancel
-
Vote Up
0
Vote Down
-
-
More
-
Cancel
Children