
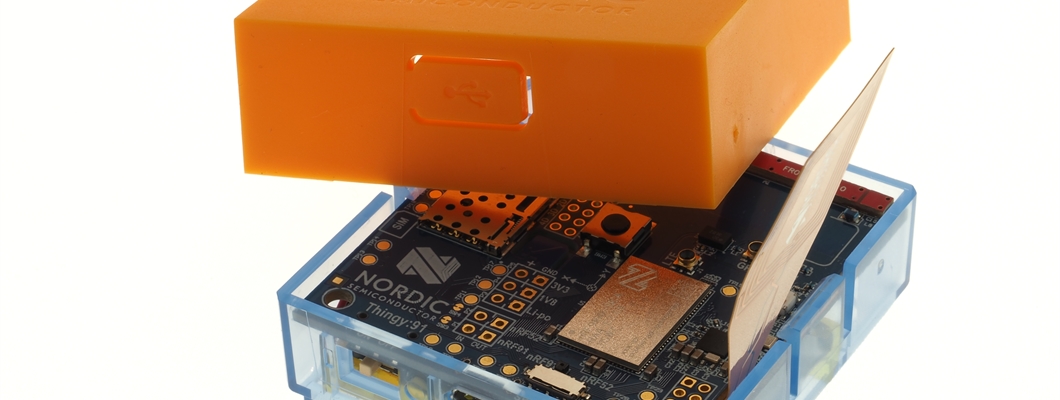
The Nordic Thingy:91 is a cellular IoT prototyping platform. It is based on the nRF9160 System-in-Package (SiP). The nRF9160 has an integrated modem that supports both LTE-M and NB-IoT. The factory programmed firmware on Thingy:91 covers LTE-M only. However, it is possible to do a device firmware update via USB connection by using the Thingy:91 MCUboot bootloader to get the device runs on NB-IoT network.
This article describes how to use the MCUboot to update the nRF9160 modem firmware and application firmware. It explains how to get the NB-IoT demo running.
What Hardware is needed?
The following hardware is needed:
- Thingy:91 evaluation kit (see Thingy:91 product web-page)
- Micro USB cable
- NB-IoT SIM card (see following note)
Note: the Thingy:91 kit contains an iBASIS eSIM card. At the time this article was written, the iBASIS coverage for some countries is limited. Click here to check the iBASIS network coverage. Therefore, in certain countries you may need another SIM card. Please ensure the selected SIM card supports NB-IoT to get the NB-IoT demo running.
The GSMA webpage gives a high-level overview of Mobile IoT Deployments. Further details are available from SIM card providers and network operators.
Which PC Tool is needed?
We are using nRF Connect Programmer to program firmware to Nordic devices. The Programmer app is included in the nRF Connect for Desktop package. A detailed description about the nRF Connect Programmer can be found here.
Update Thingy:91 Firmware
There are different ways to update the Thingy:91 firmware. The blog article Thingy:91 Firmware Update using MCUboot describes a device firmware update via command line. In this article we will use the nRF Connect Programmer GUI tool to do firmware update.
Follow the steps below to update the nRF9160 application firmware and modem firmware.
- Download the latest Thingy:91 precompiled firmware from here.
- Unzip the downloaded file (e.g. thingy91_fw_2020-04-29_bc7ade8b.zip). This file contains following firmware images:
- The ZIP file mfwnrf9160xxx.zip is the modem firmware, do not unzip!
- The download has nRF9160 application firmware for connecting to an LTE-M or NB-IoT network. There are application firmware images for different programming tools. We will use the HEX files in the folder images_dfu_hex, which support update via MCUboot bootloader.
The following sub-chapters describe how to program the modem and application firmware into the Thingy:91.
Programming the modem through USB (MCUboot)
It is recommended to use the latest modem firmware. To update the modem firmware follow the following steps:
1. Open nRF Connect for Desktop and launch nRF Connect Programmer.
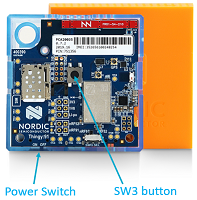
2. The Power Switch should be in position OFF. Connect Nordic Thingy:91 to the PC with a USB cable. In the Programmer’s navigation bar, No devices available is shown.
3. Put Nordic Thingy:91 into application serial recovery mode by pushing the SW3 button while powering on to update the nRF9160 modem.
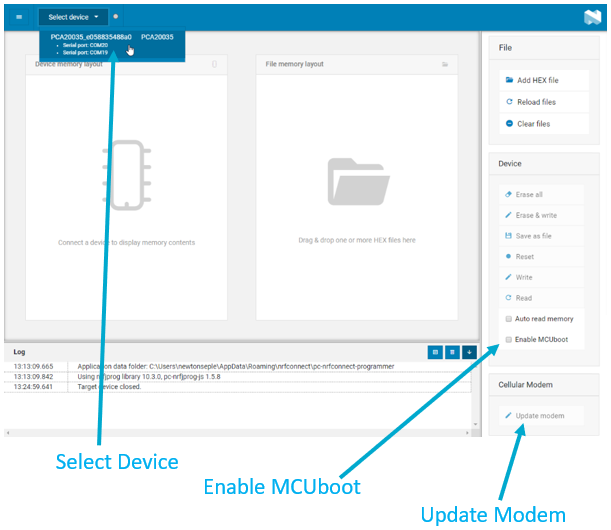
4. In the navigation bar, No devices available changes to Select device. Click Select device and select the device from the drop-down list.
5. Make sure that you have ticked Enable MCUboot in the Device pane on the right.
6. Click Update Modem in the Cellular Modem pane on the right and choose the zip file with the latest modem release, e.g. mfwnrf9160120.zip. The Modem DFU via MCUboot dialog box appears.
7. Click Write in the Modem DFU via MCUboot dialog box to update the firmware. Do not unplug or turn off the device during this process.
NOTE: The contents of the flash memory are deleted and the application must be reprogrammed!
Programming Applications through USB (MCUboot)
Follow the next steps to download the NB-IoT demo application firmware:
1. Open nRF Connect for Desktop and launch nRF Connect Programmer.
2. The Power Switch should be in position OFF. Connect Nordic Thingy:91 to the PC with a USB cable. In the Programmer’s navigation bar, No devices available is shown.
3. Put Nordic Thingy:91 into application serial recovery mode by pushing the SW3 button while powering on to program the nRF9160 SiP.
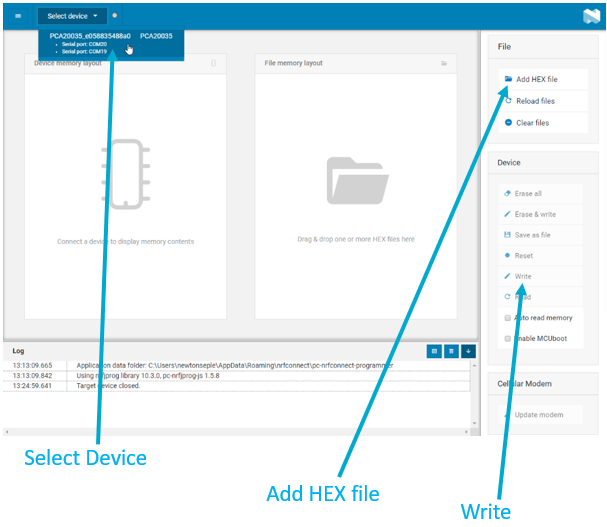
4. Click Select device and select the device from the drop-down list as shown in the following figure.
5. Click Add HEX file on the right pane (named as File) to add the files you want to program. Select the precompiled firmware file by browsing to the unzipped file destination
- use the application firmware: images_dfu_hex/thingy91_nbiot_legacy_pco_2020- … .hex
Note: for some SIM cards you may have to use the image images_dfu_hex/thingy91_nbiot_2020- … .hex
Check with SIM card provider if legacy PCO mode is supported.
6. Click Write on the Device pane in the right as shown in the following figure.#
7. The MCUboot DFU dialog box appears. Click Write in the MCUboot DFU dialog box to program the device.
Add a Thingy:91 to nRF Connect for Cloud
The following step-by-step description assume you are using an own NB-IoT SIM card and not the Thingy:91 included iBASIS eSIM card.
1. Open nRF Connect for Cloud in a browser on your computer.
2. Create a new user if necessary and login. Click ‘+’ to add a new device.
3. Select LTE device to connect your Thingy:91
4. The Activate SIM Card (iBASIS) dialog box opens. Click Skip this step.
5. The Power Switch should be in position OFF. Insert SIM Card and power on Thingy:91. The indicator LEDs start to blink white (note: due to the blue transparent case it may look bright blue). Wait until blinking color changes to blue.
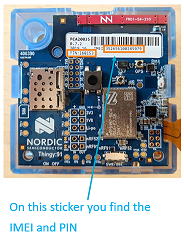
6. Locate IMEI and PIN on Nordic Thingy:91
7. To connect your device to nRFcloud, enter the device ID and PIN.
Note: For Nordic hardware like the Thingy:91, the device ID is "nrf-" followed by the 15 digit IMEI. Example: "nrf-123456789012345"
8. Optional: To active the GPS, go outside and press the SW3 button for min 10 sec until LED blinks purple. For more info, see the user guide.
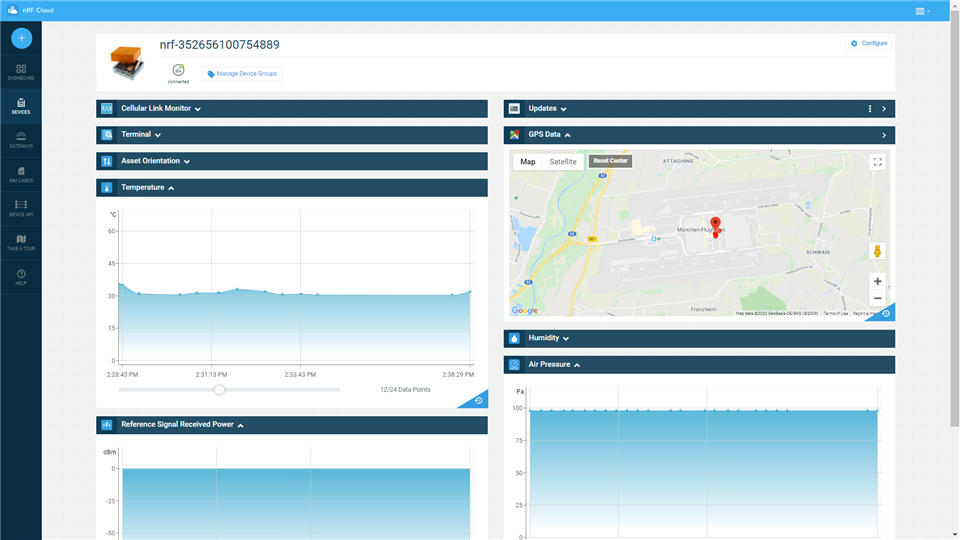
9. Select the new device in the DEVICES menu of nrfcloud.com. On the webpage you get different sensor measurements. If GPS is active, you will also see the GPS position.
Top Comments