


The DECT NR+ standard is steadily maturing, and with the release of nRF Connect SDK v2.7.0, we are inching closer to seeing NR+ commercial products on the market. If you want to get up to speed on NR+ quickly, read our previous blog post: DECT NR+: A technical dive into non-cellular 5G
The recent release of nRF Connect SDK v2.7.0, brings with it some significant improvements to the development of the DECT NR+ technology. The SDK now contains an NR+ PHY API to interact with the NR+ PHY modem firmware, as well as a DECT Hello sample application to be able to test our solution out-of-box easily.
In this blog post, we will go through how to set up the DECT NR+ sample currently available in nRF Connect SDK. We will also take a look at the DECT PHY API, which is used to interface with the modem.
Nordic’s current NR+ offering
Nordic has three SiPs that support the standard: the nRF9161 SiP, nRF9131 mini-SiP and nRF9151 SiP.
We provide the DECT NR+ physical layer, the standard's physical layer implementation, to run on the nRF91 modem core. Due to the regulatory limitations in certain areas, the modem FW is currently distributed through Nordic sales and can be requested through this form.
The nRF Connect SDK v2.7.0 release included the DECT NR+ PHY API, which interfaces with the NR+ PHY modem FW.
As for the rest of the NR+ stack, Nordic is working with solution partners that offer commercial NR+ stacks supported by Nordic hardware.
Wirepas
Wirepas has its Wirepas 5G Mesh, which is currently at 1.0.0 release status. This comes with its own Wirepas SDK (i.e., not based on Zephyr), which is separately licensed software provided by Wirepas. Contact Wirepas for more information.
Lynqn
Lynq, on the other hand, focuses on low-latency audio and long-range data applications through the products RavenTalk and RavenConnect. These are also software stacks licensed separately from Lynq. Contact Lynq for more information.
Prerequisites
-
nRF Connect SDK v2.7.0 (or higher)
-
2 nRF9161 DKs or nRF9151 DKs
-
DECT NR+ PHY modem FW (distributed through sales)
DECT NR+ PHY hello sample
Before we set up our devices, let’s examine the NR+ sample that was added to the nRF Connect SDK: the DECT NR+ PHY hello sample.
The sample runs in a loop, transmitting an incremental counter value before listening for incoming receptions for 5 seconds (set by CONFIG_RX_PERIOD_S). After 30 transmissions (set by CONFIG_TX_TRANSMISSIONS), the loop is exited.
The sample can be found here: <install_path>/nrf/samples/dect/dect_phy/hello_dect.
The sample has two overlay files, overlay-eu.conf and overlay-us.conf, to use depending on which region you are in.
-
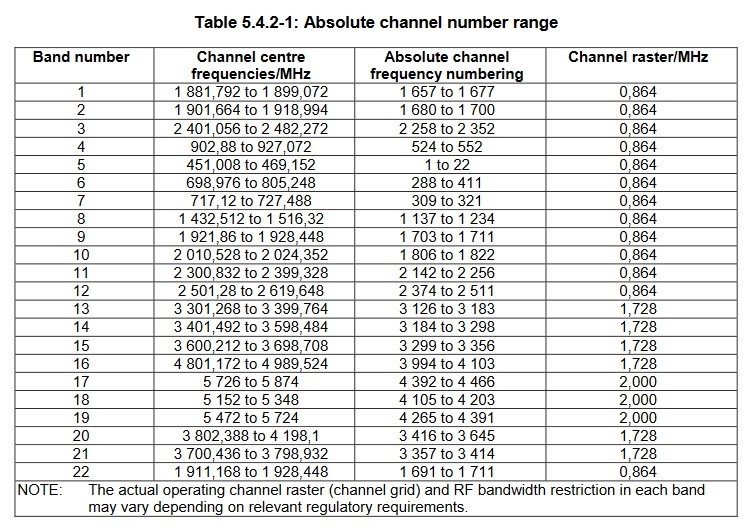
overlay-eu.confis for Europe and setsCONFIG_CARRIERto 1677, corresponding to band number 1, see Table 1 below. Band number 1 (approx. 1880-1900 MHz) is the DECT frequency allocation in Europe. -
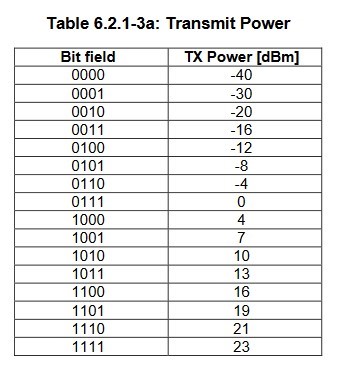
overlay-us.confis for North America and setsCONFIG_CARRIERto 1711, corresponding to band number 9, which is the DECT frequency allocation in that area (1920 - 1930 MHz). Additionally, we must decreaseCONFIG_TX_POWERfrom 13, which corresponds to 19 dBm, down to 11, which corresponds to 13 dBm, see Table 2 below.
If you are not located in either of these two regions, you will need to check the local regulation and create an adjusted overlay configuration. It is your responsibility to operate the devices according to the local regulation, in all situations. The sample should only be run when complying with the local regulations.
Lastly, you can configure the network ID, through CONFIG_NETWORK_ID and the modulating coding scheme with CONFIG_MCS. The modulating coding scheme impacts how much data fits in the current time slot, so increasing this will require the application to pad the message.
Preparing the device
Flashing DECT NR+ PHY modem FW
-
Open nRF Connect for Desktop.
-
Install and launch the Programmer application.
-
Connect the nRF91x1 DK to your computer using a USB-C cable and turn it on.
-
In the Programmer application, select the nRF91x1 DK in the upper left-hand corner.
-
Select Add file and then Browse…
-
Navigate to and select the DECT NR+ PHY modem FW zip file (
mwf-nr+_nrf91x1_<version>.zip) then click Open.
Contact the Nordic sales department to request this firmware.
-
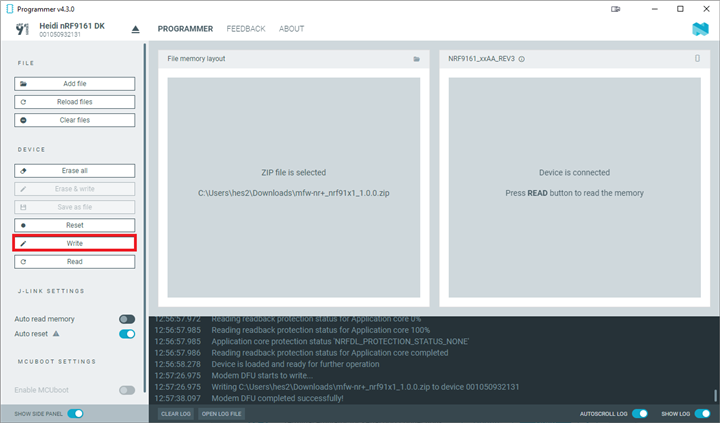
Select Write, and then Write again in the pop-up window, and wait for the modem DFU to complete.

-
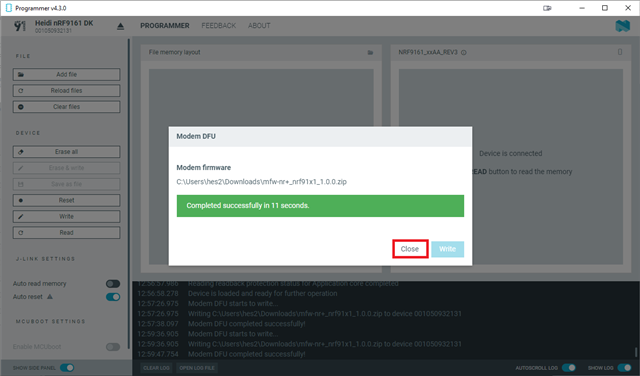
When a green success message appears, select Close.
-
Repeat steps 3-7 with the other nRF91x1 DK.
Build and flash DECT NR+ PHY hello sample
In this blog, we will provide two different methods for building and flashing the sample. First, building the sample yourself in Visual Studio Code before flashing. This requires you to have nRF Connect SDK, Visual Studio Code and the nRF Connect for VS Code extension installed on your computer.
The second method is flashing the pre-built firmware binaries using the Programmer application.
Alternative 1: Using Visual Studio Code
There are many ways to build and flash the NR+ PHY hello sample to the devices. In the following steps, we will be using the nRF Connect for VS Code extension in Visual Studio Code to both build and flash the sample.
-
Open Visual Studio Code and navigate to the nRF Connect SDK extension.
-
Select Create a new application, then Copy a sample and select the DECT NR+ PHY hello sample.
-
Click on Add build configuration to add a build configuration.
-
For Board, select either of the following board targets:
nrf9161dk_nrf9161_nsornrf9151dk_nrf9151_ns -
Under Kconfig fragments, select Add fragment, and in the drop-down menu, you should have two options:
overlay-eu.confandoverlay-us.conf. Select one depending on which region you are in.
-
Note that if neither of the .confs are selected, CONFIG_CARRIER will be unset and the application will not build.
-
Make sure Build after generation configuration is selected.
-
Select Build Configuration, and wait for the build to complete.
-
Then, under ACTIONS, click on Flash to flash the image to your device.
Alternative 2: Using the Programmer application
Alternatively, you can use the pre-built binaries attached below, and flash the firmware directly to the devices using the Programmer application:
- hello_dect_nrf9151_eu_261124.hex
- hello_dect_nrf9151_us_261124.hex
- hello_dect_nrf9161_eu_261124.hex
- hello_dect_nrf9161_us_261124.hex
-
Download the firmware binary for the hello_dect sample in your region (
-euor-ussuffix). -
In the Programmer application, select Add file and then Browse…
-
Navigate to and select the hello_dect firmware, then click Open.
-
Select Erase & write and wait for the operation to be complete
When the pattern in the window on the right side stops, the operation is complete.
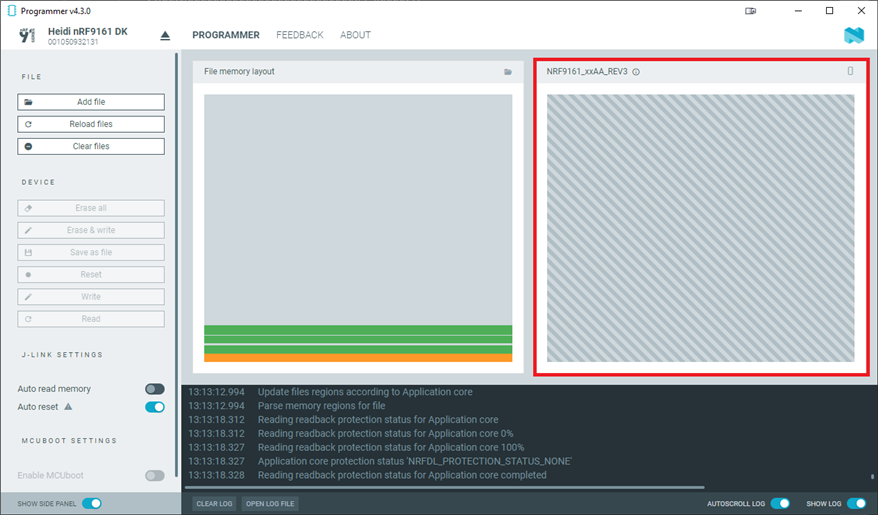
The following log output also shows a successful write operation:
13:16:25.241	Recovering Application core
13:16:25.242	Recovering Application core 0%
13:16:26.440	Recovering Application core 100%
13:16:26.440	Recovering Application core completed
13:16:26.441	Writing HEX to Application core
13:16:26.865	Writing HEX to Application core 33%
13:16:26.866	Writing HEX to Application core 33%
13:16:27.431	Writing HEX to Application core 100%
13:16:27.432	Writing HEX to Application core completed
13:16:27.432	Loading core information for Application core
13:16:27.433	Update files regions according to Application core
13:16:27.433	Parse memory regions for file
13:16:27.434	Loading core information for Application core 0%
13:16:27.463	Loading core information for Application core 100%
13:16:27.463	Loading core information for Application core completed
13:16:27.464	Update files regions according to Application core
13:16:27.464	Parse memory regions for file
13:16:31.436	Reading readback protection status for Application core
13:16:31.436	Reading readback protection status for Application core 0%
13:16:31.452	Reading readback protection status for Application core 100%
13:16:31.452	Application core protection status 'NRFDL_PROTECTION_STATUS_NONE'
13:16:31.452	Reading readback protection status for Application core completed
Testing
Open a terminal for each board to see what’s going on.
-
In Visual Studio Code, go to the nRF Connect for VS Code window.
-
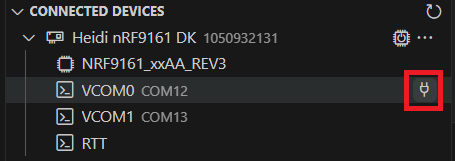
Under CONNECTED DEVICES, expand the nRF91x1 DKs.
Notice there are two COM ports, because the nRF91x1 SiP application core is split into a secure and non-secure domain with TF-M. We want to view the terminal output from the non-secure domain where the application is running.
-
Click on the icon to the right of the COM port, then in the top of the window, select the Device.

If both of the devices are running simultaneously, the log output should look similar to this, showing the transmission as well as reception of packets.
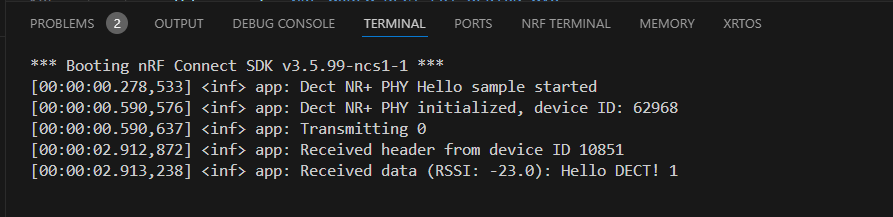
Tip: For debugging messages, change line 13 in main.c to LOG_MODULE_REGISTER(app, LOG_LEVEL_DBG);
Let the application run for a while, and notice that after the 29th transmission, it shuts down

Note: Adding CONFIG_TX_TRANSMISSION=0 to the prj.conf file will configure the application to transmit forever.
NR+ PHY API
Let’s examine the NR+ PHY API that the hello_dect sample uses to interface with the NR+ PHY FW.
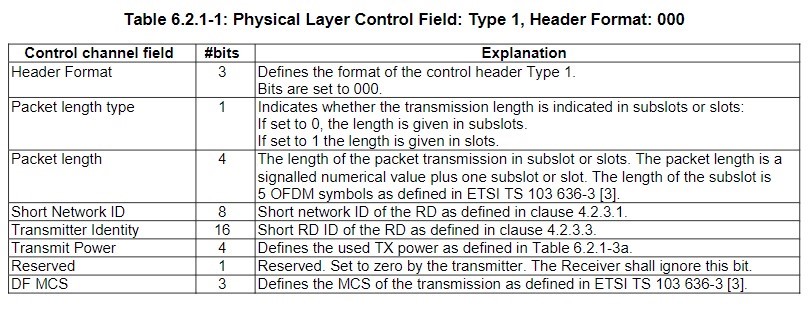
When building your own application using the NR+ PHY API, it is important to note that the following struct, struct phy_ctrl_field_common, needs to be defined by the application. The application uses the PHY API transmit and receive functions (nrf_modem_dect_phy_tx() and nrf_modem_dect_phy_rx()) and must construct the PHY header and possible payload. The modem checks the header, so incorrectly formed headers will be rejected.
/* Header type 1, due to endianness the order is different than in the specification. */
struct phy_ctrl_field_common {
	uint32_t packet_length : 4;
	uint32_t packet_length_type : 1;
	uint32_t header_format : 3;
	uint32_t short_network_id : 8;
	uint32_t transmitter_id_hi : 8;
	uint32_t transmitter_id_lo : 8;
	uint32_t df_mcs : 3;
	uint32_t reserved : 1;
	uint32_t transmit_power : 4;
	uint32_t pad : 24;
};
This is the structure for the PHY header and is defined in the NR+ specification, see the table below for more information on the fields.
Transmitting
First, let’s populate the PHY header, which will be of type struct phy_ctrl_field_common
struct phy_ctrl_field_common header = {
	.header_format = 0x0,
	.packet_length_type = 0x0,
	.packet_length = 0x01,
	.short_network_id = (CONFIG_NETWORK_ID & 0xff),
	.transmitter_id_hi = (device_id >> 8),
	.transmitter_id_lo = (device_id & 0xff),
	.transmit_power = CONFIG_TX_POWER,
	.reserved = 0,
	.df_mcs = CONFIG_MCS,
};
Then we will define the TX operation parameters, stored in struct nrf_modem_dect_phy_tx_params (Technical Documentation), where the header we defined earlier is passed.
struct nrf_modem_dect_phy_tx_params tx_op_params = {
	.start_time = 0,
	.handle = handle,
	.network_id = CONFIG_NETWORK_ID,
	.phy_type = 0,
	.lbt_rssi_threshold_max = 0,
	.carrier = CONFIG_CARRIER,
	.lbt_period = NRF_MODEM_DECT_LBT_PERIOD_MAX,
	.phy_header = (union nrf_modem_dect_phy_hdr *)&header,
	.data = data,
	.data_size = data_len,
};
Finally, to send the packet, pass the transmission parameters stored in tx_op_params to the function nrf_modem_dect_phy_tx(), which has the following signature:
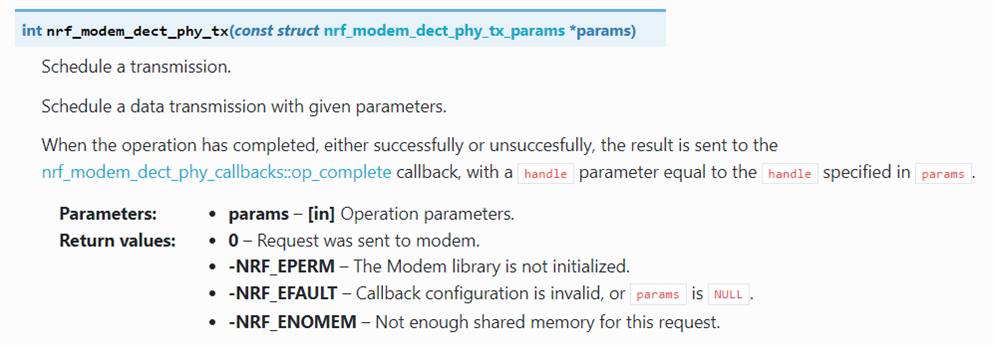
It is important to note that transmissions on the DECT band should not be done without a MAC layer in charge of the process. The MAC controls the RF resources, determines the operating channels and subslots based on RSSI measurements. Only the frequency-time windows that are measured as non-busy are allowed to be used.
The PHY API alone is not sufficient to make transmissions.
Closing
For those looking to explore the DECT NR+ technology, the NR+ PHY API and DECT hello sample in nRF Connect SDK v2.7.0 Nordic Semiconductor are useful resources. Along with our solution partners like Wirepas and Lynq and the continuous enhancement of our product offering, we are committed to supporting our customers in navigating the complexities of modern wireless communication standards.
If you have any questions about the Nordic NR+ offering, the DECT PHY or the sample, please create a DevZone ticket. If you need access to the DECT NR+ PHY firmware, please contact sales.
References
-
DECT NR+ physical layer: Technical Documentation
-
DECT NR+ PHY API: Technical Documentation
-
DECT NR+ sample: Technical Documentation


