

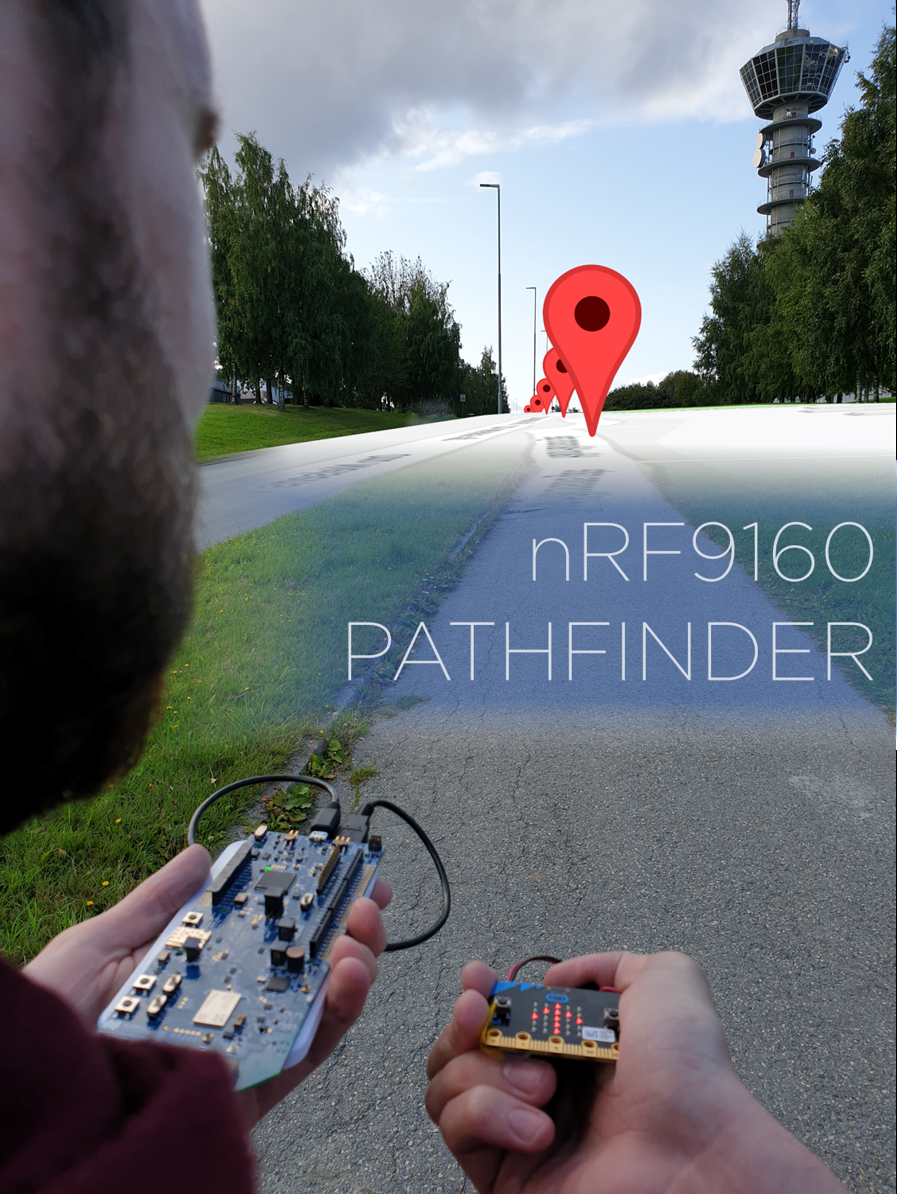
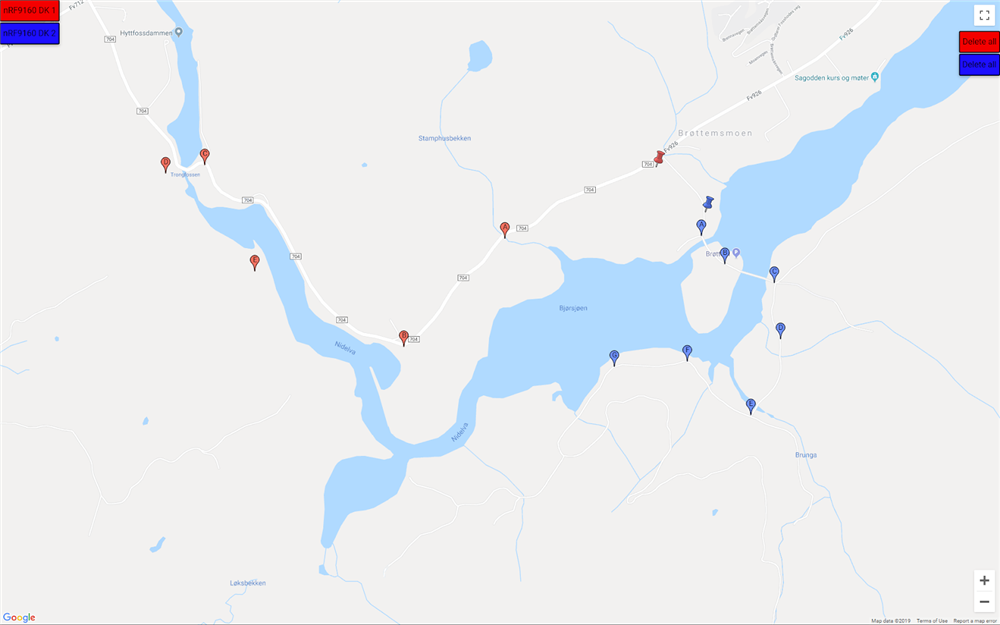
The nRF9160 SiP supports the use of both LTE-M and GPS. We want to show how these can be used in an application at the same time. In this project we demonstrate this by using the nRF9160 DK to send the GPS position of the DK to Google Cloud, which will then be sent to and shown on a map. Additionally, the user can plot out a path on the map for the nRF9160 DK to traverse. A micro:bit will draw an arrow pointing in the direction of the first marker on the path. Multiple nRF9160 DKs can be connected to the map at the same time, as different users. An example of the map can be seen below.
In order to store the various types of markers we used Firebase, and Google Cloud functions were used for communication between front end, back end and firmware. A map displaying the information flow can be seen further down.
Google Cloud and Firebase
This blog post describes how to set up and use Google Cloud and Firebase with the nRF9160 DK. Follow the instructions found there before implementing this project. However, the code will be different, so prioritize the code added in this blog post. When the nRF9160 DK gets a GPS fix it will send its GPS data to Google Cloud. If it is currently following a path it will first run a check on whether it has reached the next marker and include the result. The cloud function will update the Firebase database with the new position and remove the reached marker if necessary. If the path has been changed, the new path is sent back to the nRF9160 DK.

GPS
GPS operation on nRF9160 is time multiplexed with the LTE modem, and it is normally not possible to obtain the GPS position while the LTE is active. To operate the GPS without completely deactivating LTE, the LTE modem needs to be in power saving mode (PSM). You can read more about the GPS receiver or the GPS hardware description in the nRF9160 DK documentation.
Be aware that the iBasis SIM card bundled with the nRF9160 DK does not support PSM in some areas, and may therefore not work with this project. To verify that PSM is active the AT command AT%XMONITOR can be sent to the modem. This command returns a set of modem parameters, whereas the two last ones concerns the PSM. If they show the values "11100000","11100000" it means that PSM is deactivated or unsupported. Read more about nRF91 AT commands here.
In the “required files for v1.0.0” folder you will find a modified GPS header file, a modified LTE driver, and an experimental GPS driver. A similar version of these files will be added to the nRF Connect SDK in the near future, but until then they must be added manually. Simply drag the “nrf” folder into your NCS folder and replace all files when prompted.
Disclaimer: As these files are not in a finished state, they may not be fully optimized.
The GPS driver nrf9160_gps requires a trigger and a callback to a trigger handler. These are passed to it by the gps_controller, which also schedules starting and stopping the GPS. How the gps_controller manages the GPS can be changed in prj.conf under the GPS settings.
Our project uses Position, Velocity and Time (PVT) data, but there is also support for the NMEA standard in the GPS driver and gps_controller. To use these files with NMEA in your own project, enable CONFIG_GPS_CONTROL_USE_NMEA in prj.conf and use GPS_CHAN_NMEA when calling gps_channel_get. You can also enable/disable the following NMEA sentence structures: GSV, GSA, GLL, GGA and RMC NMEA strings in prj.conf. By default only GGA is enabled. Read more about NMEA here.
Google Maps
By using the Maps JavaScript API it is possible to host a local version of Google Maps, which lets you customize maps with your own content. In order to use this, it must first be enabled on a Google Cloud project.
The Google Maps in this project is a .html file you will have to open in a web browser. This map can contain two different types of markers.
- nRF9160 DK:
- Looks like a pin.
- Can only be one pin per nRF9160 DK at a time.
- Indicates the last known position of the nRF9160 DK since the map was opened.
- Path:
- Default, colored marker.
- Max 26 markers per device on the map.
- Will receive a letter: oldest marker get “A”, next get “B”, etc.
- Add new marker by clicking anywhere on the map.
- Minimum distance to previous marker.
- Indicates a path the user of the nRF9160 DK is intended to traverse.
When a device has published its position, its name will appear in the upper-left part of the map. To issue a path to a device, click on its name to select it, then click on the map to set path markers. Clicking on a marker deletes it from the path, and clicking “Delete all” deletes all markers for the corresponding device.
Path module, micro:bit and Bluetooth
This part is solely intended to provide a more graphic feedback than what the nRF9160 DK can provide alone, showcasing a potential use case for the project.
As nRF9160 is not capable of using Bluetooth, a UART HCI connection with the nRF52840 on nRF9160 DK is used to perform BLE communication. The Bluetooth code is based on the Bluetooth part of the lte_ble_gateway example. This was changed to use a micro:bit instead of a Nordic Thingy:52. In addition, the micro:bit will not send anything to the nRF9160 DK, so the receive parts have been removed from the bluetooth code.
In the prj.conf it is possible to disable/enable the micro:bit part of the code. In addition, the name of the micro:bit needs to be defined, in order for the application to know what to connect to. To get this name, one can use the nRF Connect App, and scan for devices. The name should be something like: “BBC micro:bit[vigar]”.
The micro:bit program can be found in the micro_bit folder. See the micro:bit Getting Started Guide on how to program this project to your micro:bit. It is possible to simply flash the HEX file delivered with the code for this project. If the editor is used instead, one must remember to edit the settings to “No pairing required” before downloading the new HEX file. In order to flash the HEX file, just drag and drop the file into the micro:bit folder that appears when the micro:bit is connected to a PC. To edit the micro:bit code, you can import the HEX file on https://makecode.microbit.org.
The micro:bit has a Bluetooth UART Service. Sending a directional string to this UUID will display an arrow. We defined this string as either “NN:”, “NW:”, “WW:”, “SW:”, “SS:”, “SE:”, “EE:” or “NE:”. Note that the string has to be terminated by “:”. This is so that the micro:bit will know when to stop reading. Furthermore, the micro:bit has a compass, which we have used to make sure that the arrow will always point in the correct direction.
Testing
We managed to perform some initial tests of the setup before the summer ended. These were conducted on the perimeters around Nordic’s office in Trondheim, where the LTE-M and GPS conditions are favourable. The testing yielded quite good results, as we successfully managed to navigate the area using the guiding arrow.
Some flaws were inevitably discovered though. Firstly the micro:bit’s internal compass malfunctions quite frequently and a more accurate/alternative solution for displaying direction should be introduced. Secondly we experienced some stability issues with the GPS, regarding both time-to-fix and infrequent crashing. Testing again using an external antenna gave much better fix-time, while the crashing is related to some yet-to-be-found bug in our code.
How to replicate
- Download nRF Connect for Desktop and install the Getting Started Assistant. Follow the steps to set up the toolchain. We have used NCS tag 1.0.0, which needs to be set as a variable in the Getting Started Assistant.
- Download our code, which can be found at the bottom of the blog post. The project should be located in a new folder under ncs, \ncs\apps. As mentioned above, some files need to be replaced. In order to do this, drag the “nrf” folder into your NCS folder and replace all files when prompted.
- The modem firmware must be version 1.0.0. How to update this can be found here.
- Setup Google Cloud as described in this blog post with the files in \gcloud\firebase\functions.
- Configure index.js in \gcloud\firebase\functions with your project, registry and topic names.
- Configure prj.conf with the correct project name, registry name and device name, and create keys as described in the blog post.
- To use the map, you must edit the GoogleMap file and replace the placeholder firebaseConfig object with your own. You can find your firebaseConfig object by following the directions found here under “Get config object for your web app”.
- If a micro:bit is to be used to display the direction, this must be enabled in prj.conf, and CONFIG_MICROBIT_ID must be set to the name of the micro:bit.
Conclusion
This blog post has covered this summer’s support group student project; an end-to-end pathfinder application with concurrent usage of GPS and LTE on the nRF9160 DK. First of all, making an end-to-end application challenged us to delve into other fields, like web development!
Secondly it has been exciting and challenging to work with such a new product, where the developers you work with know just as much as you. This has led to many good discussions and discoveries, so thank you Nordic Support team!
All the best,
Øivind, Marte, Sigurd and Carl Richard
Project code:

Top Comments