

Support for nRF52 Series in Contiki OS is no longer maintained and is pending removal. Please check out nRF52x series support in Zephyr OS which offers BLE over IPv6 connectivity.
This tutorial shows you how to set up IPv6 over BLE communication using nRF52832 and Contiki OS.
To fully understand this tutorial you will need to have minimum knowledge of Linux environment and shell. An nRF52 Development Kit and Bluetooth 4.0-compatible hardware are required to run the examples.
Introduction
Contiki OS is an open source operating system for the Internet of Things, see http://www.contiki-os.org/ for more information.
nRF52832 port is Nordic Semiconductor's first Contiki OS compatible platform that supports IPv6 over BLE. It opens up an opportunity to experiment with IPv6 over BLE by leveraging numerous software modules already created for Contiki.
Contiki design and programming model
Before we start experimenting with Contiki OS on nRF52 it’s worthwhile to learn more about it. Contiki OS uses a unique programming model based on protothreads (http://dunkels.com/adam/pt/publications.html). Protothread is a programming abstraction that uses concepts from multi-threaded and event-driven paradigms. It allows for writing code in an easily understood sequential fashion while having a lower memory overhead compared to fully fledged threads. To achieve lower memory consumption, protothreads and processes in Contiki OS do not use individual process stacks to preserve the states, but rather use global variables instead. Due to this, Contiki OS uses cooperative scheduling between context switches. This means that a process cannot be preempted and must explicitly yield control back to the scheduler, so that other processes can be run. A process can yield, for example, by waiting for an event such as timer expiration.
The code snippet below shows an example of a Contiki process which periodically (once a second) blinks an LED. A process is defined using the PROCESS() macro, which creates the process object (“periodic”) and sets a human-readable name to it (“Periodic process”). The process object is automatically started by Contiki since it’s given as an argument to the AUTOSTART_PROCESSES() macro. The process body is defined by using the PROCESS_THREAD() macro and that’s where the process loop is. As seen in the snippet, the process schedules a periodic event timer (etimer) and yields execution by waiting for an event using the PROCESS_WAIT_EVENT() macro. Once the timer triggers, the Contiki scheduler will run the process again from the next line after the PROCESS_WAIT_EVENT() macro.
#include "contiki.h"
#include "dev/leds.h"
#include <stdio.h> /* For printf() */

PROCESS(periodic, "Periodic process");
AUTOSTART_PROCESSES(&periodic);

PROCESS_THREAD(periodic, ev, data)
{
  static struct etimer tick;
  PROCESS_BEGIN();

  etimer_set(&tick, CLOCK_SECOND);

  while (1) {
    PROCESS_WAIT_EVENT();
    if (ev == PROCESS_EVENT_TIMER && etimer_expired(&tick)) {
      leds_toggle(LEDS_1);
      etimer_reset(&tick);
    }
  }

  PROCESS_END();
}
- Installing the necessary tools
Throughout the rest of the tutorial we’ll assume that we’re using Ubuntu 15.10 Linux distribution. In order to compile for the nRF52 DK platform, you'll need the following tools:
a) nRF5 IOT SDK (https://developer.nordicsemi.com)
Download the nRF5 IOT SDK, extract it to a folder of your choice, and point NRF52_SDK_ROOT environmental variable to it, for example:
wget ttps://developer.nordicsemi.com/nRF5_IoT_SDK/nRF5_IoT_SDK_v0.9.x/nrf5_iot_sdk_3288530.zip
unzip nrf5_iot_sdk_3288530.zip -d $HOME/nrf5x-sdk
export NRF52_SDK_ROOT=$HOME/nrf5x-sdk
b) Segger JLink Software for Linux (https://www.segger.com/jlink-software.html)
Download and install “Software and documentation pack” using a deb package appropriate for your machine (32bit or 64bit). In order to use the nRF52 DK as a regular Linux user, edit (using sudo) the /etc/udev/rules.d/99-jlink.rules file and replace the ATTR keyword with ATTRS.
c) The remaining tools can be installed using Ubuntu’s packet manager:
sudo apt-get install gcc-arm-none-eabi make bluez libcap-ng0 radvd picocom git
d) Clone the Contiki OS repository:
cd $HOME
git clone https://github.com/contiki-os/contiki.git
- Getting started with Hello World
Once all the tools are in place, we can compile and flash a Hello World application. The source code of a very simple Hello World application, which simply prints “Hello, world” on UART, is shown below:
#include "contiki.h"
#include "dev/leds.h"

#include <stdio.h> /* For printf() */

PROCESS(hello_world_process, "Hello world process");
AUTOSTART_PROCESSES(&hello_world_process);

PROCESS_THREAD(hello_world_process, ev, data)
{
  PROCESS_BEGIN();
  printf("Hello, world\n");
  PROCESS_END();
}
By compiling and flashing it, we’ll be able to verify that the toolchain setup is correct.
To do this, go to contiki/examples/hello-world and execute in shell:
make TARGET=nrf52dk
If the compilation completes without errors, then it’s time to connect the DK to your PC. If you haven't used the device with Contiki before, erase the device and flash it with a SoftDevice:
make TARGET=nrf52dk erase
make TARGET=nrf52dk softdevice.flash
Finally, the application can be flashed to the device:
make TARGET=nrf52dk hello-world.flash
You can also check if the device prints the “hello world” sentence on the UART by using picocom to view the logs:
sudo picocom -fh -b 38400 --imap lfcrlf /dev/ttyACM0
Since the hello_world_process runs on start and finishes as soon as the line is printed out, you’ll be able to see it every time the DK is reset with the RESET button. The exercise of modifying the Hello World program so that it prints out the sentence every second is left up to the reader!
- Making an IPv6 connection
We’ve learned how to compile and flash the Contiki application to the DK. Now it’s time to start experimenting with IPv6 connectivity!
The device will start advertising BLE as soon as it's been initialized, which is indicated by the blinking of LED1. To verify that the device is indeed advertising, run the following commands in a shell:
sudo hcitool lescan
The output should be similar to the one shown on the figure below.

Take down the device’s Bluetooth address (in my case that’s 00:87:82:E3:69:17), because you're going to need it later on.
Before we can connect to the device, we need to load and enable the bluetooth_6lowpan kernel module:
# Log in as a root user.
sudo su

# Load 6LoWPAN module.
modprobe bluetooth_6lowpan

# Enable the bluetooth 6lowpan module.
echo 1 > /sys/kernel/debug/bluetooth/6lowpan_enable
Finally, we can make the connection by running the following command (replace 00:AA:BB:CC:DD:EE with your device’s Bluetooth address):
echo "connect 00:AA:BB:CC:DD:EE 1" > /sys/kernel/debug/bluetooth/6lowpan_control
If the command above is completed successfully, LED1 will stop blinking and LED2 will switch on. You can check that by pinging the device using its link-local address. The address has the form of fe80::2aa:bbff:fecc:ddee, where the aa:bb:cc:dd:ee is the device's Bluetooth address. To ping the device, run the following command:
ping6 -I bt0 fe80::2aa:bbff:fecc:ddee
Remember that you’ll have to connect to the device every time you reset it or flash a new firmware. The kernel module will stay loaded until you switch off your PC.
- Distributing routable IPv6 prefix
Before we can try a more complex example that is described in the next section, we need to make sure that the device has a routable IPv6 address. In Linux, this is done by using the Router Advertisement Daemon (RADVD). To configure RADVD, create a /etc/radvd.conf file (as root) and edit it, so that it has the following content:
interface bt0
{
    AdvSendAdvert on;
    prefix 2001:db8::/64
    {
        AdvOnLink off;
        AdvAutonomous on;
        AdvRouterAddr on;
    };
};
Next, start the RADVD daemon:
# Set IPv6 forwarding (must be present).
sudo echo 1 > /proc/sys/net/ipv6/conf/all/forwarding

# Run radvd daemon.
sudo service radvd restart
If successful, all devices connected to the host will receive a routable 2001:db8 prefix. This can be verified by sending an echo request to the full address:
ping6 -I bt0 2001:db8::2aa:bbff:fecc:ddee
- Running a CoAP Server on nRF52
With all that preparatory work in place, we can run an IoT service on nRF52! The source code for this example CoAP server for nRF52 is located in `contiki/examples/nrf52dk/coap-demo’.
The CoAP server provides the following resources:
Host
    |-- .well-known
    |   `-- core
    `-- lights
        `-- led3
The ‘.well-known/core’ resource is a mandatory resource that describes the remaining resources available on the device. You can query that resource by using the GET method to retrieve a list of resources in CoRE link format.
The state of LED 3 can be set and queried using the lights/led3 resource. The current state of LED 3 is returned as a text string in payload. Value 0 indicates that LED 3 is off, whereas 1 indicates that LED 3 is on. This resource is also observable. This means that each time the state of lights/led3 resource changes, all interested clients will get a notification with the new state.
The state of the resource can be changed using the POST/PUT method. To switch on the LED, you need to send ‘1’ as payload, whereas to switch it off you need to send ‘0’. The LED can also be toggled using Button 1.
- Implementing the CoAP server
The server is implemented as a Contiki process. The implementation, shown in the following snippet, is quite simple. We initialize the CoAP service using the rest_init_engine() function and register a single resource using rest_activate_resource(). The latter function binds the resource object res_led3 with a URI "lights/led3".
Next, we activate the Button 1 sensor and enter an endless loop. In this loop, the process waits for an event and toggles the LED whenever the button is pressed. In addition to toggling the LED using leds_toggle(LEDS_3), the process also triggers a CoAP notification on the resource using the res_led3.trigger() function.
PROCESS(er_example_server, "nRF52 DK Coap Server");
AUTOSTART_PROCESSES(&er_example_server);

PROCESS_THREAD(er_example_server, ev, data)
{
  PROCESS_BEGIN();
  PROCESS_PAUSE();

  rest_init_engine();
  rest_activate_resource(&res_led3, "lights/led3");

  SENSORS_ACTIVATE(button_1);

  while (1) {
    PROCESS_WAIT_EVENT();

    if (ev == sensors_event) {
      if (data == &button_1 && button_1.value(BUTTON_SENSOR_VALUE_STATE) == 0) {
        leds_toggle(LEDS_3);
        res_led3.trigger();
      }
    }
  }

  PROCESS_END();
}
The single LED3 resource, which is provided on our server, is implemented in the `resources\res_leds.c’ file. The file contents (reduced a bit for brevity) are shown in the following snippets. A resource object is created using the EVENT_RESOURCE() macro. The macro requires the resource object name, its attributes specified in CoRE link format (here title and observe attributes), as well as functions that handle access to the resource using different CoAP methods. In our case, the resource supports the GET, PUT, and POST methods. Since the DELETE method isn’t allowed, a NULL parameter is given as the sixth argument. The EVENT_RESOURCE() is used to create an observable resource. Hence it also requires defining a method which is called each time the resource state changes. In our case, it is the res_event_handler() method.
EVENT_RESOURCE(res_led3,
               "title=\"LED3\"; obs",
               res_get_handler,
               res_post_put_handler,
               res_post_put_handler,
               NULL,
               res_event_handler
               );
The POST/PUT method handler is implemented by the res_post_put_handler() function. We get a pointer to the payload buffer using REST.get_request_payload() and then check if the first byte is either ‘0’ o ‘1’. If so, we set the LED state accordingly, notify observing clients, and indicate that the resource was changed using the REST.set_response_status() function.
static void
res_post_put_handler(void *request, void *response, uint8_t *buffer,
                     uint16_t preferred_size, int32_t *offset)
{
  const uint8_t *payload;
  REST.get_request_payload(request, &payload);

  if (*payload == '0' || *payload == '1') {
    if (*payload == '1') {
      leds_on(LEDS_3);
    } else {
      leds_off(LEDS_3);
    }
    REST.notify_subscribers(&res_led3);
    REST.set_response_status(response, REST.status.CHANGED);
  } else {
    REST.set_response_status(response, REST.status.BAD_REQUEST);
  }
}
The GET method handler, shown in the snippet above, simply formats the LED state as a single character and places it in the message payload. We also set the response content type to text, so that the client has a better understanding of how to interpret the data inside the CoAP message.
static void
res_get_handler(void *request, void *response, uint8_t *buffer, uint16_t preferred_size, int32_t *offset)
{
  REST.set_header_content_type(response, REST.type.TEXT_PLAIN);
  REST.set_response_payload(response, buffer, snprintf((char *)buffer,     preferred_size, "%d", (leds_get() & LEDS_3) ? 1 : 0));
}
The event handler doesn’t have much to do apart from sending a notification to clients which are observing the resource.
static void
res_event_handler()
{
  REST.notify_subscribers(&res_led3);
}
In order to compile and flash the CoAP server to the DK, execute:
make TARGET=nrf52dk coap-server.flash
Next, make an IPv6 connection to the DK using the procedure described in the previous paragraphs.
- Using Mozilla Firefox as a CoAP client
Once the connection has been established, which is indicated by LED2 being on, we can finally play with it. For this you can use Mozilla Firefox with Copper plug-in. You can simply install the plug-in using Firefox’s extensions menu. The plug-in kicks in automatically whenever you enter a URI that uses the coap:// scheme. After this, a screen similar to the one show in the Figure below will appear.
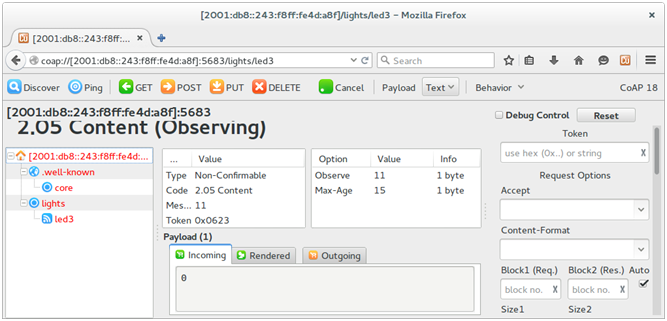
To discover resources provided by the server, click on the device IPv6 address in the Resources tree and then click on the Discover icon. This will read the contents of the .well-known/core resource.
To query the current LED state, simply select it from the Resources tree, and click on the GET icon. To switch the LED on or off, enter 1 or 2 respectively in the Payload field and click on the PUT icon. You can also observe the resource state by selecting it and clicking on the Observe icon.
Conclusion
This post demonstrated how to use the nRF52 port for Contiki OS. We’ve discussed how to write and run simple applications using Contiki OS and the nRF52 DK. We’ve also experimented with running IPv6 over BLE by implementing a simple CoAP server.

-

donhuanvn96
-
Cancel
-
Vote Up
0
Vote Down
-
-
Sign in to reply
-
More
-
Cancel
Comment-

donhuanvn96
-
Cancel
-
Vote Up
0
Vote Down
-
-
Sign in to reply
-
More
-
Cancel
Children