


Last month Nordic released the nRF7002 DK, our first ever Wi-Fi Development Kit (DK), featuring the nRF7002 companion IC. The DK includes everything you would need to test the Wi-Fi capabilities of our new IC, including a 2.4/5 GHz antenna and pins for measuring power consumption.
This blog post aims to help you utilize the power saving features of Wi-Fi 6, and in combination with the Power Profiler Kit II, measure the power consumption of the device when scanning, connecting and sleeping. First we will give an explanation of Target Wake Time, the main power saving features in Wi-Fi 6, and how it compares to legacy power saving mode in Wi-Fi.
Table of Contents
Wi-Fi's power saving techniques
DTIM mode
The main power saving feature introduced in Wi-Fi 6 is Target Wake Time (TWT), which allows devices to spend more time in sleep mode and receive data more deterministically, thereby further reducing power consumption. So how does this feature actually work and how is it different from traditional power saving in Wi-Fi?
A Wi-Fi access point (AP) transmits beacons at an interval known as the beacon interval to inform nearby devices of its existence. The beacons are used by nearby Wi-Fi devices to decide which AP to connect to. The beacon packets can contain a Delivery Traffic Indication Message (DTIM). DTIM is a message the informs devices that the AP has buffered data for that device, and will trigger it to wake up to receive the data. How often a DTIM is sent with a beacon packet is determined by the DTIM period. For instance, a DTIM interval of 2 means every other beacon is sent with a DTIM message.
The beacon and DTIM intervals are usually configurable from the access point. Most routers allow a beacon interval from 20 ms to 1000 ms and a DTIM interval from 1 up to 255.
The higher the DTIM interval, the longer a device can sleep, and the more power it saves. However, the beacon and DTIM intervals are determined by the AP, meaning all devices connected to that AP are all waking up at the same time. And since the AP is only able to communicate with one device at a time, all devices waiting to receive data packets must stay in an idle state until the AP is ready to transmit their data packets to them, which drains the battery. In addition, a higher DTIM interval can decrease the wireless performance.
Target Wake Time
With the introduction of TWT, Wi-Fi devices can individually negotiate when and how frequently to wake up with the AP. Wi-Fi devices can either negotiate their own TWT agreement, or be member of a TWT Broadcast session already existing on the AP. And devices are only required to wake up for the TWT Broadcast sessions that the device belongs to. Additionally, the length of time that a device is permitted to sleep is significantly increased. In theory, a Wi-Fi 6 device can sleep for years without waking up.
TWT is expected to work in alignment with the application running on the device. This means the application should predict the traffic, and make sure that it can be blind to the network for the period for which it is sleeping.
It is also worth mentioning that an AP also usually has limitations on how long it will store buffered messages before they are dropped. This is not dictated by the Wi-Fi specification, but is usually implemented for practicality. If there is a lot of incoming data, and the device is sleeping for extended period, the AP may drop some of the frames. Ideally, applications should not expect incoming data when sleeping in TWT sessions. It is intended for applications that mainly have predictable uplink and downlink data, and not applications that require the device to be responsive to network notifications.
See Operating in power save modes for more information on power saving on the nRF70 Series.
Prerequisites
- nRF Connect SDK, v2.2.9.-dev3, which contains the latest Wi-Fi features
- nRF Connect for Desktop
- nRF7002 DK
- Power Profiler Kit II
- Router that supports Wi-Fi 6, and has TWT feature enabled
Flash the firmware
We will be using the Wi-Fi Shell sample in nRF Connect SDK to send commands to the DK. This is a sample made for testing the Wi-Fi chipset, and supports a number of CLI commands to test various Wi-Fi features.
1. Connect your nRF7002 DK to your computer via a micro USB cable, and select the device in the Programmer application.
2. Build the Wi-Fi Shell sample for the build target nrf7002dk_nrf5340_cpuapp. (See How to build an application from the nRF Connect SDK).
3. Flash the Wi-Fi Shell sample to your DK. (See How to flash an application).
You should now have the Wi-Fi: Shell sample running on your DK.
4. When you have successfully flashed the sample to your device, test this by opening up a terminal window and sending the following command
wifi scan
This will scan and list all the access points in your vicinity.
Measuring power consumption
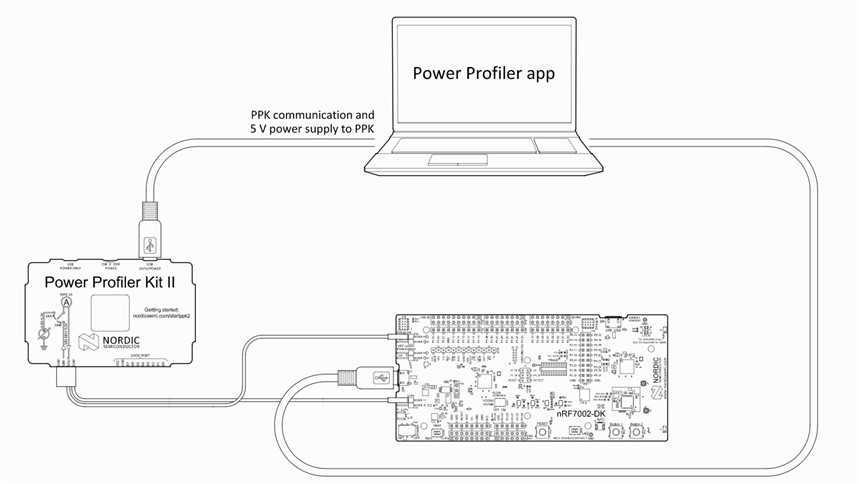
1. Connect the Power Profiler Kit II to the nRF7002 DK, following the instructions in Power profiling.
2. In nRF Connect for Desktop, launch the Power Profiler application.
3. Select source meter, and 3.6 volts.
4. Reset the application.
Scan and connect
Run wifi scan and then wifi connect <SSID> <passphrase> with the information of the access point you want to connect to. The <passphrase> parameter is only needed for secured SSIDs.
The output from the Power Profiler should look something like the following image

You can distinctly see three different stages from the graph, the first one of which occurs twice. Once when we call wifi scan and then again when we call wifi connect.
1. This is the device performing a scan of all the access points in the vicinity. The device scans first on the 2,4 GHz band and then on the 5 GHz band. Notice the small decrease in base RX current, from 60 mA down to 56 mA. 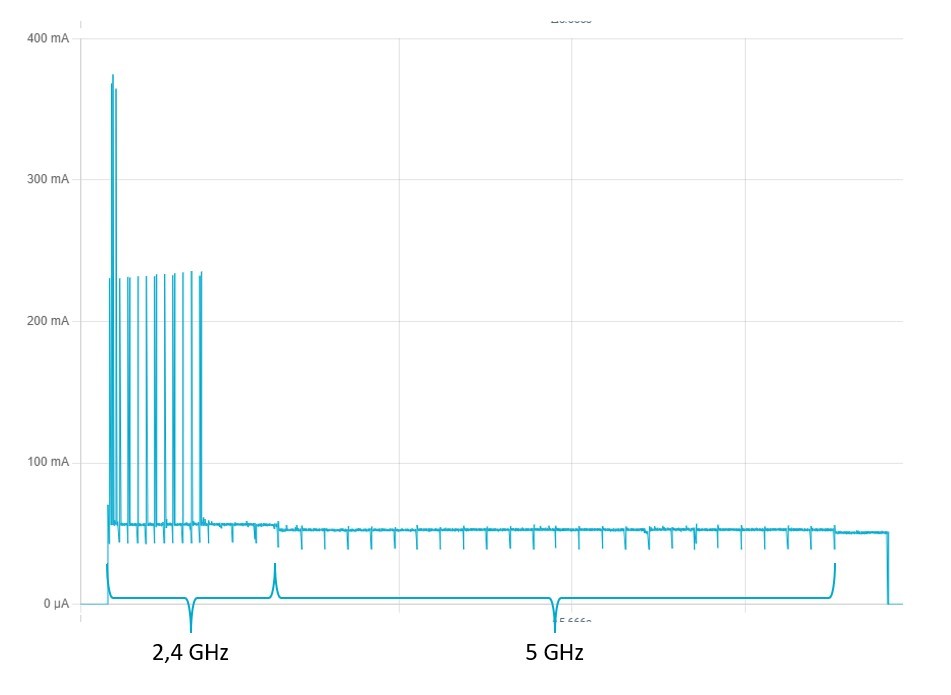
A client can use active scanning or passive scanning, and in this example we see both. On the 2,4 GHz band it is scanning actively by transmitting a probe request and listening for a response from an AP. Then, on the 5 GHz band, it is scanning passively, by listening on each channel for beacons that the AP sends out. Whether it is active or passive depends on the regulatory domain info. Typically, all 2.4 GHz channels are active, and 5 GHz channels are passive by default.
The device also performs a scan after calling wifi connect. This is a prerequisite for connecting, and is necessary to be able to use fresh scan results from the AP instead of using stale results taken before the connection. In this example, the scan process took around 7 seconds and consumed approximately 30 mA.
2. This is the RF calibration. This can consist of up to 250 ms of high current (~213 mA), followed by the connection process to the AP.
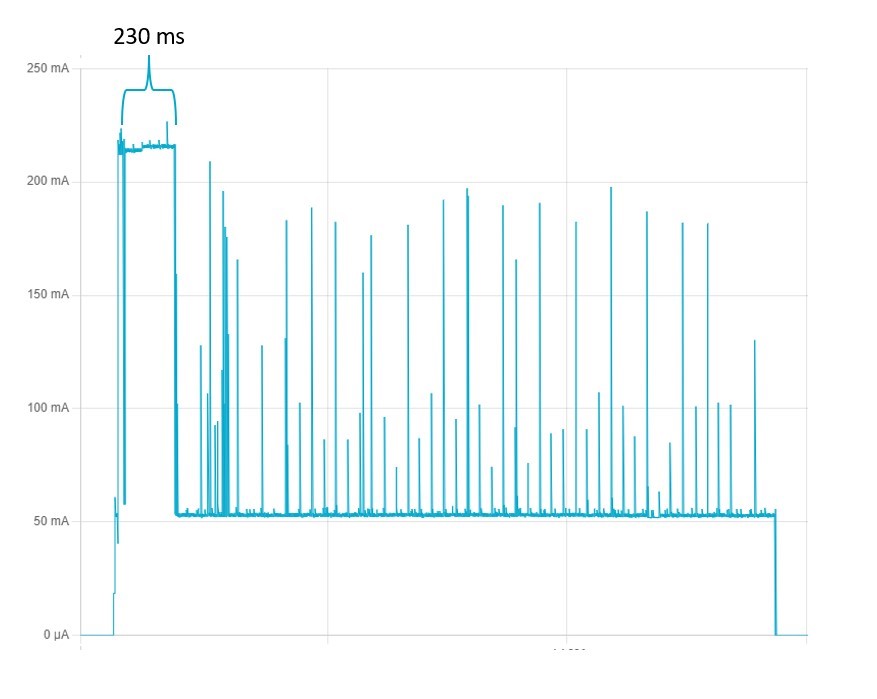
3. This is the device in DTIM mode, the legacy power-saving feature for Wi-Fi. We can see that the device wakes up every 200 ms, indicating that the DTIM period from the AP is 200 ms.
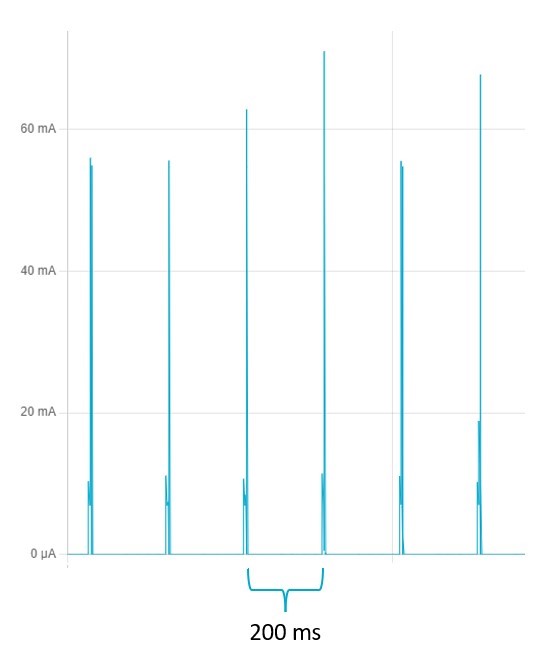
Here we see an average consumption of 2 mA, which can be decreased with a higher DTIM period.
Enabling TWT
The subcommand for managing the TWT is wifi twt.
wifi twt setup will start a TWT session, and wifi twt teardown will teardown the TWT session.
The key parameters here are the TWT Wake Duration, <twt_wake_interval_ms>, which is how long the device will wake for, and the TWT Wake Interval <twt_interval_ms> which is the interval between the TWT wake periods. See Key parameters for a more thorough explanation.
One minute
When the device is connected to your access point, send the following command to enable a TWT period of one minute:
wifi twt setup 0 0 2 2 0 1 1 1 20 60000
Your output should look something like this. Notice the spike as the device enters TWT mode.
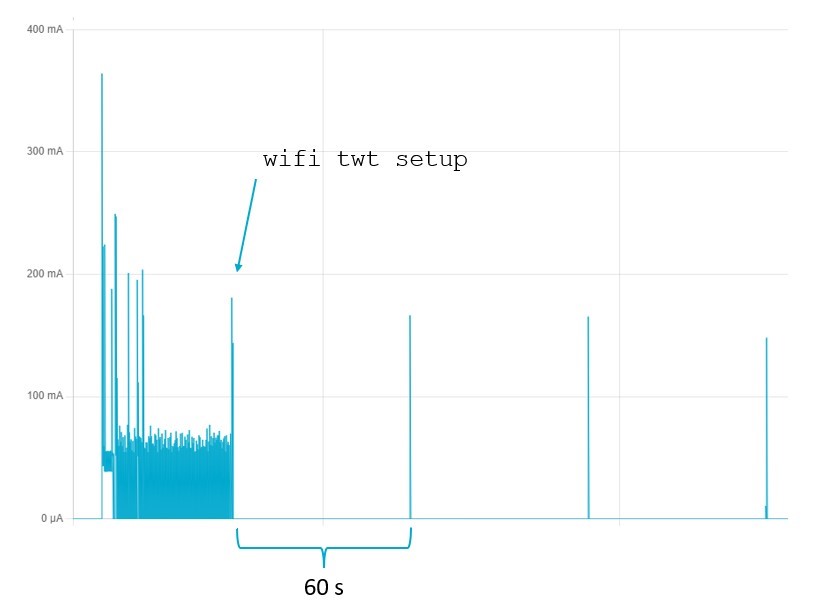
The current consumption now drops to the 15 uA sleep current and wakes up every minute that draws around 40 mA.
Before proceeding to the next step, call the following command to teardown the current TWT flow
wifi twt teardown 0 0 2 2
Alternatively you can call also wifi twt teardown_all.
Five minutes
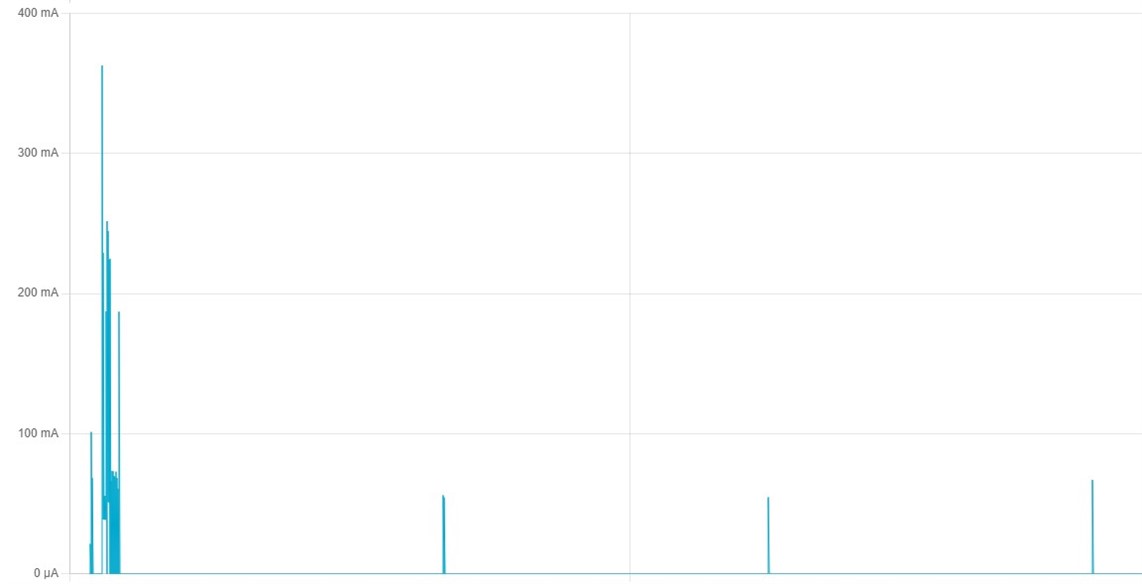
Let’s take a look at increasing the TWT interval to 5 minutes, by sending the following command:
wifi twt setup 0 0 2 2 0 1 1 1 20 300000
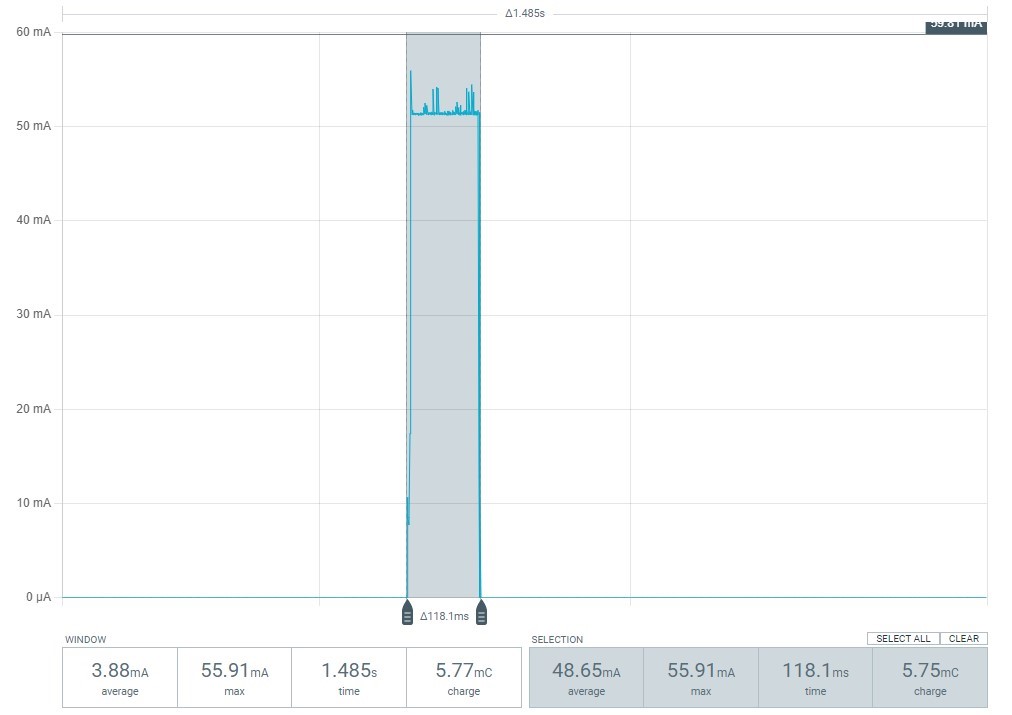
By increasing the TWT interval, the average current consumption decreases by about half, to an average of 28 uA.
You will also notice that when the device wakes, it stays awake for a longer period of time. This is because the device has to resynchronize with the network every time it wakes. This kind of resynchronization by the network is handled automatically by the nRF7002.
When the device is sleeping, it loses the synchronization with the access point. So when it wakes, it must resynchronize before going back to sleep.
Before proceeding to the next step, make sure to teardown the current TWT flow
Ten minutes
Lastly, let’s increase it again to 10 minutes, by sending the following command:
wifi twt setup 0 0 2 2 0 1 1 1 20 600000
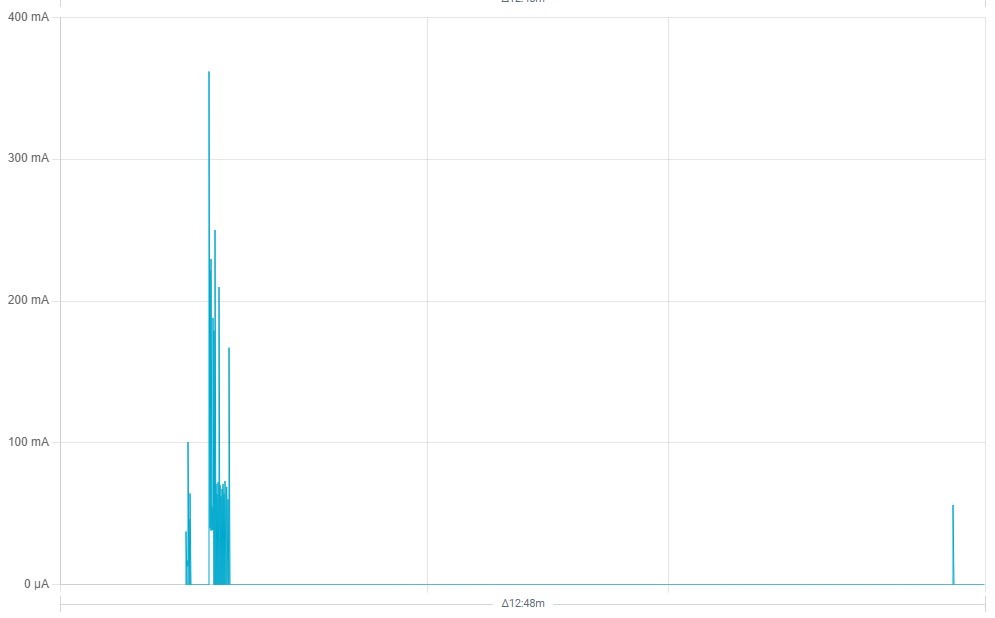 This brings the average current consumption closer to the base current of 15 uA. Here we see an average of 24 uA.
Closing
You can read more about the Wi-Fi protocol here. And check out the other Wi-Fi samples in the nRF Connect SDK and this blogpost to get your nRF7002 DK up and running MQTT over Wi-Fi.
Do you want more content like this? Feel free to like this blog post, and leave a comment below to tell us what you would like to use the new Wi-Fi DK for!

-

drselim
-
Cancel
-
Vote Up
0
Vote Down
-
-
Sign in to reply
-
More
-
Cancel
Comment-

drselim
-
Cancel
-
Vote Up
0
Vote Down
-
-
Sign in to reply
-
More
-
Cancel
Children