Introduction
Storing data is important for analysis and displaying information. Since device messages are stored on the nRF Cloud for 30 days, you have to forward them to another database if you want to store them for a longer time period. This can be done by using a JavaScript object to fetch the messages from the nRF Cloud, and then sending them to a database. This guide presents a working sample, based on JavaScript code from the nRF Beehavior project, where the device messages were fetched from nRF Cloud in order to create graphs of the sensor data. The sample provided let's you connect to the nRF Cloud to retrieve and display the device messages of your cloud device.
If you want to try follow this guide, you will need to setup a cloud device that can send messages to the nRF Cloud, e.g. Thingy:91 or nRF9160 DK. Information on how to make your cloud device send device messages to the nRF Cloud is explained in the sample, nRF9160: nRF Cloud REST Device Message.
The JavaScript object, NRFCloudAPI
In 2019, Nordic made a demo web app called nRF Pizza to demonstrate cellular IoT with the Thingy:91, this includes a JavaScript object called NRFCloudAPI, found in the nrf91-pizza repository. The object uses Fetch API to send HTTPS requests to nRF Cloud, the requests are based on the RESTful API style with GET, POST and DELETE requests.
The sample presented in this guide is a reduced version of the object in the nRF Pizza repository, so only GET requests have been used.
Another important thing to note about the sample is that only one device has been used to send device messages to nRF Cloud, thus we have left the parameter for "deviceId" as ' '. If there are more than one cloud device connected on the team page, then "deviceId" has to be included in the input of the "getMessages" function in order to receive the correct messages.
Using NRFCloudAPI
To make use of the JavaScript code provided, you need
- npm (Node Package Manager), to download the related JavaScript packages
- NodeJS, to compile and run the JavaScript code.
- nRF Cloud API key, a JSON Web Token, to connect and authenticate to the nRF Cloud
First download npm and NodeJS.
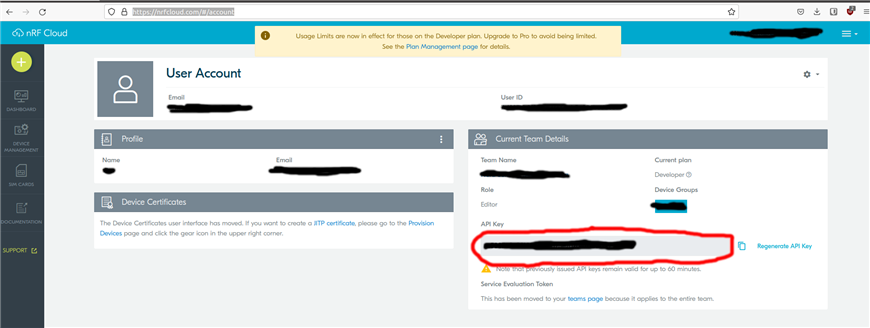
Then log in to your nRF Cloud account, click on the drop-down menu and go to your User Account page, here you can copy your nRF Cloud API key.

After you have copied the API key, you insert it into the nRFCloudAPI variable in the code:
const nRFCloudConnection = new NRFCloudAPI("*INSERT API KEY*");

const messagesPromise = nRFCloudConnection.getMessages().then( (cloudMessageObject) => {
    //Do something with the recieved object, here we print the messages recieved
    for(let objectIndex = 0; objectIndex < cloudMessageObject.total; objectIndex++){
        console.log(cloudMessageObject['items'][objectIndex]['message']);
    }
});
The code above uses the nRFCloudAPI object to fetch messages from the Cloud one time.
If the Thingy:91 sends data to the cloud continuously, then the built-in JavaScript function setInterval can be used to check for messages every cycle time:
const nRFCloudConnection = new NRFCloudAPI("*INSERT API KEY*");
const cycle_time = 5000 //The time for each cycle, here it is 5 seconds

let requestInterval = setInterval(async() => {
    const cloudMessageObject = await nRFCloudConnection.getMessages('');
    // Do something with the items
    for(let objectIndex = 0; objectIndex < cloudMessageObject.total; objectIndex++){
        console.log(cloudMessageObject['items'][objectIndex]['message']);
    }
},  cycle_time);
In the code snippet above we check for new messages every 5 seconds, but this is not necessarily ideal. If the cloud device only sends a message every 10 minutes, then a more appropriate cycle time would be 10 minutes.
Avoiding duplicates
When receiving messages, there are instances where you can collect the same message multiple times, which creates duplicates in the database. This can happen for instance when the code is intermittently stopped and started again.
The reason why this happens is because of the "getMessages" function. The first three lines of the function defines the timestamps that are used in the GET request's endpoint, and the problem arises because of the initialization of the variable "start". If "start" is not initialized, the function takes the end-time and subtracts 100 seconds from it, so whenever the code is restarted, you have the risk of receiving an overlap between messages received before the code was restarted and messages receiver after the code was started again.
A quick fix to this is changing the "getMessages" function to include another input parameter based on the last message received on the nRF Cloud:
getMessages(deviceId, startTime) {
        //startTime is the time of the last received message on the nRF Cloud.
        //In this case used to filter out potential duplicates.
            const end = new Date();
            const start = this.getMessages_start || new Date(filterTime);
            this.getMessages_start = new Date();
            const devIdsParam = deviceId ? `&deviceIdentifiers=${deviceId}` : '';
        //Return the endpoint of the device to connect it to the cloud:
            return this.get(`/messages?inclusiveStart=${start.toISOString()}&exclusiveEnd=${end.toISOString()}${devIdsParam}&pageLimit=100`);
        }
Related to the Beehavior Monitoring project, if the messages sent from the nRF91 Series device also includes a timestamp, then it is important to note that the JavaScript object will return two completely different timestamps. One of the timestamps will be from the original message, the other will be related to when the nRF Cloud recieved the message. To see the last timestamp, change ['message'] to ['receivedAt'] in the examples above.
To avoid duplicates we have to look at the time when the last message was received, and to do this we have to fetch the messages from the nRF Cloud to check their timestamps. The problem with implementing this solution is that we first have to fetch the messages, thus startTime is not defined, and the code will crash. We solved this by making a new instance in our database for storing the timestamps of the last received messages from the nRF Cloud, and before the function getMessages was called, we fetched the last received timestamp from our database, and then initialized startTime as this timestamp. It was a cumbersome fix, but it solved our duplicate problem.
Output
Below is an example of a cloud message sent from a nRF9160 DK.
For the Beehavior monitoring project, lines 5 through 13 were extracted, which gives temperature, humidity, battery percentage, air quality and time in seconds since epoch the sensor data was measured.
{
  topic: 'prod/<team-id>/m/d/<device-id>/d2c',
  deviceId: '<device-id>',
  receivedAt: '2022-10-13T09:16:14.562Z',
  message: {
    TEMP: 23,
    HUMID: 40,
    BTRY: 100,
    appID: 'Thingy',
    AIR: 99.87,
    TIME: 1665652513,
    NAME: 'Hive1'
  },
  tenantId: '<team-id>'
}
Project
The sample can be found here:
Further reading
If a graphical method is preferred, then Mariano Goluboff made a blog post about using the Postman Client.
You can read it here: nRF Cloud REST API and configuring the Asset Tracker v2 application.


