nrf52840 DK description and schematic do not agree for external debug port P19

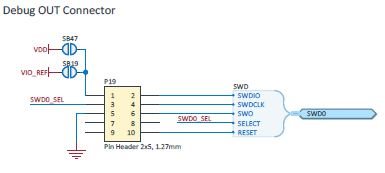
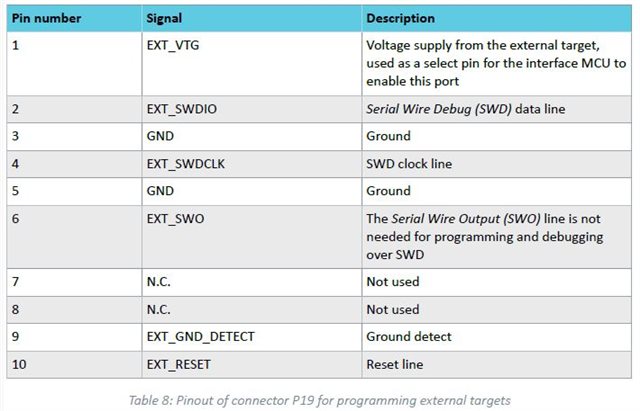
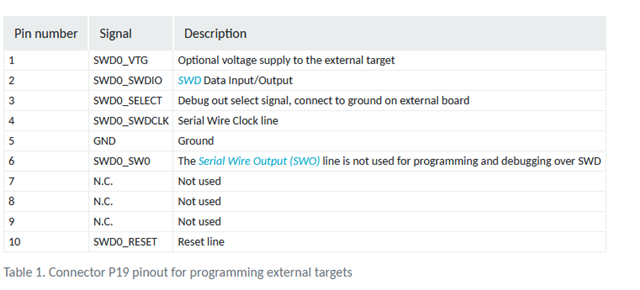
I am attempting to connect my nrf52840/52811 DK to my custom PCB that contains nrf52840. The DK users guide describe the connections on the P19 debug out port but I can see on the schematic for the DK that something is incorrect. Specifically, the UG says that Pin1 is "EXT_VTG" and is used to select this port for debugging by connecting a 3V level. The schematic shows pin1 as an optional "power out" to my custom PCB and is not connected to anything if I don't short one of the two solder bridges. Also, the schematic shows that pin 3 is a "select" pin while the UG claims that this is GND. The UG also says that pin 9 is an "EXT_GND_SEL" but doesn't explain what this is for!

Can anyone tell me the correct pin functions for this port and also confirm that the "select" function is done with a 3V level? It would have made more sense to me to have the "select" function done with a connection to ground so just want to make sure I have that right!

Parents
  • The nRF52840 DK user guide hasn't been updated to match the latest DK version. You can check out the nRF52 DK user guide for how to use P19/P20 for programming external targets. Note that the external target must have same operating voltage as the DK.

  • Thank you for the information. I looked at the nRF52DK UG and the section on "DEBUG OUT" does not have much detail. It does say that "If the interface MCU detects target power on both P19 and P20, it will by default program/debug the target connected to P19" but then it doesn't tell me which pins I use to apply this 3V to. I thought that maybe they just copied the standard J-Link interface but that doesn't seem to have any pin assigned to a power source. I am surprised that Nordic would be providing a piece of hardware (the nRF52840 DK) but not also provide an accurate description of how to use it. I would be a bit leery of using the description obtained from a different piece of hardware; especially now that I know that the documentation provided by Nordic is a bit "sloppy"! I don't want to start applying power randomly to pins since that could cause the magic smoke to leave my hardware!

  • Also, since the published nRF52840/52811 DK Users Guide is not accurate, can you please let me know the current method that allows me to set the system operating voltage for the DK? My custom PCB runs on 3.0V so I will need to change the DK to match so my debug signals are the correct level.

  • Please also confirm that I must apply a 'high" level on pin3 of the interface to "select" the debug out function.

  • If you run the board in "VDD" mode then the voltage will be 3V. If you move to USB or Li-Po then the voltage will be controlled by the regulator setting in the target device on the DK, default is 1.8V but that can be changed by the SW in the device.

    When using the 10 pin header P19

    When using the 8 pin header P20

  • Thank you for the updated pin description table. I would encourage you to press Nordic to update the online version of the DK User Guide so other users will not have the same experience as me! Much time and money has been wasted by this inaccurate information!

    One last question (hopefully) that has not been answered: is the 'reset' active high or active low? This information should be added to the UG as well.

  • The nRF52840 has an active-low reset pin.

    Kenneth

Reply Children
  • Hi Kenneth. Yes, that is true. However, the signals routed to the Debug Out connector come from the "interface MCU" so they could potentially be either polarity. I suspect that it is an active-low, but nowhere in the literature is this explicitly stated. I have it currently connected as an active low, and since I also now have the "select" line pulled low (instead of high as all the published documentation tells me), I can now program the part on my custom PCB. I am still having issues getting the debugger to start but I think I may need to adjust my RC values on the reset line for faster response. That's todays project!

  • I can confirm that the reset signal is active low. I monitored on the scope while the system was programming and configuring and it normally sits high with an occasional drop to low.

Related