Controlling GPIO on a common port from two different cores

We have
nRF54H20DK (rev. 0.9.1), SDK: v2.9.0-nRF54H20-1 and the same Toolchain, IDE: VSCode + nRF Connect plugin

We need to control the GPIO LEDs from two cores (P9.00, P9.01 on the APP core and P9.02, P9.03 on the RAD core), i.e. on the same port - does this mean that the GPIO drivers on the cores must use the same memory? 

Here are the "overlapping" visualizations that indicate possible conflicts when all LED control is enabled on both cores.

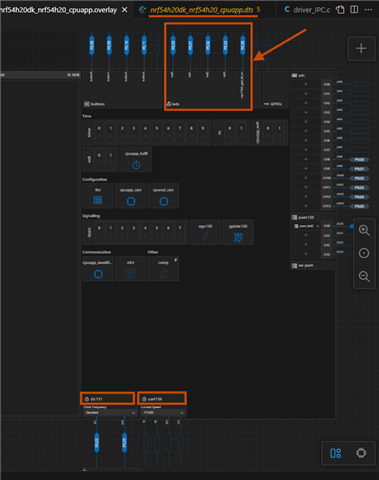
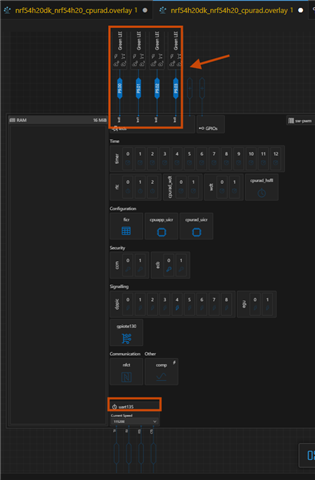
Is this possible? If so, how do I need to configure the "overlay" and prj.conf files for both cores?

Br, KeySoft

Parents
  • Hello,

    According to documentation (Configuring your application for a custom PCB)

    ''The application might require board overlays for multiple cores. In this case, ensure that these overlays are consistent with each other.'' For both cores you need separate prj.conf file and device tree overlay file.

    For example: For application core,

    / {
        leds {
            compatible = "gpio-leds";
            led0: led_0 {
                gpios = <&gpio9 0 GPIO_ACTIVE_LOW>;
                label = "LED0";
            };
            led1: led_1 {
                gpios = <&gpio9 1 GPIO_ACTIVE_LOW>;
                label = "LED1";
            };
        };
    };

    For radio core

    / {
        leds {
            compatible = "gpio-leds";
            led2: led_2 {
                gpios = <&gpio9 2 GPIO_ACTIVE_LOW>;
                label = "LED2";
            };
            led3: led_3 {
                gpios = <&gpio9 3 GPIO_ACTIVE_LOW>;
                label = "LED3";
            };
        };
    };

    Make sure you project config file has CONFIG_GPIO=y set.

  • Hello,

    Thanks for the reply. I tried this "overlay" option before asking. I think for APP core it is necessary to disable the nodes for led2 and led3 because in the "dts" file they are enabled by default for APP. Is that right?

    Br, KeySoft

  • Hello,

    Yes. It is right

    You need to delete the property and disable the specific leds.

    / {
        aliases {
            /delete-property/ led2;
            /delete-property/ led3;
        };
    };
    
    &led2 {
        status = "disabled";
    };
    
    &led3 {
        status = "disabled";
    };

    Alternatively, you can only delete the property and then define your used leds in the device tree overlay

    / {
        aliases {
            /delete-property/ led2;
            /delete-property/ led3;
        };
        
        leds {
            compatible = "gpio-leds";
            led0: led_0 {
                gpios = <&gpio9 0 GPIO_ACTIVE_LOW>;
                label = "LED0";
            };
            led1: led_1 {
                gpios = <&gpio9 1 GPIO_ACTIVE_LOW>;
                label = "LED1";
            };
        };
    };

Reply
  • Hello,

    Yes. It is right

    You need to delete the property and disable the specific leds.

    / {
        aliases {
            /delete-property/ led2;
            /delete-property/ led3;
        };
    };
    
    &led2 {
        status = "disabled";
    };
    
    &led3 {
        status = "disabled";
    };

    Alternatively, you can only delete the property and then define your used leds in the device tree overlay

    / {
        aliases {
            /delete-property/ led2;
            /delete-property/ led3;
        };
        
        leds {
            compatible = "gpio-leds";
            led0: led_0 {
                gpios = <&gpio9 0 GPIO_ACTIVE_LOW>;
                label = "LED0";
            };
            led1: led_1 {
                gpios = <&gpio9 1 GPIO_ACTIVE_LOW>;
                label = "LED1";
            };
        };
    };

Children
No Data
Related