Definitive guide on measuring current using PPK2 + nRF 52833 DK

Hi, 

I have read the PPK2 user guide here https://docs.nordicsemi.com/bundle/ug_ppk2/page/UG/ppk/PPK_user_guide_Intro.html and the nRF 52833 DK here docs.nordicsemi.com/.../hw_measure_current.html

But I cannot find a definitive set up guide on how to configure the PPK2 and the nRF 52833 DK in order to get an accurate reading for current usage of the SOC. 

By Nordic's own admission here (NRF52840DK + PPK2 - Nordic Q&A - Nordic DevZone - Nordic DevZone

"the PPK2 user guide. Unfortunately it only tells you how to correctly connect to an nRF91 DK (we're working on improving this)"

This was 4 years ago and I've not found any update. 

I have found confusing information on these pages relating to the use of 

EXT Supply

SW10

SW6

SW9

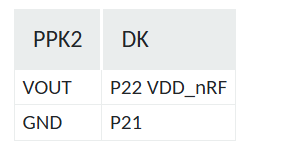
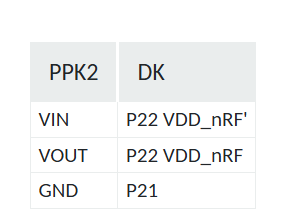
Jumpers on P22 / cut tracks SB 40

Whether the USB should be connected or not. 

I would be most grateful if you could make the set up clear such that a simple firmware guy like me can perform the current measurement tests. 

Many thanks

Ian 

  • Hi Ian,

    The procedure is as follows:

    Cut the solder bridge SB40 as mentioned here: Set up the DK 

    You can either use the Ampere meter mode or source meter mode to measure the current. For Source meter mode make the following connection (Refer:Measuring current in Source Meter mode):

    And for Ampere meter mode, the connection is as follows (Refer:Measuring current in Ampere Meter mode):

    The board must be powered using an external power source (like usb, coin cell, etc.) when using the Ampere meter mode.

    Regards,

    Swathy

  • Thank you Swathy,

    Please can you confirm SW6, SW9 and SW10 positions as these are not mentioned in any of the URLs you have provided (which I had already read) or in your reply above.

    Regards

    Ian 

  • In the absence of any further reply from Swathy, I thought others may find this useful as we worked it out for ourselves. 

    Connect the PPK II to the DK as shown in the image:

    1- From P1 on the PPK II:
       Black → GND
       Brown → P22 (VDD_nRF – the pin farthest from the USB connector)
       Red → P22 (VDD_nRF – the pin closest to the USB connector)
    2- Set SW6 to “nRF ONLY”.
    3- Leave SW9 in the middle position (VDD on-board).
    4- Leave SW10 in the off position.
    5- Power the board by connecting a USB cable.
    6-In the Power Profiler app, set the device to Ammeter mode, enable, and press Start to begin measuring current.

    #include <zephyr/kernel.h>
    #include <zephyr/sys/poweroff.h>
    #include <zephyr/drivers/gpio.h>
    
    static const struct gpio_dt_spec led = GPIO_DT_SPEC_GET(DT_ALIAS(led0), gpios);
    
    
    int main(void)
    {
        int ret;
    	bool led_state = true;
    
    	if (!gpio_is_ready_dt(&led)) {
    		return 0;
    	}
    
    	ret = gpio_pin_configure_dt(&led, GPIO_OUTPUT_ACTIVE);
    	if (ret < 0) {
    		return 0;
    	}
    
        for(int i=0; i < 10; i++)
        {
            gpio_pin_toggle_dt(&led);
            led_state = !led_state;
    		k_msleep(200);
        }
    
        gpio_pin_configure_dt(&led, GPIO_DISCONNECTED);


        // Minimal init only
        k_sleep(K_FOREVER);
        // or: sys_poweroff();
    
        return 0; 
    }

Related