I am using nRF Connect SDK 3.2.1 and Toolchain 3.2.1. The hardware I am using is the nRF52840DK and a custom board with the Raytac MDBT50Q-P1MV2 - which contains the nRF52840. I created a custom board in the SDK and built a program that blinks an onboard LED on the custom board. The program builds without error, but when I try to flash the code to the custom board I get the following error - Device error: Setting the debug port SELECT register failed while powering up sys and debug regions (Unknown error in the J-Link DLL (error code =-1)). I saw a similar question 4 months ago, but no solution was ever obtained (or if it was the developer never replied). My custom board is powered by a 3.3V LDO regulator that is powered by a 3.8V power supply. The SWD setup uses a 10 pin connector with with pinout: 1: VCC= 3.3V supplied from LDO regulator, 2: SWDIO, 3: GND, 4: SWCLK, 5: GND, 6:SWO, 7: GND, 8: N/C, 9: GND. 10: nRESET. I use a ribbon cable with connectors purchased from Adafruit for the J-Link edu mini to connect my board to the DK Debug Out port P19. When I power my board and connect it to the DK, I see the following voltages on some pins I can access: On SCL and SDA pins I see 2.3V; On SDIO I see 3V. On SWCLK I see 0V. (One odd thing is if I power my board and do not connect it to the DK, I see a 1.6V, 260uS pulse every 34mS on the SWDIO line - so about 30Hz)
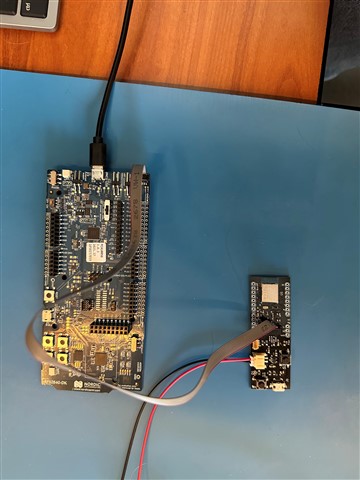
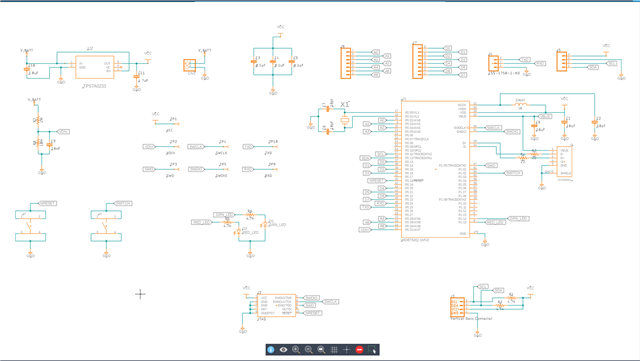
I designed the board (based on the Adafruit nRF52840 feather and assembled it myself. This is the first time I've used the Raytac module, so I don't know exactly how to prove it is working correctly before flashing it. I have attached a picture of the flashing setup - my board and the SDK with ribbon connector, and a picture of my schematic for reference. Here is the text from the Output and Terminal windows in nRF Connect extension for VS Code:
Output
[13:47:34] build --build-dir c:/myfw/protoboard/button/build --domain button
[13:47:36] Success.
[13:47:40] flash -d c:\myfw\protoboard\button\build --domain button --dev-id 1050257059
[13:47:42] Failure (code 1).
Terminal
* Executing task: nRF Connect: Build [incremental]: button/build/button
Building button
west build --build-dir c:/myfw/protoboard/button/build --domain button
-- west build: building domain(s): button
ninja: no work to do.
* Terminal will be reused by tasks, press any key to close it.
* Executing task: nRF Connect: Flash: button/build/button
Flashing button to nRF52840 DK
west flash -d c:\myfw\protoboard\button\build --domain button --dev-id 1050257059
-- west flash: rebuilding
[0/5] Performing build step for 'button'
ninja: no work to do.
[4/5] cmd.exe /C "cd /D C:\myfw\protoboard\button\build\_sysbuild && C:\ncs\toolchains\66cdf9b75e\opt\bin\cmake.exe -E true"
-- west flash: using runner nrfutil
-- runners.nrfutil: reset after flashing requested
-- runners.nrfutil: Flashing file: C:\myfw\protoboard\button\build\merged.hex
-- runners.nrfutil: Connecting to probe
Error: One or more batch tasks failed:
* 1050257059: Device error: Setting the debug port SELECT register failed while powering up sys and debug regions (Unknown Error in J-Link DLL (error code =-1)).
This might indicate that the debug port is unavailable. Please double-check device power sFATAL ERROR: command exited with status 1: nrfutil --json device x-execute-batch --batch-path 'C:\myfw\protoboard\button\build\button\zephyr\generated_nrfutil_batch.json' --serial-number 1050257059
* The terminal process terminated with exit code: 1.
* Terminal will be reused by tasks, press any key to close it.
Appreciate your expert review and advice,
Lonnie