This post is older than 2 years and might not be relevant anymore
More Info: Consider searching for newer posts

Mesh Elements Subscribe of Proxy Light Switch Client can't receive 2nd Publish of Proxy Light Switch Server


Hi ~

   SDK: nrf5_SDK_for_Mesh_v2_0_1 's ligth switch proxy client & proxy server
   IDEs : SEGGER Embedded Studio for ARM
              Release 3.40  Build 2018052200.36079
              Windows x64

   SoftDevices : s132_nrf52_6.0.0_softdevice
   Computer platform : Windows10
   hardware revisions : PCA10040 V1.1.0

  Element 0x0004 can't receive Element 0x0002 As shown.
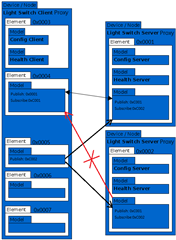
Parents Reply Children
  • Hi Mttrinh,

    Step1: Program s140_nrf52_6.0.0_softdevice.hex and light_switch_proxy_client_nrf52840_xxAA_s140_6.0.0.hex to PCA10056, that call it A.
    Step2: Program s132_nrf52_6.0.0_softdevice.hex and light_switch_proxy_server_nrf52832_xxAA_s132_6.0.0.hex to two PCA10040s, that call it B and C.
    Step3: A and B trun off, C trun on.
    Step4: Open nRF Mesh for Andriod APP , that call it APP , Press Scanner in APP.
    Step5: Find "nRF5x Mesh Light" in APP , that Press it.
    Step6: Then press "PROVISION" in APP .
    Step7: Wait for "Confguration Complete" in APP, that press "OK" in APP.
    Step8: A and C trun off, B trun on.
    Step9: Press Scanner in APP.
    Step10: Find "nRF5x Mesh Light" in APP , that Press it.
    Step11: Then press "PROVISION" in APP .
    Step12: Wait for "Confguration Complete" in APP, that press "OK" in APP.
    Step13: B and C trun off, A trun on.
    Step14: Press Scanner in APP.
    Step15: Find "nRF5x Mesh Switch" in APP , that Press it.
    Step16: Then press "PROVISION" in APP .
    Step17: Wait for "Confguration Complete" in APP, that press "OK" in APP.
    Step18: Press "Network" in APP , You will get  .
    Step19: A and B,C trun on.
    Step20: Press "CONFIGURE" in APP at C.
    Step21: Press "Element : 0001" in APP , then Press "Vendor Model" in APP.
    Step22: Then Press "BIND KEY" in APP, then Press "App Key 1".
    Step23: Press "SET PUBLISH ADDRESS" in APP, Key in "C001" then Press "OK".
    Step24: Press "SUBSCRIBE" in APP, Key in "C002" then Press "OK".
    Step25: Press "<-" , then press "<-" , Back to Network.
    Step26: Press "CONFIGURE" in APP at B.
    Step27: Press "Element : 0002" in APP , then Press "Vendor Model" in APP.
    Step28: Then Press "BIND KEY" in APP, then Press "App Key 1".
    Step29: Press "SET PUBLISH ADDRESS" in APP, Key in "C001" then Press "OK".
    Step30: Press "SUBSCRIBE" in APP, Key in "C002" then Press "OK".
    Step31: Press "<-" , then press "<-" , Back to Network.
    Step32: Press "CONFIGURE" in APP at A.
    Step33: Press "Element : 0004" in APP , then Press "Vendor Model" in APP.
    Step34: Then Press "BIND KEY" in APP, then Press "App Key 1".
    Step35: Press "SET PUBLISH ADDRESS" in APP, Key in "0001" then Press "OK".
    Step36: Press "SUBSCRIBE" in APP, Key in "C001" then Press "OK".
    Step37: Press "<-" , Back to Node Configuration.
    Step38: Press "Element : 0006" in APP , then Press "Vendor Model" in APP.
    Step39: Then Press "BIND KEY" in APP, then Press "App Key 1".
    Step40: Press "SET PUBLISH ADDRESS" in APP, Key in "C002" then Press "OK".
    Step41: Press "Button 3" in A, watch B and C LED1 state , is good.
    Step42: Press "Button 1" in C, watch A LED1 state, is good.
    Step43: Press "Button 1" in B, watch A LED1 state, is no good.
    as "question 001.png" , sorry "Element : 0005" change "Element : 0006".

    Step44: Back to Network.
    Step45: Press "CONFIGURE" in APP at A.
    Step46: Press "Element : 0004" in APP , then Press "Vendor Model" in APP.
    Step47: Press "SET PUBLISH ADDRESS" in APP, Key in "0002" then Press "OK".
    Step48: Press "Button 3" in A, watch B and C LED1 state , is good.
    Step49: Press "Button 1" in C, watch A LED1 state, is no good.
    Step50: Press "Button 1" in B, watch A LED1 state, is good.
    as "question 002.png" , sorry "Element : 0005" change "Element : 0006".

    How do I get A's Subscribe to receive all the Publish?

Related