This post is older than 2 years and might not be relevant anymore
More Info: Consider searching for newer posts

NRF52 dongle.... can't program with Segger (No idcode Error) after JLink Erase All

Hi All,

I have been busy trying to get my application programmed onto my NRF52 dongle by using the Nordic NRF52 DK board as a Segger debug/programming interface. All was going well and I managed to program the board with the 'blinky' example written especially for the  PCA10059.

Unfortunately though whilst trying to put my real application onto the target I went into JLINK and did an 'Erase All'.... now when I go into Segger studio and try to program the device with the blinky I get 

Is there a way to 'unbrick' my device??.... I have read a few suggestions on the forum but nothing has worked so far - I've tried using nRF MDK tools and running

> nrfjprog --recover

but I got :

If I put a new NRF52 donge in place of the origonal I can happily program the blinky code - so I know the JTAG interface and the method works okay.

Any help would be appreciated to try and unbrick the device

Cheers

Michael

  • Hi Bjørn

    Thanks for the above information and the support you are giving me on this.

    If I have the dongle plugged into my laptop or a usb hub then the Jlink fails to communicate correctly. The only way to get reliable communication now that I have done an 'erase all' is to plug the device into a USB power adaptor (I am using one from an Amazon Echo).

    I Have  three dongles available to me and all three are showing different results for the same method connect to the NRF52840 DK via the JLink TAG interface,

    • connect power to the dongle via USB power adaptor,
    • Open segger IDE with the blinky (peripheral version),
    • Target>ConnectJ-Link, 
    • Target>Erase-All, 
    • Target> DownLoad blinky_PCA10059_mbr

    Dongle 1: The unit connects okay, erases okay and programs okay - the blink light sequence starts once programmed (This is the only fully working dongle I have)

    Dongle 2: The unit connects okay, But when I try to erase all it comes up with an error saying "Failed to restore target. RAMCode never stops"

    Note: I tried using the nRFgo Studio application and did an 'erase all' - this did not return  the  "Failed to restore target. RAMCode never stops". I went back into segger studio and once again tried the erase and found that this time there was no error, plus the chip would program and start to execute the blinky code as expected. (so at this point I now have two working dongles)

    Dongle 3:  The unit connects okay, erases okay and programs okay - Once programming has finished the the blink light sequence never starts (all lights are out).

    Although this device seems to erase, program and verify correctly it just doesn't run/execute the code - (as the method is the same for all of them (Note-I have tried to use nRFgo Studio application and did an 'erase all' but this hasn't helped for this dongle)...  any ideas  ??

    I had a look in the DFU Open_bootloader file section but there didn't seem to be a hex file. When I open the project with Segger studio and try and compile I get an error about the keys... 

    #error "Debug public key not valid for production. Please see github.com/.../README.md to generate it"

    I need to look into this further to get my head around the requirements for the DFU (one problem at a time) - can I ask what the difference is between the open_bootloader 'pca10059_usb' and the 'pca10059_usb_debug' is??

    An help on the dongle 3 will be appreciated

    Cheers

    Michael

  • Hi Bjørn

    I have discovered that when I am trying to program the dongles (Via the external target Jlink pass through on the nRF52 DK), that I am actually (unwittingly) programming the target device on the DK board and not the dongle - it looks as though this is caused by the 0V detection circuit not working (which is used by the DK to change to an external target).... If I plug the dongle into my PCs USB port instead of the USB power adaptor it all programs and runs fine. Probably something to do with the USB power adaptor having an isolated 0V, so the DK doesn't detect the need for an external Jtag swap over

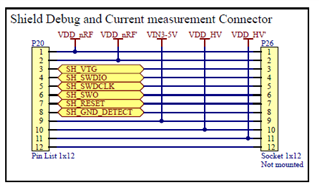
    My connection from the PCA00156 DK's P20 port to the PCA10059 dongle is as follows:


    Do you see any problem with this wiring or how it could be improved to make sure erasing and programming functions correctly independently of where the USB power derives from ??

    I have no connection to Pin 5 (VBUS) of J2 on the dongle.... does this cause a problem??

    Cheers

    Michael

  • Hi Michael,

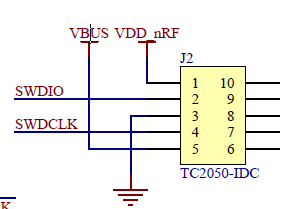
    Very sorry for the delayed response. You can download the HW files of the dongle & 52840 dev kit here & here. The version should be written the back of the dongle & the top of the interface MCU on the 52840 dev kit. I believe you could use J2 on the dongle, but as you can see from the image below, you would need to use the VBUS voltage from the usb like you have mentioned to program the dongle:

    Here is the P20 snapshot for reference:

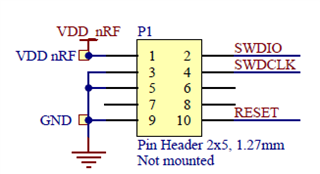
    If you use the P1 port instead, I believe it might be a bit easier, as you do not require the VBUS voltage:

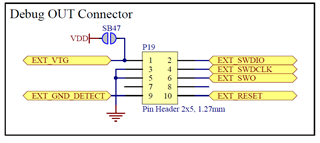
    Here is a snapshot of the debug out connector on the pca10056 dev kit for reference:

    Also, if you take a look at the infocenter documentation, you can see this text at the bottom:

    "If it is inconvenient to have a separate power supply on the external board, the nRF52840 DK board can supply power through the Debug out connector (P19). To enable this, short solder bridge SB47. Note that as long as SB47 is shorted, it is not possible to program the onboard nRF52840 SoC even if the external board is unplugged. "

    I would try using P19 on the dev kit along with the P1 connector on the dongle if you can. I believe that might be easier than using J2 on the dongle.

    Kind Regards,

    Bjørn

Related