Beware that this post is related to an SDK in maintenance mode
More Info: Consider nRF Connect SDK for new designs
This post is older than 2 years and might not be relevant anymore
More Info: Consider searching for newer posts

Bootloader on custom board using uart

Hi,

We have developed a customized board for use in a gateway. We would like to have a working bootloader on that board but it looks like it is almost impossible to make things work.

We are using nRF5 SDK version 15.0.0. I have tested the secure_dfu_test_images for nrf52840 on a PCA10056 board and they do not work as expected, so perhaps I was foolish to think that it would make any difference adapting the secure uart example for our board.

I have tested the uart example on both boards and they work perfectly so there is nothing wrong with the hardware (at least the uart is working properly). I have tried various baudrates since one support case suggested a baudrate of 9600 instead of the 115200 which is default in the bootloader example. I have also read most of the other support cases concerning the dfu and I have not found anything that could explain the problems that I see. I have also altered the python code to make the default baudrate 9600 but I cannot understand how to create a new version of nrfutil. However I assume that using the -b 9600 argument makes those changes unnecessary. 

When trying to upload a new application to the board I get the following response:

pc_ble_driver_py.exceptions.NordicSemiException: No ping response after opening COM port

I have nrfutil version 3.5.1 (some support cases suggests exactly version 3.0.0 while others say >= 3.0.0).

Now I am out of ideas to try and fix this. Any ideas and/or suggestions?

If it does not work with nrfutil, how am I going to write a similar software to use inside the gateway? Is there a detailed specification for the protocol used by the bootloader/nrfutil? In that case where? (Yes, I know - RTFM, but the documentation is really fragmentet in certain parts and it is far from easy to know where to look).

Best regards

Anders

Parents
  • Hi Anders.

    When you say you have tested the secure_dfu_test_images for nRF52840, could you be a bit more specific? Which files have you flashed to your board? Did you follow any of the DFU bootloader examples and if you did, which example?

    You also say you tested the uart example, which UART example? The one found in examples\dfu\secure_dfu_test_images\uart, or in examples\ble_peripheral\ble_app_uart?

    Any more information would be much helpful, so I can try to recreate what you're doing.

    - Andreas

  • Hi Andreas,

    I used the files under ..\examples\dfu\secure_dfu_test_images\uart\nrf52840 and I am using nrfutil.exe version 3.5.1 (which I found on my computer because downloading and the master branch using pip install nrfutil produces som very strange failures probably due to python version mismatch) and nrfjprog.

    I am using several batch files containing the following content

    nrfjprog --eraseall

    nrfjprog --reset --program bootloader_secure_uart_debug_without_bonds_mbr.hex --family NRF52 --sectoranduicrerase

    nrfjprog --reset --program mbr.hex --family NRF52 --sectoranduicrerase

    nrfjprog --reset --program softdevice_s140.hex --family NRF52 --sectoranduicrerase

    nrfutil dfu serial -pkg blinky_mbr.zip -p COM3 -b 115200 -fc 0

    Using the instructions found on http://infocenter.nordicsemi.com/index.jsp?topic=%2Fcom.nordic.infocenter.sdk5.v15.0.0%2Fsdk_app_serial_dfu_bootloader.html&cp=4_0_0_4_3_4
    w
    hich by the way is difficult to follow since the instructions are intended for other uses. Which of the points needs to be done in order to test the bootloader? 1? 2? 3? 4? 5? 6? 7? 8? 9? 10?

    The uart has been tested with ..\examples\peripheral\uart\pca10056\blank\ses both using the original board (PCA10056) and with my custom board, and it works every time.

    We are using an FTDI cable to connect the devices to the PC and we are not using flow control since it is not available on our custom board, so only GND, RX and TX are used.

    I have tried debugging the bootloader while trying to download the application and it appears that the ping is received in the bootloader and it is replying as expected. Altering the copmmand line to add "-fc 0" did actually do someting for the result from nrfutil. It then became:

    pc_ble_driver_py.exceptions.NordicSemiException: Extended Error 0x07: The array of supported SoftDevices for the update does not contain the FWID of the current SoftDevice.

    Which may be a good thing since it no longer complains about no response from ping. I have not yet been able to make a package that does not contain an "--sd-req". This is strange because neither the bootloader nor the application depends on having a softdevice (why is it even included in the "secure_dfu_test_images"?). How can I create that zip file without having to tell nrfutil the version of the soft device when I do not want any soft device?

    If I get this bootloader up and running, which I firmly believes that I already have,  there is still a problem on how to create a similar functionality (working that is) like that of nrfutil to be able to download new software over the uart using C-code in a gateway. For that I would like to have som specifications on the protocol...

    Addition:

    Just noted one thing in ReadMe.md "**Note**: The Thread stack doesn't use a SoftDevice but --sd-req option is required for compatibility reasons. You can provide any value for the option as it is ignored during DFU.". Am I to understand that I can put any value in "--sd-req" like for instance 0x00, but then why does nrfutil complain about SoftDevice?

    BTW is there a way to get soft device versions like you get when you use s_dfu_settings.app_version? All I see is the s_dfu_settings.sd_size which may or may not be enough information...

    Best regards

    Anders

  • Hi.

    Try this:

    Open the project found in examples\dfu\secure_bootloader\pca10056_uart_debug, in sdk_config.h line 1151, put 0 instead of 1.

    // <q> NRF_DFU_SERIAL_UART_USES_HWFC  - HWFC configuration
     
    
    #ifndef NRF_DFU_SERIAL_UART_USES_HWFC
    #define NRF_DFU_SERIAL_UART_USES_HWFC 0
    #endif

    Use the following code in dfu_public_key.c:

    /* This file was automatically generated by nrfutil on 2018-03-22 (YY-MM-DD) at 12:39:00 */
    
    #include "stdint.h"
    #include "compiler_abstraction.h"
    
    /* This file was generated with a throwaway private key, that is only inteded for a debug version of the DFU project.
      Please see https://github.com/NordicSemiconductor/pc-nrfutil/blob/master/README.md to generate a valid public key. */
    
    #ifdef NRF_DFU_DEBUG_VERSION 
    
    /** @brief Public key used to verify DFU images */
    __ALIGN(4) const uint8_t pk[64] =
    {
        0x65, 0xfc, 0x2b, 0xf8, 0x16, 0xda, 0x01, 0x9a, 0xde, 0x75, 0xd4, 0xa8, 0x47, 0x71, 0x96, 0x21, 0x1c, 0x87, 0x55, 0x69, 0x10, 0x5a, 0xbe, 0x04, 0x57, 0x8f, 0xd2, 0xb0, 0x29, 0x94, 0x56, 0xb8, 
        0xca, 0x03, 0x63, 0xd6, 0x35, 0xc6, 0x4d, 0xa7, 0x81, 0x9f, 0xef, 0xa7, 0xd2, 0xec, 0xb7, 0xf3, 0x07, 0xff, 0x80, 0xaf, 0x7a, 0x3b, 0x4c, 0x19, 0xb8, 0x91, 0xc5, 0x14, 0x3c, 0xe8, 0x76, 0x6d
    };
    
    #else
    #error "Debug public key not valid for production. Please see https://github.com/NordicSemiconductor/pc-nrfutil/blob/master/README.md to generate it"
    #endif
    

    Create a .bat file in your SDK folder (nRF5_SDK_15.0.0_a53641a) with this code inside, and run it from command prompt:

    nrfjprog --eraseall
    nrfjprog --program examples\dfu\secure_bootloader\pca10056_uart_debug\ses\Output\Release\Exe\secure_bootloader_uart_mbr_pca10056_debug.hex --chiperase
    nrfjprog --program examples\dfu\secure_dfu_test_images\uart\nrf52840\mbr.hex
    nrfjprog --reset
    
    SLEEP 2
    nrfutil dfu serial -pkg examples\dfu\secure_dfu_test_images\uart\nrf52840\blinky_mbr.zip -p COM7 -b 115200 -fc 0


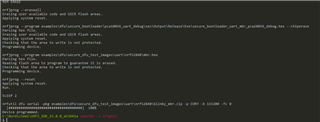
    This should now work, and you should see the following in your command prompt:

    I've now modified the examples\dfu\secure_bootloader\pca10056_uart_debug example to use no flowcontroll and a baudrate of 115200.

    The Jlink CDC UART Port is the driver for the Segger on-board debugger on the DK.

    The same key should be used for both the bootloader and the application, correct.  You should not use a different key for the zip file.

    QIAAAA should not be the problem.

    You should use Python 2.7 for nrfutil. When it comes to nrfutil for Python 3 i refer to this question.

    Hope this works for you, good luck.

    - Andreas

  • Hi Andreas,

    For some unknown reason I am not allowed to make a reply to your latest post, so I do it here instead.

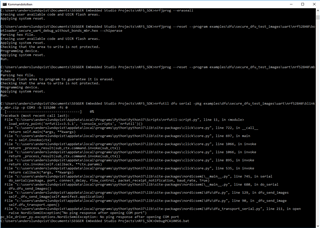
    As you can see from the image below it did not quite work as intended...

    As you pointed out, the new hardware did nothing to improve the situation but at least we have verified that which is good.

    What do we do now?

    Best regards

    Anders

  • Hi.

    Did you try to do as i said in my previous reply? That is open the project found in examples\dfu\secure_bootloader\pca10056_uart_debug, edit sdk_config.h inside the project, edit dfu_public_key.c inside the project, create a .bat file and paste the code i posted in my previous reply.

    Because it seems from the screenshot you sent that you did not program using that .bat file, and you are still programming the  nRF5_SDK_15.0.0_a53641a\examples\dfu\secure_dfu_test_images\uart\nrf52840 examples.

    I've attached it in this reply.

    REM nrfutil settings generate --family NRF52840 --application examples\dfu\secure_dfu_test_images\uart\nrf52840\bootloader_secure_uart_debug_without_bonds_mbr.hex  --application-version 3 --bootloader-version 2 --bl-settings-version 2 settingscase.hex
    
    REM ERASE
    nrfjprog --eraseall
    nrfjprog --program examples\dfu\secure_bootloader\pca10056_uart_debug\ses\Output\Release\Exe\secure_bootloader_uart_mbr_pca10056_debug.hex --chiperase
    nrfjprog --program examples\dfu\secure_dfu_test_images\uart\nrf52840\mbr.hex
    nrfjprog --reset
    
    SLEEP 2
    nrfutil dfu serial -pkg examples\dfu\secure_dfu_test_images\uart\nrf52840\blinky_mbr.zip -p COM7 -b 115200 -fc 0


    Please do as i stated above, once you have finished editing the project, compile it.

    Download the .bat file i sent you and place it in the SDK folder (nRF5_SDK_15.0.0_a53641a), and then run it.

    - Andreas

  • Hi,

    Must have sent the wrong picture, sorry for that. It did not work nevertheless.

    However, I have ditched the nrfutil that came using "pip install nrfutil" and downloaded a precompiled version which most likely is exactly the same as the one I used initially.

    This time it actually worked. I have even made som progress on the bootloader for the custom board. I have come to the conclusion that you need to set the "--sd-req" to an unsupported value for the download to work properly. This is as far as I can remember not mentioned anywhere in the documentation, which I for obvious reasons have not read in it's entirety.

    There are some issues left and I will try to figure out what I need to do to make it work.

    If I need more help, I will start a new ticket for that. This one is getting clogged up and I can not reply to the last post no matter how I try - must be something wrong with the ticketing system...

    Thanks!

    Best regards

    Anders

  • Hi Again,

    Just one more question. Do I need to adjust the start address for the application that is downloaded? I.e. 0x20000 instead of 0x0?

    Best regards

    Anders

Reply Children
  • Hi.

    That depends on what your DFU contains. Take a look at this memory layout. If the DFU contains a MBR or a SoftDevice, then you have to adjust the start address of the application, if it doesnt, then you should be fine.

    - Andreas

  • Hi,

    Since I have besed my (tweaked) DFU on your example, it contains an MBR (as far as I can tell). Anyway the hex file begins with:

    :02000002F0000C
    :108000000000042061820F00B9820F00BB820F00C4
    :10801000BD820F00BF820F00C1820F000000000070

    The uart test program hex file begins with:

    :100000000000042061020000B9020000BB020000F1
    :10001000BD020000BF020000C1020000000000009D

    I suspect that this means that it is placed in flash starting at address 0x0 which according to the memory map is the MBR.

    So how on earth do I get it to be placed where it should be using the Segger Embedded Studio? The flash_placement_file.xml, the project options or directly in the solution using the editor? It is far from obvious to me how this is done.

    The best solutions would have been if the bootloader would have made the necessary decisions.

    In fact I am a bit confused on how the whole system should work in practice. It is impractical to have to determine memory location at compile time. Who knows the actual size of the soft device apart from the bootloader and what if you upgrade a soft device to a version with a bigger footprint?

    Is there any explanation available in the documentation that explains this in detail?

    Best regards

    Anders

  • Hi.

    You can configure the flash addresses in SES by doing the following:

    1. Click on Edit Options for your project.
    2. Select Common in the configuration scrollbar.
    3. Click on Linker.
    4. Double-click on Section Placement Macros.
    5. Configure the addresses and click on Ok --> and Ok.

    ...


    - Andreas

Related