This post is older than 2 years and might not be relevant anymore
More Info: Consider searching for newer posts

nRF9160-DK - Make Application From Scratch

Hi,

I have nRF9160-DK kit and its environment is set such as nRF Connect SDK and Segger Embedded Studio.

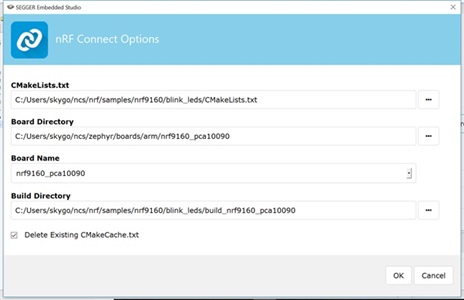
I want to build a simple application from scratch for example toggling LEDs on the board or anything else.

I have tried some sample application supplied with and they are running fine.

Could you provide any tutorial or documentation which shows how to build application from scratch for nRF9160-DK?

Thanks,

Aakash.

Parents
  • I have figured out how to control LEDs of the board. See following:

    This tutorial targets windows 10 based application development for nRF9160-DK board. This is my way of making this application. I am new with this board and there might be better/official way of developing application for this board. This tutorial does not require sim card activation.

    Environment Setup:

    It is expected that your environment is set by installing the nRF Connect for Desktop application and following Getting Started Assistant from the installed application.

    Link for the nRF Connect for Desktop:

    http://developer.nordicsemi.com/nRF_Connect_SDK/doc/latest/nrf/gs_ins_windows.html

    Once installed, download the Getting Started Assistant from add/remove apps tab and follow the steps carefully.

    The following link is helpful during setting-up an environment for the nRF9160-DK board:

    https://www.nordicsemi.com/Software-and-Tools/Development-Tools/nRF-Connect-for-desktop

    Once the environment is set, you should try running the sample applications provided with the installation to verify everything is working properly.

    Actual Tutorial:

    In this tutorial, a led blinking application is developed with same sample folder structure provided in \ncs\nrf\samples\nrf9160 folder.

    First, create a folder in above mentioned directory and name is blink_leds or anything you would like (\ncs\nrf\samples\nrf9160\blink_leds).

    Then, create another folder inside blink_leds folder and name it src (\ncs\nrf\samples\nrf9160\blink_leds\src). Inside the src folder, our main main.c programme is saved. Main.c programme is provided at the end of this document.

    After that, copy these three files, CMaleLists.txt, prj.conf and sample.yaml, from provided sample files (e.g. \ncs\nrf\samples\nrf9160\at_client) and paste it into blink_leds folder.

    Now open these files and replace the content of these files with this:

    For CMakeList.txt:

    cmake_minimum_required(VERSION 3.13.1)
    include($ENV{ZEPHYR_BASE}/cmake/app/boilerplate.cmake NO_POLICY_SCOPE)
    project(NONE)
    target_sources(app PRIVATE src/main.c)

    For prj.conf:

    CONFIG_GPIO=y
    CONFIG_SERIAL=n

    For sample.yaml:

    sample:
      name: blink_leds Sample
    tests:
      sample.blink_leds:
        tags: LED gpio
        filter: DT_GPIO_LEDS_LED0_GPIO_CONTROLLER
        depends_on: gpio
        harness: led
        platform_whitelist: nrf9160_pca10090
        tags: ci_build

    Save these files and open the SEGGER Embedded Studio. In SEGGER, click on File → Open nRF Connect SDK Project. This gives you following window and set the parameters by navigating to your folder and as shown in the picture.

    After that, click on Build → Build zephyr/zephyr.elf to generate .elf file and then click Build → Build and Run to flash the board. It should work. All these LEDs should toggle on and off with 1 second interval.

    //This code is adapted and modified from the Blinky sample project.
    
    #include <zephyr.h>
    #include <device.h>
    #include <gpio.h>
    
    #define LED_PORT0 LED0_GPIO_CONTROLLER
    #define LED_PORT1 LED1_GPIO_CONTROLLER
    #define LED_PORT2 LED2_GPIO_CONTROLLER
    #define LED_PORT3 LED3_GPIO_CONTROLLER
    
    #define LED0    LED0_GPIO_PIN
    #define LED1    LED1_GPIO_PIN
    #define LED2    LED2_GPIO_PIN
    #define LED3    LED3_GPIO_PIN
    
    /* 1000 msec = 1 sec */
    #define SLEEP_TIME  1000
    
    void main(void)
    {
        int cnt = 0;
        struct device *dev0, *dev1, *dev2, *dev3;
    
        dev0 = device_get_binding(LED_PORT0);
        dev1 = device_get_binding(LED_PORT1);
        dev2 = device_get_binding(LED_PORT2);
        dev3 = device_get_binding(LED_PORT3);
        /* Set LED pin as output */
        gpio_pin_configure(dev0, LED0, GPIO_DIR_OUT);
        gpio_pin_configure(dev1, LED1, GPIO_DIR_OUT);
        gpio_pin_configure(dev2, LED2, GPIO_DIR_OUT);
        gpio_pin_configure(dev3, LED3, GPIO_DIR_OUT);
    
        while (1) {
            /* Set pin to HIGH/LOW every 1 second */
            gpio_pin_write(dev0, LED0, cnt % 2);
            gpio_pin_write(dev1, LED1, cnt % 2);
            gpio_pin_write(dev2, LED2, cnt % 2);
            gpio_pin_write(dev3, LED3, cnt % 2);
            cnt++;
            k_sleep(SLEEP_TIME);
        }
    }
    

  • Thanks for making this quick tutorial! As is asking, it could be good to add an explanation of what you are configuring.

    Kind regards,

    Øyvind

Reply Children
  • Hi  and. I think CMakeList.txt file is useful when working with SEGGER Embedded Studio for building purposes. See: cmake.org/.../ and wiki.ros.org/.../CMakeLists.txt. In my cmakelist.txt file, I include one file and specify sources to use when compiling a given target. You will not have to update this file every time you add or edit the code. But, if you want to include external files, this is the space to use.

    Regarding sample.yaml and prj.conf, I have no experience with these files. I am with this board from last one week. As I said before, I tried to make similar example by following given sample application files. However, I tried to run above application without these two files, sample.yaml and prj.conf, and it worked perfectly. Therefore, these two files may not be mandatory.

    Regarding the GPIO ports, see my new code. It references the pins now therefore it will remain same or change according to hardware pinouts.

    #include <zephyr.h>
    #include <device.h>
    #include <gpio.h>
    
    #define LED_PORT0 LED0_GPIO_CONTROLLER
    
    #define LED0    2
    #define LED1    3
    #define LED2    4
    #define LED3    5
    
    /* 1000 msec = 1 sec */
    #define SLEEP_TIME    1000
    
    void main(void)
    {
    	int cnt = 0;
    	struct device *dev0, *dev1, *dev2, *dev3;
    
    	dev0 = device_get_binding(LED_PORT0);
    	dev1 = device_get_binding(LED_PORT0);
    	dev2 = device_get_binding(LED_PORT0);
    	dev3 = device_get_binding(LED_PORT0);
    	/* Set LED pin as output */
    	gpio_pin_configure(dev0, LED0, GPIO_DIR_OUT);
    	gpio_pin_configure(dev1, LED1, GPIO_DIR_OUT);
    	gpio_pin_configure(dev2, LED2, GPIO_DIR_OUT);
    	gpio_pin_configure(dev3, LED3, GPIO_DIR_OUT);
    
    	while (1) {
    		/* Set pin to HIGH/LOW every 1 second */
    		gpio_pin_write(dev0, LED0, cnt % 2);
    		gpio_pin_write(dev1, LED1, cnt % 2);
    		gpio_pin_write(dev2, LED2, cnt % 2);
    		gpio_pin_write(dev3, LED3, cnt % 2);
    		cnt++;
    		k_sleep(SLEEP_TIME);
    	}        
    }

    If you want to change the port, you will have to use this:

    /* change this to use another GPIO port */
    #ifndef LED0_GPIO_CONTROLLER
    #ifdef LED0_GPIO_PORT
    #define LED0_GPIO_CONTROLLER LED0_GPIO_PORT
    #else
    #error LED0_GPIO_PORT or LED0_GPIO_CONTROLLER needs to be set in board.h
    #endif
    #endif
    #define PORT	LED0_GPIO_CONTROLLER

  • I'm quite new with the environment as well, as I understand;

    prj.conf = you setup which drivers you would like to use in your application such as I2C, Spi or sensor drivers that you want to add like lis2dhl. Other than you can create and setup threads. You can see the accepted values from this link.

    sample.yaml is for documentation I believe so.

    Other than these ones you can add overlay files like "nrf9160_pca10090ns.overlay". in this file you can edit dts file of board, that will allow you to assign different pin for peripherals.

    &i2c2 {
    	status = "ok";
    	sda-pin = <21>;
    	scl-pin = <22>;
    };

  • would be so much easier if there was a GUI for choosing the libraries and drivers, as well as config

  • Hi, thanks for the link and explanation. Regarding this .overlay file, do I have to write this manually such as text file or it generates automatically when we build the programme?

Related