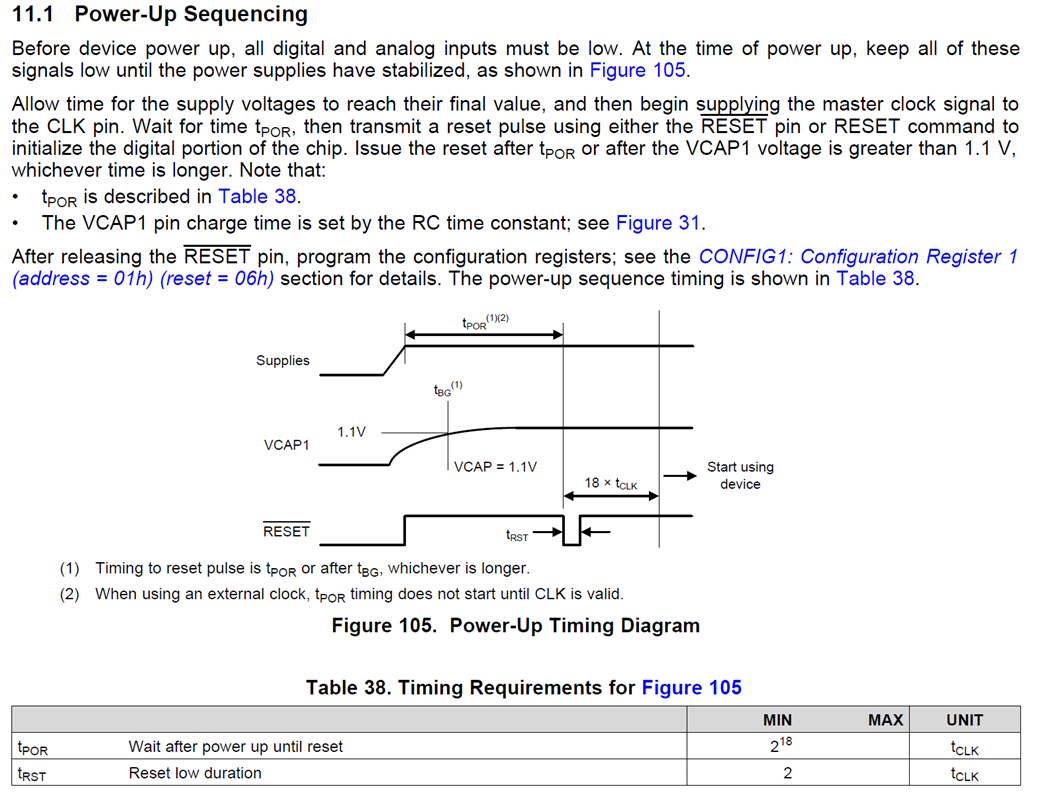
This post is older than 2 years and might not be relevant anymore
More Info: Consider searching for newer posts

Problem using the nRF52840 to interface an ADS1298 via SPI

Hi DevZone,

I am using the nRF52840 to interface an ADS1298 (ECG Chip) via SPI.

I want to test if the communication between the devices are working by:

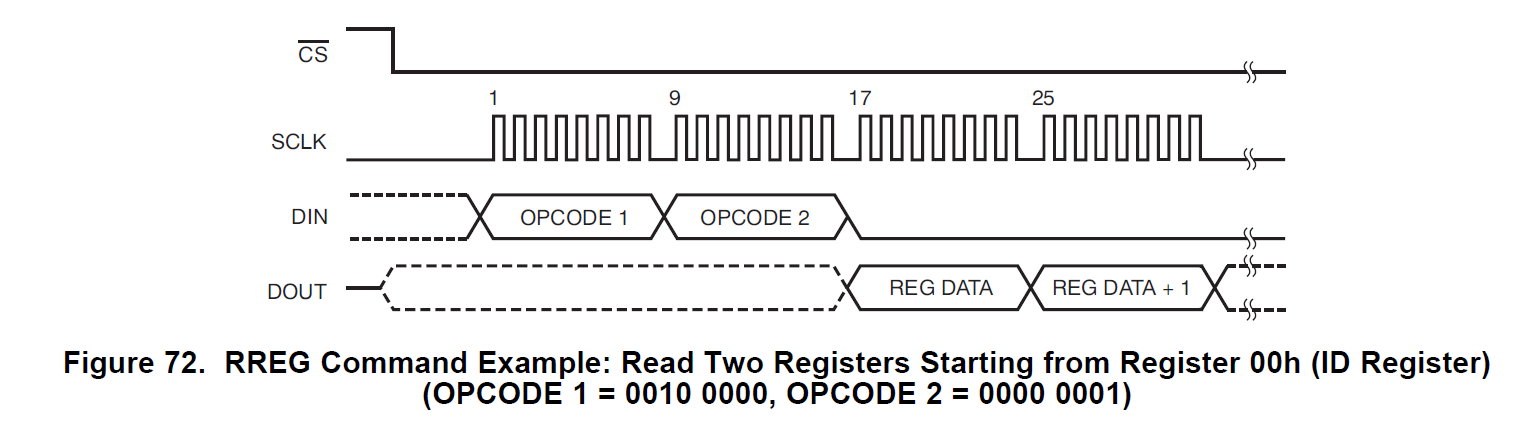
    -  Sending a RREG (Read From Register) opcode from the nRF52840 to the ADS1298

    -  And then read its ID Register.

The RREG command is two bytes long, and for multi-byte commands the following needs to be done:

    1.  Send the first byte and then wait for 4 * tCLK  before sending the next byte.

    2. The CS (or SS) pin needs to be held low during the entire session for both transfer and receive.

I am trying to test this with the example provided in the nRF5 SDK 15.3 by using this function:

    -  nrf_drv_spi_transfer(&spi, m_tx_buf, m_length, m_rx_buf, m_length);

My problem is that:

    -  I cannot insert a delay between the bytes when using the nrf_drv_spi_tranfer() for multiple byte transfers

    -  If i use separate calls of the nrf_drv_spi_transfer() for each byte, then the CS pin is not held low.

Is there any way I can use this driver to send multiple bytes with a fixed delay between them, without the CS pin going high during the session?

Thank you for reading

Br. Casper

  • You may be overlooking the following; I think all family members start up in the read-continuous mode:

    "If the device is in RDATAC mode, an SDATAC command must be issued before any other commands can be sent to the device."

        AdsReset();                      // Reset ADS - not necessary if using power-on reset
        AdsSendCmd(ADS_CMND_SDATAC);     // Stop continuous mode
        // Turn on internal reference and allow time to settle
        AdsWriteReg(ADS1x9x_REG_CONFIG2, 0xA0);
    now read id ..

    Otherwise the command looks correct:

    /****************************************************************/
    /* ADS1x9x COMMAND DESCRIPTION and definitions */
    /****************************************************************/
    typedef enum {
      // System Commands
      ADS_CMND_WAKEUP    = 0x02,   // Wake-up from standby mode
      ADS_CMND_STANDBY   = 0x04,   // Enter standby mode
      ADS_CMND_RESET_CMD = 0x06,   // Reset the device registers
      ADS_CMND_START     = 0x08,   // Start/restart (synchronize) conversions
      ADS_CMND_STOP      = 0x0A,   // Stop conversion
      ADS_CMND_OFFSETCAL = 0x1A,   // Channel offset calibration - needs to be sent every time there is a change to the PGA gain
      // Data Read Commands
      ADS_CMND_RDATAC    = 0x10,   // Enable Read Data Continuous mode.
                                   // - This mode is the default mode at power-up.
      ADS_CMND_SDATAC    = 0x11,   // Stop Read Data Continuously mode
      ADS_CMND_RDATA     = 0x12,   // Read data by command; supports multiple read back.
      // Register Read/Write Commands
      ADS_CMND_RREG      = 0x20,   // Read n nnnn registers starting at address r rrrr
                                   //  - first byte 001r rrrr (2xh)(2) - second byte 000n nnnn(2)
      ADS_CMND_WREG      = 0x40    // Write n nnnn registers starting at address r rrrr
                                   //  - first byte 010r rrrr (2xh)(2) - second byte 000n nnnn(2)
    } ADS1x9xCommand_t;
    

    I should add that if you are going off-board to the ADS development board it might be necessary to boost the drive to SCK, CS and MOSI pins from S0S1 to H0H1 after the SPI has been initialised; not usually necessary at lower SCK speeds however..

  • Hi hmolesworth,

    Thank you for taking your time to reply again!

    I am aware that the ADS1298 is starting in RDATAC mode by default, and I am sending the SDATAC command prior to attempting to send the RREG opcode to read the ID-register. At the moment I am running the SPI at a low 500kHz.

    According to TI's FAQ for the ADS129x devices: https://e2e.ti.com/support/data-converters/f/73/t/772058

    it could be a problem with my Power-Up sequencing. 

    I am supplying the ADS1298 Development board directly from my nRF82840 development board via 3.0V single supply. This is configured so that both the analog voltage (AVDD) and the digital voltage (DVDD) is supplied.

    According to the datasheet, the correct Power-Up sequence is as follows: (I am using the internal 2.048MHz clock for now)


    To try and adhere to these specifications I have made a simple test code:

        // Powerup Sequence:
        nrf_gpio_pin_set(ADS1298_PWDN_PIN);     // 1) Powerup the ADS1298
        nrf_gpio_pin_set(ADS1298_RESET_PIN);    // 2) Set the RESET pin high
        nrf_delay_ms(100);                      // 3) Wait after powerup until reset
        nrf_gpio_pin_clear(ADS1298_RESET_PIN);  // 4) Set RESET pin low for a minimum of 2 * tCLK
        nrf_delay_ms(10);                       // 5) wait > 2 * tCLK
        nrf_gpio_pin_set(ADS1298_RESET_PIN);    // 6) Setting RESET pin high now enables the digital portion of the ADS1298
        nrf_delay_ms(100);                      // 7) Wait > 18 * tCLK Before starting to use the device
        

    But perhaps I am stilling missing something. Could it be that I actually have to toggle the power supply completely to the board, and using the /PWDN pin is not enough?

    Thank you again for reading!

    Br. Casper

  • Are you using an external clock?
    In that case, it seems you need to supply a clock signal on the SCK pin before resetting the device. 


    There's a fairly detailed start-up sequence description in 10.1.1 Setting the Device for Basic Data Capture. 


    From 11.1; "After releasing the RESET pin, program the configuration registers". 
    - It seems you must program the configuration registers before you can read the DEVICE_ID register. 


    I suggest you scope all I/O lines and all supply pins and compare their states with the datasheet's start-up and communication sequences. 


    Are you using the ADS1298 on a custom board or it's dev kit?
    - If you're using a custom board I suggest you submit your schematics and design files for review at TI. 

  • Hi haakonsh,

    Thank you for replying!

    I am using the Internal Clock of 2.048MHz as recommended in the datasheet because this application will be powered by battery, and therefore has to be low power.

    I am using Figure 93. Initial Flow at Power Up in section 10.1.1 as a guide for my Power-Up sequence.

    All of the I/O lines have been monitored with an oscilloscope I have confirmed that they all start out LOW at power up, and then I turn them on in the sequence described in 10.1.1 and 11.1 of the datasheet for the ADS1298.

    I am using the Development kit for the ADS1298, but I am not powering it with the MMBO board, but with the nRF82840 microcontroller. Single supply 3.0V.

    Still no luck though..

    Again, thank you very much for replying!

    Br. Casper

    1. I suggest you scope the ADS1298's power supply line for any fluctuations or noise during startup. 

    2. From 9.5.2:
      NDS Enable Read Data Continuous mode. RDATAC 0001 0000 (10h) — This mode is the default mode at power up.(1)

      (1) When in RDATAC mode, the RREG command is ignored.

      From 9.5.2.10:
      When the device is in read data continuous mode (RDATAC), it is necessary to issue a SDATAC command before a RREG command can be issued.

    3. From 11.1:
      Allow time for the supply voltages to reach their final value, and then begin supplying the master clock signal to the CLK pin. Wait for time tPOR, then transmit a reset pulse using either the RESET pin or RESET command to initialize the digital portion of the chip. Issue the reset after tPOR or after the VCAP1 voltage is greater than 1.1 V, whichever time is longer.

      Have you made sure that the clock signal is applied exactly when it's supposed to?


Related