This post is older than 2 years and might not be relevant anymore
More Info: Consider searching for newer posts

nRF Connect v3.2.0 issue for nFR9160

 Hi, 

I am new to Nordic Thingy91.


I have tried to connect Nordic Thingy91 (nRF9160) device using "nRF connect v3.2.0", via USB.
But I am facing, below issue.

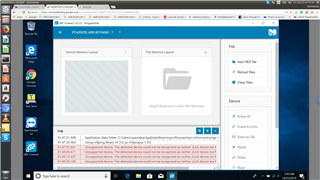
Issue 1: "unsupported device: the detected device could not be recognized as neither jlink device nor nordic USB device for windows 10"

Tried: I have tried installing different versions of J-Link from below:
www.segger.com/.../
(Tried with: 6.22g,e 6.50e, etc.,)

But no luck, and below issue is seen,

Issue 2: "unsupported device with serial number PCA_20035_d081421f4d65 and trails ["serialport"]"

Is JTAG necessary to flash/program the "nRF9160" and "nRF52840"..?

Host Machine Details (Where I am trying to flash/Program the nRF9160):
Windows 10
nRF Connect v3.2.0

NOTE: Apart from nRF Connect v3.2.0, I didn't installed any tools in windows 10 machine.
I have a Nordic Thingy91 development environment (including SEGGER) in a different machine. Planing to use windows 10 to flash/program the nRF9160 remotely.


I was able to successfully compile and generate the binary (Ex: Asset tracking) in the development environment.

Please direct me to the correct path, whether I am missing anything on Windows 10 machine to flash/program the nRF9160.


Thank you for your help.

Parents
  • Hi.

    There are two ways to program the Thingy:91:

    1. With an external debugger. E.g. you can connect an SWD cable between the "Debug out" header on an nRF91 DK and the 10-pin connector on the Thingy. Then in the programmer app, you must select the nRF91 DK.

    2. Using MCUBoot. For more information see this guide: https://devzone.nordicsemi.com/nordic/cellular-iot-guides/b/getting-started-cellular/posts/thingy91_2d00_fw_2d00_update_2d00_mcuboot

    Best regards,

    Didrik

  • Hi Didrik, 

    Thank you for the quick reply. 

    As I mentioned in the above description, I am getting errors (Issue1 & 2) "unsupported device...",  while connecting the nRF9160 using "nRF Connect v3.2.0". Please refer to the screenshot attached. 

    The connection was NOT successful between the Host machine and nRF9160 DK to flash/program it, 

    Could you please help with this. 

  • Yes...!! You are correct, As per the instructions are given in the MCUboot ref document, we can flash both nRF9160 and nRF58240 on Thingy91 device by following the below steps: 

    Updating FW: 
    Before trying to update your Thingy:91 FW make sure its connected to your computer using USB.

    Put your Thingy:91 into application serial recovery mode either by pushing the main button (SW3) while turning on power to update the nRF9160 SiP or the small button (SW4) while turning on power to update the nRF52840 SoC.
    Then update the FW by using the below mcumgr image upload command:

    This is why I got confused and asked the above questions for further clarification.  Please clarify as soon as possible as our development activity will kick start very soon. 

    ****************************************************************************************************************

    Please clarify on suitable Images as well, like:

    Correct Image for nRF9160(pca_20035) is:  /build/zephyr/app_update.bin


    Which Image we have to flash on nRF52840(pca_20035):........?? 

    After the build was a success, I can see that there are so many images that are getting generated like below, in different folders.

    in /build/zephry:

    /build/zephry/app_moved_test_update.hex

    /build/zephry/app_signed.hex

    /build/zephry/app_test_update.hex

    /build/zephry/app_to_sign.bin

    /build/zephry/app_update.bin         ==> This we are flashing on nRF9160(PCA20035)

    /build/zephry/mcuboot_primary.hex

    /build/zephry/mcuboot_primary_app.hex

    /build/zephry/merged.hex

    /build/zephry/zephyr.bin

    /build/zephry/zephyr.elf

    /build/zephry/zephyr.hex

    /build/zephry/zephyr.lst/.map/.stat

    /build/zephry/zephyr_prebuilt.elf/.map

    in /build/mcuboot:

    /build/mcuboot/zephyr.bin

    /build/mcuboot/zephyr.hex

    /build/mcuboot/zephyr.elf

    /build/mcuboot/zephyr.lst

    /build/mcuboot/zephyr.map

    /build/mcuboot/zephyr.stat

    Which one to use for nRF52840 (PCA20035)..? If you have any references to understand about the above images and their uses please share. 

    Thank You. Slight smile

  • I did some testing but was not successful. There seems to be something not working right.

    I have reported it internally, and will keep you updated.

    Regarding what images to use, it should be app_update.bin. Remember to build the project for the nrf52840_pca20035 board.

    The "build products" are always called the same, so you will always be using the merged.hex or app_update.bin in the build/zephyr folder.

    Also, a project is usually either suitable for the nRF9160 or the nRF52840, so the firmware running on the two chips will typically be from two different projects.

  • Ok. Understand. 

    Could you please confirm on,

    is it possible to flash nRF52840 (pca20035) using MCUBoot on thingy91 device....?? 

    Because I don't have nRF DK (PCA10090). 

    I am actually waiting for your valuable reply today. 

    Thank you. 

  • Hi.

    Firmware update of the nRF52840 on the Thingy:91 using MCUBoot does not seem to work on Windows 10 with the default firmware.

    However, the version that is on the 1.1-branch is working.

    So, at the moment you are in a catch-22 situation: You must update the firmware to make MCUBoot work, but you must make MCUBoot work to be able to update the firmware.

    I am looking into other possible fixes.

    Best regards,

    Didrik

  • Ok. Thank you. 

    Can you please refer pre-compiled Images (Firmware) for nRF52840 (PCA20035).

Reply Children
Related