This post is older than 2 years and might not be relevant anymore
More Info: Consider searching for newer posts

Programming Nordic Thingy:91

Hello,

I have a question: how can i make applications for Nordic Thingy:91, and upload them to it? (I am a total newbie when it comes to Nordic products and IoT, i am not a programmer, but i have some small experience with arduino.)

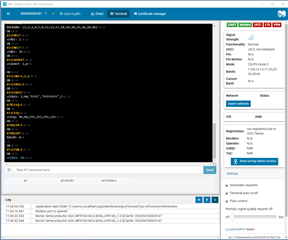
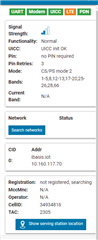
I got Nordic Thingy:91 and followed the quick start guide. I searched internet for answers, but its too complicated for me. I will be using it on flying vehicle (model rocket), and i want to program it with something like default asset tracker, but i want it to have precise x and y gyroscope axis, accelerometer readings, maybe air pressure already converted to height and i want it to send data to nRF Cloud more frequently.

I am very sorry, for how little i know, but im 13 years old.

  • Hi,


    First step is to get a application up and running on the Thingy:91. 

    Here are some useful links that will help when working with the Thingy:91 or other nrf9160 products.
    https://www.nordicsemi.com/Software-and-tools/Software/nRF-Connect-SDK
    https://developer.nordicsemi.com/nRF_Connect_SDK/doc/latest/nrf/introduction.html
    https://developer.nordicsemi.com/nRF_Connect_SDK/doc/latest/nrf/getting_started.html
    https://developer.nordicsemi.com/nRF_Connect_SDK/doc/latest/nrf/gs_assistant.html#gs-assistant
    https://www.nordicsemi.com/Software-and-Tools/Development-Tools/nRF-Connect-for-desktop


    Lets start with the basic and go from there.


    Here is a link to a YouTube video explain the getting started process, pleas watch the video first. I will also explain in text with links down below.

    First download the nrf Connect for Desktop app to your computer. When you have installed the nrf Connect for Desktop open it and click install on the Programmer application.
    it should look like this when it is installed, se picture.


    Now we need some applications to program the Thingy:91 with so lets go to Nordic Thingy:91 website and download the latest precompiled application and modem firmware.
    it will download as a Zip file so you have to extract it once. Inside the Zip file there will be 3 folders 1 txt file and 1 zip file.


    if you have something that looks like the above picture then we are on the right track. 

    Open the Programmer application, it looks like this:


    In the top left corner you can se the No device available tab 


    This will change to Select device when you have connected the Thingy:91 to your computer with a USB cable.


    NOTE: before plugging in the Thingy:91 remember to hold SW3 while turning on the device.


    Here is a more detailed description of how to connect the device to you computer when programming the modem or the application core.


    Now select the Thingy:91, it should look like this when it is available to be selected.


    and it looks like this when it is selected, note the dot on the side changes from grey to green


    Lets start by updating the modem firmware:

    Click the Update modem button down in the right corner.(see picture)

    Then navigate to where you have the Thingy:91 application an modem firmware folder located and select the file with the name mfwnrf9160120.zip.


    Then click Write on the Pop up box.


    Make sure that the Thingy 91 is in MCUboot mode.

    This is shown in the YouTube video and in the links highlighted in yellow above.

    Now for the application. 
    Make sure that the Thingy 91 is in MCUboot mode in this step also.

    The process is the same as when updating the modem firmware but click on the add hex file instead.

    Locate the files you downloaded and select the images_dfu_hex folder. Inn the video above they show the asset tracer example, I will explain the at client example here in text.
    Find the file called thingy91_at_client_dfu_2020-09-23_b6ad40d0.hex from the folder, a green block should be located in the file memory box like this:


    You can now click write and then click write on the pop up box.


    To test the AT command application wee need the LTE link Monitor


    Download LTE Link monitor and open it.
    Select your Thingy:91 device. It should loom something like this when first connected.


    Click on the AT+CFUN=1 and AT+CFUN? button 2 times and there should be a response (loots of yellow and white text )


    If you have not activated the SIM card and plugged it in it will look something like this:


    if you have the SIM registered and plugged in then it will look like this


    The LTE indicator will blink red and yellow until it connects and turns green or red if it fails.


    If you have gotten this far and it is working then you can try the asset tracker application if you have not all ready done that.

    Then the next step would be to learn how to build and compile a sample project. 
    Here is a link to the Getting started with nrf Connect SDK (NCS)


    Regards,
    Jonathan

Related