This post is older than 2 years and might not be relevant anymore
More Info: Consider searching for newer posts

Thingy 91 debug using J link Edu

Hi,

I tried to burn the hello world sample code into thingy 91 using segger and J link Edu.
After configuring Termite it did not show anything.
And now LEDs are not blinking and nothing happening.
can you guide, what to do? or how to reset thingy 91?
while connecting again to segger showing below issue
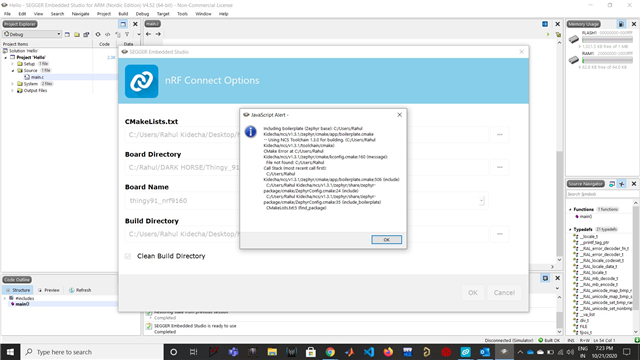
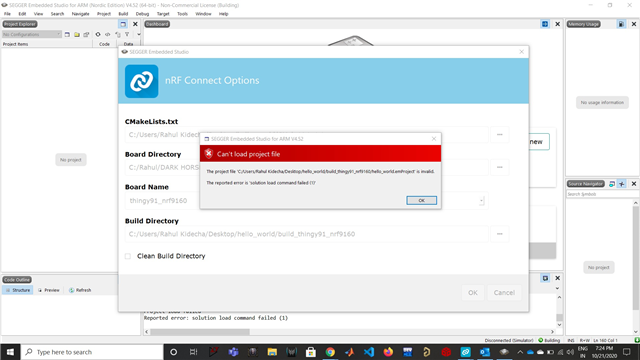
Also, it is not going under the MCU boot mode.
With Regards,
Rahul kidecha
Parents
  • Hi Carl,

    What kind of errors did you experience when trying to flash hello_world with the JLink EDU?
    Yes I tried to flash hello_world with JLink EDU

    Did you try to do it using the nRF Connect Programmer app? 
    I was following this link to debug thingy 91 using segger.
    developer.nordicsemi.com/.../ug_thingy91.html

    When I am debugging using Segger software was getting hang and not allowing me to do anything. after step 3 ( doing setting nrf connect setting )

    Do I need to make changes in the directory?

    Regards,

    Rahul Kidecha

  • Hi again, Rahul!

    It seems like the bootloader may have been deleted. Could you try to follow the steps below closely:

    1. Download and unzip the newest Thingy:91 firmware
    2. Connect your Thingy:91 to your JLINK Edu and turn it on. Make sure SW2 is at the nRF91-position. 
    3. Open the nRF Connect programmer app and select the debugger.
    4. Update modem firmware: press the "update modem" button and navigate to the folder you extracted in step 1. Select the file "mfwnrf9160122.zip". Press "Write" in the following dialog and let the program finish.
    5. Update application firmware: press the "add hexfile" button in the Programmer app and the press "browse". Navigate to the folder you extracted in step 1. and then enter the folder img_app_bl. This folder contains application hex files that also includes the bootloader. For the asset tracker choose one of the following hex files:
      1. For LTE-M select: thingy91_ltem_2020-10-30_5522ca2b.hex  
      2. For NB-IoT select: thingy91_nbiot_2020-10-30_5522ca2b.hex 
    6. Observer that the "Memory Layout" now shows the occupied memory of the selected hex-file.
    7. Press "Erase & write" and let the programming finish.

    You should now have the asset_tracker including MCUBoot flashed to your Thingy:91. When programming applications in the future with the JLINK Edu make sure that they have MCUBoot enabled by having "CONFIG_BOOTLOADER_MCUBOOT=y" in prj.conf, or else the bootloader will be overwritten.

    When it comes to your issues with opening a project in Segger Embedded Studio do the following:

    1. Make sure that there are no "space" characters in the path of the SDK. I see that you have "DARK HORSE" as a part of your path, which will result in errors because of the space character.

    2. Program the application for the correct board name: thingy91_nrf9160ns

    Hope this works!

    Best regards,
    Carl Richard

Reply
  • Hi again, Rahul!

    It seems like the bootloader may have been deleted. Could you try to follow the steps below closely:

    1. Download and unzip the newest Thingy:91 firmware
    2. Connect your Thingy:91 to your JLINK Edu and turn it on. Make sure SW2 is at the nRF91-position. 
    3. Open the nRF Connect programmer app and select the debugger.
    4. Update modem firmware: press the "update modem" button and navigate to the folder you extracted in step 1. Select the file "mfwnrf9160122.zip". Press "Write" in the following dialog and let the program finish.
    5. Update application firmware: press the "add hexfile" button in the Programmer app and the press "browse". Navigate to the folder you extracted in step 1. and then enter the folder img_app_bl. This folder contains application hex files that also includes the bootloader. For the asset tracker choose one of the following hex files:
      1. For LTE-M select: thingy91_ltem_2020-10-30_5522ca2b.hex  
      2. For NB-IoT select: thingy91_nbiot_2020-10-30_5522ca2b.hex 
    6. Observer that the "Memory Layout" now shows the occupied memory of the selected hex-file.
    7. Press "Erase & write" and let the programming finish.

    You should now have the asset_tracker including MCUBoot flashed to your Thingy:91. When programming applications in the future with the JLINK Edu make sure that they have MCUBoot enabled by having "CONFIG_BOOTLOADER_MCUBOOT=y" in prj.conf, or else the bootloader will be overwritten.

    When it comes to your issues with opening a project in Segger Embedded Studio do the following:

    1. Make sure that there are no "space" characters in the path of the SDK. I see that you have "DARK HORSE" as a part of your path, which will result in errors because of the space character.

    2. Program the application for the correct board name: thingy91_nrf9160ns

    Hope this works!

    Best regards,
    Carl Richard

Children
No Data
Related