This post is older than 2 years and might not be relevant anymore
More Info: Consider searching for newer posts

How to configure new hardware in a nRF5340 sample project

I have an nRF5340 DK board.  I have followed the online installation instructions and *believe* I have successfully installed (win 10) nRF Connect and Segger Embedded Studio (not to mention chocolatey, ninja, python, west, and all the rest).  I can build and flash from either west and SES.  I can execute any number of the sample programs. 

As a next step, I want to add new hardware interfaces to an example.  The example I chose the zephyr\samples\threads.  Following the "nRF Connect SDK Tutorial - Part 2" I created a local project and got it running.   To add a new HW interface I decided to add uart1 (I need use a uart to talk to another board) .  Here's some code.

static int uart_init(void)
{
  int err;
  struct uart_data_t *rx;

  uart1_device = device_get_binding(DT_LABEL(DT_NODELABEL(uart1)));
  if (!uart1_device) {
    printk("UART binding failed");
    return -ENXIO;
  }

My program always hits the "UART binding failed" case above.  This is almost certainly because I don't understand how all of this device tree stuff works and how to configure it.  Reading the "Part 2 Tutorial", I thought that maybe I could just add a local overlay file and put the following text in it:

&uart1 {
status = "okay";
current-speed = <115200>;
rx-pin = <44>;
tx-pin = <45>;
/delete-property/ rts-pin;
/delete-property/ cts-pin;
};

This didn't seem to work...nor did anything else I tried.  Maybe I need to edit the Kconfig.  Or the prj.conf.  Or dts file.  Or dtsi file. 

Nordic has walkthroughs for modifying sample applications - developer.nordicsemi.com/.../gs_modifying.html

...but these all seem to guide me right to the point where I'm ready to configure my example for new hardware interfaces...and go no further.

I've tried reading the documentation for the device tree and in any practical sense, I am still profoundly ignorant of how this all works.  I get that Nordic is doing this because it allows Zephyr to run on many different hardware platforms....which is cool.  It is also very confusing ...not so cool. 

Question:  What am I doing wrong?  Is there a better tutorial that shows real examples of how to change the device tree to enable/disable all the various HW interfaces on the DK?  

MikeB

Parents
  • I'm not sure why it didn't work for you. Could you try the following sample:

    6862.hello_world.zip

    Build and flash using the following commands:

    west build -b nrf5340dk_nrf5340_cpuapp -d build_53
    cd build_53 
    west flash

    Make sure the stuff you put in the overlay file is present in build_53/zephyr/zephyr.dts and that CONFIG_SERIAL=y in build_53/zephyr/.config

    Best regards,

    Simon

  • Hello Simon,

    I can successfully build my project from west and process the overlay file.

    Evidently the command:    west build -b nrf5340dk_nrf5340_cpuapp -d build_53

    uses a default  "nrf5340dk_nrf5340_cpuapp.overlay" file.  

    When building from my SES project, I was specifying the overlay file via the CMakeList.txt file:

    # SPDX-License-Identifier: Apache-2.0

    cmake_minimum_required(VERSION 3.13.1)
    set(ThreadsEx_DTC_OVERLAY_FILE
    ${CMAKE_CURRENT_SOURCE_DIR}/ThreadsEx.overlay
    )

    find_package(Zephyr REQUIRED HINTS $ENV{ZEPHYR_BASE})
    project(threads)

    target_sources(app PRIVATE src/main.c)

    The problem I was having was that 2.2.2 of the Part 2 Tutorial indicates to modify the CMakeList.txt

    I substituted my project name for the <image_name>...but this wrong. 

    How do I know what the <image_name> is?  (I'm sure this is a stupic question).

    Mike

Reply
  • Hello Simon,

    I can successfully build my project from west and process the overlay file.

    Evidently the command:    west build -b nrf5340dk_nrf5340_cpuapp -d build_53

    uses a default  "nrf5340dk_nrf5340_cpuapp.overlay" file.  

    When building from my SES project, I was specifying the overlay file via the CMakeList.txt file:

    # SPDX-License-Identifier: Apache-2.0

    cmake_minimum_required(VERSION 3.13.1)
    set(ThreadsEx_DTC_OVERLAY_FILE
    ${CMAKE_CURRENT_SOURCE_DIR}/ThreadsEx.overlay
    )

    find_package(Zephyr REQUIRED HINTS $ENV{ZEPHYR_BASE})
    project(threads)

    target_sources(app PRIVATE src/main.c)

    The problem I was having was that 2.2.2 of the Part 2 Tutorial indicates to modify the CMakeList.txt

    I substituted my project name for the <image_name>...but this wrong. 

    How do I know what the <image_name> is?  (I'm sure this is a stupic question).

    Mike

Children
  • The code

    set(<image_name>_DTC_OVERLAY_FILE
        ${CMAKE_CURRENT_SOURCE_DIR}/<name_overlay>.overlay
    )

    is used if you want to set an overlay file of a child image from the application. A child image can be mcuboot, or spm. E.g. if you build using nrf5340dk_nrf5340_cpuappns, the child image SPM will get included (zephyr/samples/threads/build/zephyr/merged.hex will contain both the application and SPM image).

    If you then do 

    set(spm_DTC_OVERLAY_FILE
        ${CMAKE_CURRENT_SOURCE_DIR}/whatever_name.overlay
    )

    This will be the same as adding it here: sdk-nrf/samples/spm at master · nrfconnect/sdk-nrf · GitHub. The stuff in the overlay file will then be applied to the SPM image.

    If you just want to add an overlay file to your applicatiion, you can just add it like this: zephyr/samples/threads/nrf5340dk_nrf5340_cpuapp.overlay (no need to add anything to the CMakeLists.txt file). If you then build using the same name (nrf5340dk_nrf5340_cpuapp), the stuff in that overlay file will get applied to the application image. It is important to build with the same name as the name of the overlay file.

    (I have not tested it, but I think it should work using the name whatever_name, for the SPM, since you explcitly set it).

    Hope this clarifies stuff.

    Best regards,

    Simon

  • Hey Simon,

    OK...the above helped me better understand the overlay file.  I now understand that the default overlay is the nrf5340dk_nrf5340_cpuapp.overlay and have made some successful modification of sample programs.

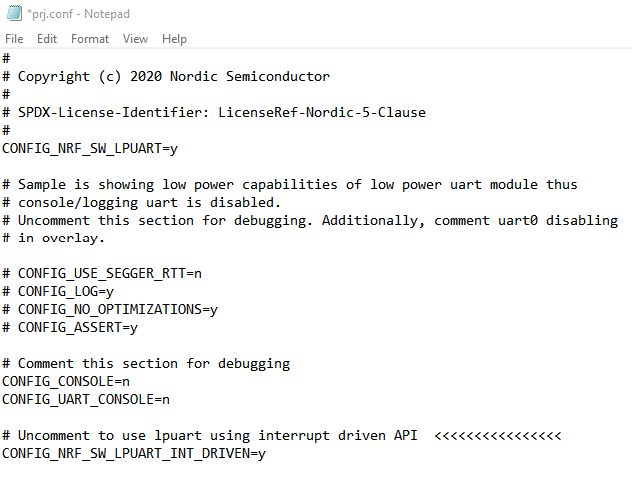
    Back to the subject of this thread:  I still need to configure 2 uarts (in addition to the console) on my dev kit.  I'm searching the sample code for examples and decided to build the ncs\v1.5.0\nrf\samples\peripheral\lpuart example.  I can successfully build this example and can see the uart pins toggle correctly when executing it. I then attempted to build this example to be interrupt driven. I thought I could do this by editing the file below and set the CONFIG_NRF_SM_LPUART_INT_DRIVEN value to yes (per the comment):

    I'm building in SES (mainly because I'm using the debugger to set breakpoints) and reloaded the project and cleaned/rebuilt the solution.  I changed the above file and also the boards\nrf5340dk_nrf5340_cpuapp.conf file in the sample project.   I couldn't hit the ISR breakpoints...or the init driven initialization path.  (i.e. it doesn't look like the CONFIG_NRF_SM_LPUART_INT_DRIVEN symbol is being processed as enabled).

    How do I configure this example to be interrupt driven?  Do I need to go into the Kconfig and change something?  

    Mike

  • The sample is optimized for low power and not debugging. You need to uncomment the configs, as specified in nrf\samples\peripheral\lpuart\prj.conf. I think ucomment CONFIG_NO_OPTIZATION=y is the most crucial for debugging.

    Try to apply this patch to an umodified NCS v1.5.0:

    1004.lpuart_debug.patch

    Best regards,

    Simon

Related