Thingy91 accessing P6 GPIO of nrf52840

Hello,

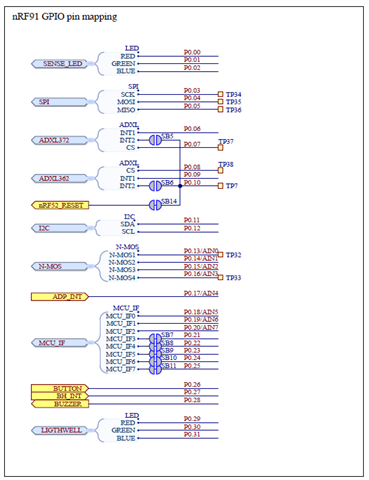
 I am trying to work on a simple GPIO program for the Thingy:91 which involves reading a pin for sensor inputs (this will be 2 sensors eventually). I have tried to look through the documentation in the infocenter and I believe that the way to do this would be to use the P6 spare GPIO of the nrf52480 (Nordic Semiconductor Infocenter table 4 pinout of connector P6).

My question is how to access these GPIO pins and set them as inputs/read from them, as I assumed that to reference P6.1 I would use the provided NRF_GPIO_PIN_MAP macro to reference Port 6, pin 1. This however seems to enable the green color of color sensor support LED, which is P0.1. 

Could someone point me in the right direction/ explain how to access these P6 GPIO pins?

I've included the small code snippet as further info. 

Thanks!

-Julian

#include <zephyr.h>
#include <sys/printk.h>
#include <hal/nrf_gpio.h>
#define INPUT NRF_GPIO_PIN_MAP(6, 1)

void main(void)
{
	printk("Hello World! %s\n", CONFIG_BOARD);
	nrf_gpio_cfg_output(29);
	nrf_gpio_pin_write(29, 1); // sets red RGB LED high as expected

	nrf_gpio_cfg_output(13);
	nrf_gpio_pin_write(13, 1); // sets Test Point 32 high as expected

	nrf_gpio_cfg_output(INPUT);
	nrf_gpio_pin_write(INPUT, 1); // sets green color of color sensor support LED high? unexpected
}

  • Hello Julian,

    If you would like to use the pins on P6 you would need to program nRF52840 with a modified version of the Connectivity Bridge firmware. Remember to set the switch to nRF52 on the Thingy when programming the 52 device.

    Why did you see a green light?

    NRF_GPIO_PIN_MAP is provided to reference the ports and pins on the IC, not the ports and pins on Thingy:91. Which LED goes green, the SENSE_LED or the lightwell?

    If it is the SENSE_LED that goes green then I suppose the explanation could be that this result after the use of the macro is port 0, pin 1(P0.01) on nRF9160.

    Other solutions
    (this will be 2 sensors eventually)

    How many pins/what type of pins are required for the two sensors?

    Here are a few more options for GPIOs on Thingy:91: https://devzone.nordicsemi.com/f/nordic-q-a/51355/inputs-via-gpio-on-the-thingy-91

    Another discussion on alternative use of the pins on Thingy:91: https://devzone.nordicsemi.com/f/nordic-q-a/68213/thingy91-uart-external-communication/279485#279485

    It looks like SPI is available on some test points.

    Best regards,

    Håkon

  • Hi, thanks for telling us about the modified Connectivity Bridge firmware need, could you explain further what exactly has to be modified, as the CONFIG_GPIO is already set to y and I can't see anything else that would be relevant?

    Yes it was the SENSE_LED - the Port 0 Pin 1 explanation seems right to me.

    One of the sensors needs power/GND/Analog input, while the other sensor just needs power/Analog input. The power and GND connections will be done with connector P5 (the 3.3V and GND connections).

    Really all I need to do is read the analog voltage on two of the 6 pins on P6 or the test points 32 and 33. I am able to read the logical level on the test points, however I really need the actual voltage on the point. Is there a way to get the actual voltage level from pin reads?

    Those two tickets you linked were helpful, thanks!

  • I found out how to read the voltage level on TP32, and logical level on TP33, which is enough for my purposes.

    For anyone wondering how to do it:

    TP32 is AIN0 and TP33 is AIN3 for the Thingy91 (https://infocenter.nordicsemi.com/topic/ug_thingy91/UG/thingy91/hw_description/pin_maps.html)

    So using the Analog Digital Converter (ADC) sample code found here: fw-nrfconnect-nrf/main.c at nrf9160_samples · Rallare/fw-nrfconnect-nrf (github.com)

    Modifying this to make it useable (lot of old libraries that have been moved):

    /*
     * Copyright (c) 2018 Nordic Semiconductor ASA
     *
     * SPDX-License-Identifier: LicenseRef-BSD-5-Clause-Nordic
     */
    
    #include <net/socket.h>
    #include <nrf9160.h>
    #include <stdio.h>
    #include <string.h>
    #include <drivers/uart.h>
    #include <drivers/adc.h>
    #include <zephyr.h>
    
    //variables needed for ADC channel reading
    struct device *adc_dev;
    #define BUFFER_SIZE 1
    static uint16_t m_sample_buffer[BUFFER_SIZE];
    
    //Setting needed ADC settings
    #if defined(CONFIG_BOARD_NRF9160DK_NRF9160_NS)	|| \
    	defined(CONFIG_BOARD_THINGY91_NRF9160_NS)
    #include <hal/nrf_saadc.h>
    #define ADC_DEVICE_NAME DT_ADC_0_NAME
    #define ADC_RESOLUTION 10
    #define ADC_GAIN ADC_GAIN_1_6
    #define ADC_REFERENCE ADC_REF_INTERNAL
    #define ADC_ACQUISITION_TIME ADC_ACQ_TIME(ADC_ACQ_TIME_MICROSECONDS, 10)
    #define ADC_1ST_CHANNEL_ID 0
    #define ADC_1ST_CHANNEL_INPUT NRF_SAADC_INPUT_AIN0
    
    #endif
    
    static const struct adc_channel_cfg m_1st_channel_cfg = {
    	.gain = ADC_GAIN,
    	.reference = ADC_REFERENCE,
    	.acquisition_time = ADC_ACQUISITION_TIME,
    	.channel_id = ADC_1ST_CHANNEL_ID,
    #if defined(CONFIG_ADC_CONFIGURABLE_INPUTS)
    	.input_positive = ADC_1ST_CHANNEL_INPUT,
    #endif
    };
    
    static int adc_sample(void)
    {
    	int ret;
    
    	const struct adc_sequence sequence = {
    		.channels = BIT(ADC_1ST_CHANNEL_ID),
    		.buffer = m_sample_buffer,
    		.buffer_size = sizeof(m_sample_buffer),
    		.resolution = ADC_RESOLUTION,
    	};
    
    	if (!adc_dev) {
    		return -1;
    	}
    
    	ret = adc_read(adc_dev, &sequence);
    	if (ret < 0) {
    		printk("ADC read err: %d\n", ret);
    		return ret;
    	}
    	/* Print the AIN0 values */
    		float adc_voltage = 0;
    		adc_voltage = (float)(((float)m_sample_buffer[0] / 1023.0f) *
    				      3600.0f);
    		printk("ADC raw value: %d\n", m_sample_buffer[0]);
    		printf("Measured voltage: %f mV\n", adc_voltage);
    
    	return ret;
    }
    
    int main(void)
    {
    	int err;
    
    	printk("nrf91 saadc sampling AIN0 (P0.13)\n");
    	printk("Example requires secure_boot to have ");
    	printk("SAADC set to non-secure!\n");
    	printk("If not; BusFault/UsageFault will be triggered\n");
    
    	adc_dev = device_get_binding("ADC_0");
    	if (!adc_dev) {
    		printk("device_get_binding ADC_0 failed\n");
    	}
    	err = adc_channel_setup(adc_dev, &m_1st_channel_cfg);
    	if (err) {
    		printk("Error in adc setup: %d\n", err);
    	}
    
    	/* Trigger offset calibration
    	 * As this generates a _DONE and _RESULT event
    	 * the first result will be incorrect. 
    	 */
    	NRF_SAADC_NS->TASKS_CALIBRATEOFFSET = 1;
    	while (1) {
    		//380 - 176 range
    		err = adc_sample();
    		if (err) {
    			printk("Error in adc sampling: %d\n", err);
    		}
    		k_sleep(K_MSEC(500));
    	}
    }

    Your project config file should include (at least):

    CONFIG_ADC=y
    CONFIG_ADC_ASYNC=y
    CONFIG_NRFX_SAADC=y
    CONFIG_NEWLIB_LIBC_FLOAT_PRINTF=y
    CONFIG_NEWLIB_LIBC=y

    You can flash this to the Thingy:91 (I used the DK and JTAG cable method, don't know if the MCUBoot one would work or not) and connect whatever input voltage you are trying to read to TP32 which is right above Switch 3 on the PCB.

    Additionally, if all you need is the logical level you can use pins 13 and 16 to connect to Test Points 32 and 33 respectively.

    I hope this helps others like me who are newer to this, as I find having simple examples to build off of is very helpful!

    -Julian

Related