This discussion has been locked.
You can no longer post new replies to this discussion. If you have a question you can start a new discussion

Servo PPM Routines for Nano 33 BLE (Examples & Questions)

Good evening, (I have a few questions which are at the bottom, so I hope you don't mind me having posted the full length of these two programs first)

I've managed to produce some great results in developing PPM (pulse position modulation; related to PWM pulse width modulation) for a head tracker project I'm working on. I've included two fundamentally different programs as described below, which I'm testing using my Nano 33 BLE via the Arduino development environment...

Method 1: Servo PPM using 2 timers (4 channels)

This method produces the best results (although method 2 does indeed work quite well). The servos move virtually perfectly smooth almost 100% of the time. Timer 3 CC[0] sets the initial high value of the waveform, followed by CC[1] to [4] for the 4 channels. CC[5] is used for the PPM frame length which is set to 22500 microseconds. Each timer 3 compare activates timer 4 which in turn controls the pulse length.

The GPIOTE tasks are controlled by timer events via PPI channels. One complete frame length is processed by timer 3 independent of timer 3 IRQ handler. After the frame is complete, timer 3 stops and clears, then the new servo values are transferred, and the timer is started again. The delay until the next frame starts is dependent on timer 3 prescaler which is set to 1MHz, which could be increased, and the PPM channel values scaled accordingly.

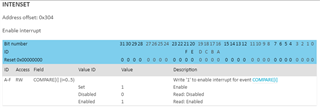
Note: I've omitted all Timer "_Pos" instructions except for TIMER_INTENSET (for GPIOTE I decided to just leave them all in place). _Pos is required for INTENSET even though it has only one field in its register (note "Write 1 to enable..." in the description. Without _Pos it doesn't work). Although SHORTS has 2 fields in its register, it doesn't need _Pos because I'm using its 1st field.  

#include <nrf.h>

#define PPI_CHANNEL_0 (0)
#define PPI_CHANNEL_1 (1)
#define PPI_CHANNEL_2 (2)
#define PPI_CHANNEL_3 (3)
#define PPI_CHANNEL_4 (4)
#define PPI_CHANNEL_5 (5)	

// #define PIN_GPIO (16) // Green for Nano 33 BLE
#define PIN_GPIO (2) 
#define PORT (1)

/* Using timer 1 via MBED doesn't work, so perhaps it's being used */

void setup()
{
	// Configure PIN_GPIO as output
	// ----------------------------
	NRF_GPIO->DIRSET = (1UL << PIN_GPIO);
	
	// Configure GPIOTE
	// ----------------
	NRF_GPIOTE->CONFIG[0] =
	
	(GPIOTE_CONFIG_MODE_Task    << GPIOTE_CONFIG_MODE_Pos) |		
	(PORT                	    << GPIOTE_CONFIG_PORT_Pos) |	
	(PIN_GPIO                   << GPIOTE_CONFIG_PSEL_Pos);		
	
	// Configure TIMER3 & TIMER4 to generate EVENTS_COMPARE[n]
	// -------------------------------------------------------
	NRF_TIMER3->BITMODE = TIMER_BITMODE_BITMODE_32Bit;			
	NRF_TIMER3->PRESCALER = 4;			
	NRF_TIMER3->CC[0] = 1000; // Values [0] to [4] set here can be anything because they're set in TIMER3_IRQHandler_v 
	NRF_TIMER3->CC[1] = 2500;	
	NRF_TIMER3->CC[2] = 4000;	
	NRF_TIMER3->CC[3] = 5500;
	NRF_TIMER3->CC[4] = 7000;
	NRF_TIMER3->CC[5] = 22500; // PPM Frame length
	
	NRF_TIMER3->INTENSET = TIMER_INTENSET_COMPARE5_Enabled << TIMER_INTENSET_COMPARE5_Pos; 
	NVIC_EnableIRQ(TIMER3_IRQn); 		
	
	NRF_TIMER3->TASKS_START = 1;		
	
	// Pulse length timer
	// ------------------
	NRF_TIMER4->MODE = TIMER_MODE_MODE_Timer;
	NRF_TIMER4->BITMODE = TIMER_BITMODE_BITMODE_32Bit;
	NRF_TIMER4->SHORTS = TIMER_SHORTS_COMPARE0_CLEAR_Enabled;
	NRF_TIMER4->PRESCALER = 4; // 1MHz
	NRF_TIMER4->CC[0] = 500; // Pulse length	
	
	// Configure PPI channels with connection between TIMER->EVENTS_COMPARE[n] and GPIOTE->TASKS_SET[0]
	// ------------------------------------------------------------------------------------------------
	NRF_PPI->CH[PPI_CHANNEL_0].EEP = (uint32_t) & NRF_TIMER3->EVENTS_COMPARE[0];
	NRF_PPI->CH[PPI_CHANNEL_0].TEP = (uint32_t) & NRF_GPIOTE->TASKS_SET[0];		
	NRF_PPI->FORK[PPI_CHANNEL_0].TEP = (uint32_t) & NRF_TIMER4->TASKS_START;
	
	NRF_PPI->CH[PPI_CHANNEL_1].EEP = (uint32_t) & NRF_TIMER3->EVENTS_COMPARE[1];
	NRF_PPI->CH[PPI_CHANNEL_1].TEP = (uint32_t) & NRF_GPIOTE->TASKS_SET[0];		
	NRF_PPI->FORK[PPI_CHANNEL_1].TEP = (uint32_t) & NRF_TIMER4->TASKS_START;
	
	NRF_PPI->CH[PPI_CHANNEL_2].EEP = (uint32_t) & NRF_TIMER3->EVENTS_COMPARE[2];
	NRF_PPI->CH[PPI_CHANNEL_2].TEP = (uint32_t) & NRF_GPIOTE->TASKS_SET[0];		
	NRF_PPI->FORK[PPI_CHANNEL_2].TEP = (uint32_t) & NRF_TIMER4->TASKS_START;
	
	NRF_PPI->CH[PPI_CHANNEL_3].EEP = (uint32_t) & NRF_TIMER3->EVENTS_COMPARE[3];
	NRF_PPI->CH[PPI_CHANNEL_3].TEP = (uint32_t) & NRF_GPIOTE->TASKS_SET[0];		
	NRF_PPI->FORK[PPI_CHANNEL_3].TEP = (uint32_t) & NRF_TIMER4->TASKS_START;
	
	NRF_PPI->CH[PPI_CHANNEL_4].EEP = (uint32_t) & NRF_TIMER3->EVENTS_COMPARE[4];
	NRF_PPI->CH[PPI_CHANNEL_4].TEP = (uint32_t) & NRF_GPIOTE->TASKS_SET[0];		
	NRF_PPI->FORK[PPI_CHANNEL_4].TEP = (uint32_t) & NRF_TIMER4->TASKS_START;	
	
	// --------------------------------------------------------------------
	
	NRF_PPI->CH[PPI_CHANNEL_5].EEP = (uint32_t) & NRF_TIMER4->EVENTS_COMPARE[0]; // Control pulse length
	NRF_PPI->CH[PPI_CHANNEL_5].TEP = (uint32_t) & NRF_GPIOTE->TASKS_CLR[0];		
	NRF_PPI->FORK[PPI_CHANNEL_5].TEP = (uint32_t) & NRF_TIMER4->TASKS_STOP;				
	
	// Enable PPI channels
	// -------------------
	NRF_PPI->CHENSET = (1UL << PPI_CHANNEL_0);
	NRF_PPI->CHENSET = (1UL << PPI_CHANNEL_1);
	NRF_PPI->CHENSET = (1UL << PPI_CHANNEL_2);
	NRF_PPI->CHENSET = (1UL << PPI_CHANNEL_3);
	NRF_PPI->CHENSET = (1UL << PPI_CHANNEL_4);
	NRF_PPI->CHENSET = (1UL << PPI_CHANNEL_5);		
}

volatile int initial_off_period = 1000; // The off period will always remain the same, therefore this initial value is arbitrary
volatile int chan1 = 1500;
volatile int chan2 = 1500;
volatile int chan3 = 1500;
volatile int chan4 = 1500;

void loop()
{			 
	while (1)
	{
		// __WFE();			
	}
}

extern "C" void TIMER3_IRQHandler_v (void)
{		
	// volatile uint32_t dummy;
	
	static int travel_rate = 5;
	
	if (NRF_TIMER3->EVENTS_COMPARE[5] == 1)
	{
		NRF_TIMER3->EVENTS_COMPARE[5] = 0;		
		NRF_TIMER3->TASKS_STOP = 1;		
		NRF_TIMER3->TASKS_CLEAR = 1;		
		
		// Read back event register to ensure we have cleared it before exiting IRQ handler
		// dummy = NRF_TIMER3->EVENTS_COMPARE[5];
		// dummy; // To get rid of set but not used warning	
		
		chan1 += travel_rate;
		chan2 += travel_rate;
		chan3 += travel_rate;
		chan4 += travel_rate;
		
		if (chan1 > 1900)
		{
			chan1 = 950;
			chan2 = 950;
			chan3 = 950;
			chan4 = 950;
		} 
		
		NRF_TIMER3->CC[0] = initial_off_period;
		NRF_TIMER3->CC[1] = NRF_TIMER3->CC[0] + chan1;
		NRF_TIMER3->CC[2] = NRF_TIMER3->CC[1] + chan2;
		NRF_TIMER3->CC[3] = NRF_TIMER3->CC[2] + chan3;
		NRF_TIMER3->CC[4] = NRF_TIMER3->CC[3] + chan4;
		
		NRF_TIMER3->TASKS_START = 1;			
	}
}

Method 2: Servo PPM using 1 timer (8 channels)

Unlike method 1, the entire PPM waveform is constructed inside the timer handler and therefore is dependent on its timing accuracy/consistency. You can have as many channels as PPM supports, even though only one timer is being used. I've added a demo option which requires setting the "demo_multiplier" value and "sigPin" to an LED.

Synchronisation seems like a key point. For example, by considering method 1, it's clear that all 4 channel values are transferred whilst the timer is stopped. However for this single timer method, the channel values are transferred without stopping the timer. **Refer to the 5th post for clarification about this** 

// The following program is adapted from here: https://forum.arduino.cc/t/mbed-os-isr-linkage-on-arduino-33-ble/898811 and here: https://quadmeup.com/generate-ppm-signal-with-arduino
// -------------------------------------------

#include <nrf_timer.h>

NRF_TIMER_Type* timer = NRF_TIMER4;
IRQn_Type timer_irq = TIMER4_IRQn;

#define NUMBER_OF_CHANNELS 8 		// Number of channels		
#define CHANNEL_DEFAULT_VALUE 950	// Default servo value
#define FRAME_LENGTH 22500			// PPM frame length in microseconds (1ms = 1000µs)
#define PULSE_LENGTH 500  			// Pulse length		 

#define sigPin 10 // 23 is the Nano 33 BLE Green LED. 10 is ~D10... See here for pin definitions: https://github.com/arduino/ArduinoCore-nRF528x-mbedos/blob/master/variants/ARDUINO_NANO33BLE/pins_arduino.h#L54		

volatile int demo_multiplier = 1; // 200 is good for testing via the onboard LEDs (Don't forget to change "sigPin" above)	
volatile int ppm [NUMBER_OF_CHANNELS];

extern "C" void TIMER4_IRQHandler_v()
{		
	static int cur_chan_numb;
	static unsigned int calc_rest;
	
	static bool state = true;
	
	if (timer->EVENTS_COMPARE[0] == 1)
	{   
		timer->EVENTS_COMPARE[0] = 0;							
		
		if (state) // Start pulse
		{  					
			digitalWrite (sigPin, HIGH); // On state				
			timer->CC[0] = PULSE_LENGTH * demo_multiplier;
			
			state = false;
		}  
		else // End pulse and calculate when to start the next pulse
		{  			
			state = true;					
			
			digitalWrite (sigPin, LOW); // Off state
			
			if (cur_chan_numb >= NUMBER_OF_CHANNELS)
			{
				cur_chan_numb = 0;					
				calc_rest = calc_rest + PULSE_LENGTH;  					
				timer->CC[0] = (FRAME_LENGTH - calc_rest) * demo_multiplier;				
				calc_rest = 0;
			}
			else
			{					
				timer->CC[0] = (ppm[cur_chan_numb] - PULSE_LENGTH) * demo_multiplier;					
				calc_rest = calc_rest + ppm[cur_chan_numb];					
				cur_chan_numb++;
			}     
		}
	}			
}

void setupTimer (NRF_TIMER_Type* timer, unsigned int timer_period)
{	
	timer->MODE = NRF_TIMER_MODE_TIMER;
	timer->BITMODE = TIMER_BITMODE_BITMODE_32Bit;
	timer->SHORTS = TIMER_SHORTS_COMPARE0_CLEAR_Enabled;		
	timer->PRESCALER = NRF_TIMER_FREQ_1MHz;
	timer->CC[0] = timer_period;
	
	timer->INTENSET = TIMER_INTENSET_COMPARE0_Enabled << TIMER_INTENSET_COMPARE0_Pos;	
	NVIC_EnableIRQ (timer_irq);
	
	timer->TASKS_START = 1;
}

void setup()
{		
	pinMode (sigPin, OUTPUT);
	
	setupTimer (timer, 10000); // Setup timer registers and start timer. Note that this value here is quite arbitrary because it's set in TIMER4_IRQHandler_v()	
	
	for (int i = 0; i < NUMBER_OF_CHANNELS; ++i)		
	    // ppm[i] = CHANNEL_DEFAULT_VALUE;
    	ppm[i] = 950 + i * 100; // This produces a varied but consistent offset LED demo via demo_multiplier
}

float currentTime = 0;
float previousTime = 0;
float deltaTime = 0; 

void loop()
{
	if (demo_multiplier == 1) // Don't run here for LED demo
	{
		currentTime = micros();
		deltaTime += currentTime - previousTime;
		previousTime = currentTime;          
		
		if (deltaTime > 10000) // 100Hz
		{
			deltaTime = 0;
			
			for (int i = 0; i < NUMBER_OF_CHANNELS; ++i)
			    if (ppm[i] > 1900)
			        ppm[i] = 950;
			    else
			        ppm[i] += 3;
		} 
	}
}

Here are my questions

  1. When are timer CC values updated if the transfer is initiated whilst the timer is running? 
  2. Commented in timer 3 handler for method 1 is "dummy" from here Nordic Timer Example. I thought that "NRF_TIMER3->EVENTS_COMPARE[n] = 0" took care of that, so please kindly explain to me what the two dummy lines do?
  3. How important is __WFE() and what does it do? (I have it commented, and everything seems fine)
  4. With respect to the findings as detailed in my "Note:" near the beginning of this post in relation to INTENSET for Timer, please explain why _Pos is required even though INTENSET's register only has one field?
  5. Please advise of any improvements for either method? Although both work well, method 1 as I already said is very smooth but limited to 4 channels via two timers, unless for example reusing the CC values by using a timer handler via EVENTS_COMPARE[4] to stop it, transfer the next set of PPM values, and restart again. Like it's already doing but two stages instead of one, but that would of course introduce a timer handler interruption part way in constructing the waveform.  
  • Hello,

    • When are timer CC values updated if the transfer is initiated whilst the timer is running? 

    The CC registers are captured whenever you capture them using NRF_CLOCK->TASKS_CAPTURE[n], where n refers to the CC register number.

    Commented in timer 3 handler for method 1 is "dummy" from here Nordic Timer Example. I thought that "NRF_TIMER3->EVENTS_COMPARE[n] = 0" took care of that, so please kindly explain to me what the two dummy lines do?

    I am not sure. You would have to ask the author of this example. This is not an official Nordic example. For official Nordic examples, please see our SDK.

    • How important is __WFE() and what does it do? (I have it commented, and everything seems fine)

    It has to do with current consumption. Your sample will run fine without __WFE() (wait for event) and __WFI() (wait for interrupt). However, the CPU will not go to sleep, causing a higher current consumption.

    • With respect to the findings as detailed in my "Note:" near the beginning of this post in relation to INTENSET for Timer, please explain why _Pos is required even though INTENSET's register only has one field?

    You can see from the INTENSET register description that the INTENSET bit for TIMER0 CC[0] is bit 16 in that register. This is why TIMER_INTENSET_COMPARE0_Pos = 16 (you can look it up in nrf52840_bitfields.h). So this line actually sets (pseudocode):

    NRF_TIMER0->INTENSET = TIMER_INTENSET_COMPARE0_Enabled << TIMER_INTENSET_COMPARE0_Pos;
    =
    NRF_TIMER0->INTENSET = 1 << 16 = 0x0001 0000 = 65536;

    Please advise of any improvements for either method? Although both work well, method 1 as I already said is very smooth but limited to 4 channels via two timers, unless for example reusing the CC values by using a timer handler via EVENTS_COMPARE[4] to stop it, transfer the next set of PPM values, and restart again. Like it's already doing but two stages instead of one, but that would of course introduce a timer handler interruption part way in constructing the waveform.  

    To be honest, I have not heard about pulse position modulation before reading this, so I don't know if I have any brilliant ideas. Is the idea that the pulses have the same length, but starts at the end of where the PWM signal would stop?

    I see that PWM is alot easier to set up with PPI, since as long as they have the same duty cycle/frequency, you can use one event to clear them all. 

    The way I imagine you would have to implement it is that as long as all channels have the same period/frequency, you need one timer that resets at this period (one CC), and then you would need 2 CCs to trigger the LoToHi and HiToLo. 

    In your "Method 2", I see that you change the CCs in the timer handler. I guess that is completely fine, as long as the CPU have time for it. If you intend to run BLE together with this, you may experience some issues, as BLE interrupts will have a higher priority than your timer interrupts. It would also require the CPU to wake up (several times?) every period. I don't know what your current consumption requirements are. Perhaps that is negligable if you are powering servo motors either way. 

    I guess the two implementations have their pros and cons for different scenarios. I see that in your second method you have an incremental ppi value array. Do you intend to do that? In that case, you would have to continuously update the ppi values, as you do in your TIMER interrupt. However, if you only need to update the values every now and then (as if you were controlling a motor for a system), I guess the first method is more efficient.

    Best regards,

    Edvin

  • Hi Edvin, and thank you very much for your detailed reply,

    Regarding your last point for method 2, it's not using GPIOTE or PPI (that's method 1) :) Method 2 does have an array of PPM/Servo values which are updated in the main loop via micros(). For this method 2, I could set a flag/bool in the timer handler exactly when the 22500 microseconds cycle is complete, and then use this flag to execute updating the PPM values in loop(). The thing is, I'm doubting that'll perfect the slight unsmoothness because as I stated, the timer used in method 2 isn't being stopped like it is for method 1, which leads me to my next query...

    1. Regarding NRF_CLOCK->TASKS_CAPTURE[n], I'm not using this, so for my question 1 (in relation to method 2) I'm wondering when the CC values are transferred because I'm not synchronising like is done in method 1. For example, if the CC values are updated immediately, then the current timer value would have a new target before it has reached its current target? **Refer to the 5th post for clarification about this**
    2. Regarding _Pos for INTENSET, various examples seem to arbitrarily use or not use _Pos, so I decided to try and only use it when necessary, but even though INTENSET for Timer only has one field in the register, it is indeed still needed, and so I don't understand why that is?

    Once again thank you kindly, cheers, Gary, I'll check back later (Y)


  • GaryDT said:
    Regarding NRF_CLOCK->TASKS_CAPTURE[n], I'm not using this, so for my question 1 (in relation to method 2) I'm wondering when the CC values are transferred because I'm not synchronising like is done in method 1. For example, if the CC values are updated immediately, then the current timer value would have a new target before it has reached its current target?

    Yes. If they are set immediately, but if you have some other interrupt with a higher priority that is blocking the timer interrupt, you may not be able to set it in time. 

    GaryDT said:
    but even though INTENSET for Timer only has one field in the register, it is indeed still needed

    What do you mean with "one field in the register"? Can you please point me to the documentation that you refer to?

    BR,

    Edvin

  • Regarding my last point 1. my apologies... my initial description for method 2 stating that it isn't synchronised is incorrect, i.e., the CC values are not being update directly, but instead the PPM array is being update via loop(), and those array values are then read into CC[0] each time the handler executes. Again sorry about that...

    So then for my initial question 1. to be meaningful, I've updated method 2 so that we now have a method 3, which I've tested and it works as smoothly as method 2. I've moved the PPM code from the timer handler to the main loop.

    Therefore to reword question 1 slightly... by the time "if (timer_handler_flag)" executes within loop(), the timer will have kept running, and now only later is the updating of CC[0] initiated. In other words, because it's possible to instruct CC values to be updated whilst the timer is incrementing towards its current CC target value, the question is therefore... when does CC get updated?

    If it's immediately, then the timer will have to either stop because it has already gone by its target, or count for even longer than it was set to do so... maybe instead, CC values are copied temporarily such that the timer increments towards a copy of the CC Value?     

    Method 3: Servo PPM using 1 timer (8 channels) & CC updated in main loop 

    // The following program is adapted from here: https://forum.arduino.cc/t/mbed-os-isr-linkage-on-arduino-33-ble/898811 and here: https://quadmeup.com/generate-ppm-signal-with-arduino
    // ------------------------------------------
    
    #include <nrf_timer.h>
    
    NRF_TIMER_Type* timer = NRF_TIMER4;
    IRQn_Type timer_irq = TIMER4_IRQn;
    
    #define NUMBER_OF_CHANNELS 8 		// Number of channels		
    #define CHANNEL_DEFAULT_VALUE 950	// Default servo value
    #define FRAME_LENGTH 22500			// PPM frame length in microseconds (1ms = 1000µs)
    #define PULSE_LENGTH 500  			// Pulse length		 
    
    #define sigPin 10 // 23 is the Nano 33 BLE Green LED. 10 is ~D10... See here for pin definitions  https://github.com/arduino/ArduinoCore-nRF528x-mbedos/blob/master/variants/ARDUINO_NANO33BLE/pins_arduino.h#L54		
    
    volatile int demo_multiplier = 1; // 200 is good for testing via the onboard LEDs (Don't forget to change "sigPin" above)	
    volatile int ppm [NUMBER_OF_CHANNELS];
    
    volatile bool timer_handler_flag = false;
    
    extern "C" void TIMER4_IRQHandler_v()
    {	
    	if (timer->EVENTS_COMPARE[0] == 1)
    	{   
    		timer_handler_flag = true;
    		timer->EVENTS_COMPARE[0] = 0;	
    	}			
    }
    
    void setupTimer (NRF_TIMER_Type* timer, unsigned int timer_period)
    {	
    	timer->MODE = NRF_TIMER_MODE_TIMER;
    	timer->BITMODE = TIMER_BITMODE_BITMODE_32Bit;
    	timer->SHORTS = TIMER_SHORTS_COMPARE0_CLEAR_Enabled;		
    	timer->PRESCALER = NRF_TIMER_FREQ_1MHz;
    	timer->CC[0] = timer_period;
    	
    	timer->INTENSET = TIMER_INTENSET_COMPARE0_Enabled << TIMER_INTENSET_COMPARE0_Pos;	
    	NVIC_EnableIRQ (timer_irq);
    	
    	timer->TASKS_START = 1;
    }
    
    void setup()
    {		
    	pinMode (sigPin, OUTPUT);
    	
    	setupTimer (timer, 10000); // Setup timer registers and start timer. Note that this value here is quite arbitrary because it's set in TIMER4_IRQHandler_v()	
    	
    	for (int i = 0; i < NUMBER_OF_CHANNELS; ++i)		
    		// ppm[i] = CHANNEL_DEFAULT_VALUE;
    		ppm[i] = 950 + i * 100; // This produces a varied but consistent offset LED demo via demo_multiplier
    }
    
    bool state = true;
    int cur_chan_numb;
    unsigned int calc_rest;	
    
    void loop()
    {
    	if (timer_handler_flag)		
    	{	
    		timer_handler_flag = false;
    		
    		if (demo_multiplier == 1) // Don't run here for LED demo			
    			for (int i = 0; i < NUMBER_OF_CHANNELS; ++i)
    				if (ppm[i] > 1900)
    					ppm[i] = 950;
    				else
    					ppm[i] += 1;		
    		
    		if (state) // Start pulse
    		{  					
    			digitalWrite (sigPin, HIGH); // On state				
    			timer->CC[0] = PULSE_LENGTH * demo_multiplier;
    			
    			state = false;
    		}  
    		else // End pulse and calculate when to start the next pulse
    		{  			
    			state = true;					
    			
    			digitalWrite (sigPin, LOW); // Off state
    			
    			if (cur_chan_numb >= NUMBER_OF_CHANNELS)
    			{
    				cur_chan_numb = 0;					
    				calc_rest = calc_rest + PULSE_LENGTH;  					
    				timer->CC[0] = (FRAME_LENGTH - calc_rest) * demo_multiplier;				
    				calc_rest = 0;
    			}
    			else
    			{					
    				timer->CC[0] = (ppm[cur_chan_numb] - PULSE_LENGTH) * demo_multiplier;					
    				calc_rest = calc_rest + ppm[cur_chan_numb];					
    				cur_chan_numb++;
    			}   
    		}			
    	}	
    }

    For INTENSET... please see this thread where I learnt about _Pos _Pos Thread Link

    And also here is the page for the Timer peripheral Timer Peripheral Documentation

    You can see that there's only one entry in the table for INTENSET, compared to for example SHORTS for which there are two entries/fields. Referring to Amanda's explanation via the 1st link above, it seems to follow that _Pos shouldn't be needed for INTENSET because the other registers such as BITMODE for example that also only have one field... don't require the _Pos instruction to be added via the << operator, hence my curiosity and therefore question about it?

  • GaryDT said:
    You can see that there's only one entry in the table for INTENSET, compared to for example SHORTS for which there are two entries/fields. Referring to Amanda's explanation via the 1st link above, it seems to follow that _Pos shouldn't be needed for INTENSET because the other registers such as BITMODE for example that also only have one field... don't require the _Pos instruction to be added via the << operator, hence my curiosity and therefore question about it?

    You can see from the timer's intenset register:

    That the relevant bits are bit 16->21. Therefore you need the << operator if you use TIMER_INTENSET_COMPARE0_Enabled

    GaryDT said:
    by the time "if (timer_handler_flag)" executes within loop(), the timer will have kept running, and now only later is the updating of CC[0] initiated. In other words, because it's possible to instruct CC values to be updated whilst the timer is incrementing towards its current CC target value, the question is therefore... when does CC get updated?

    The timer->CC[0] is updated at the time when that line executes:

    timer->CC[0] = PULSE_LENGTH * demo_multiplier;

    So if the timer reaches the value that you update it to before it is updated in your application, the timer will not trigger until it wraps around (reached countertop and start over). Especially if you have other interrupts with the same or higher priority this may be an issue for your application. If you have a BLE event blocking the timer interrupt, it will not be executed before the softdevice event is done, and you may have missed that timing critical operation.

Related