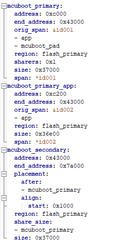
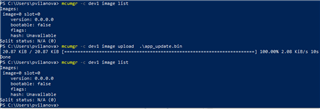
Multi image configuration with mcuboot doubt

Hi! I'm working with nRF52833 in a laird dev kit and I'm having problems understanding the multi-image build configuration on nrf Connect SDK with zephyr.

Our project concept is the following:

Having mcuboot on top, and 2 more bootable images.

The first image is the one with the hability to write to the slot 1 of both images.

The second image is the client application.
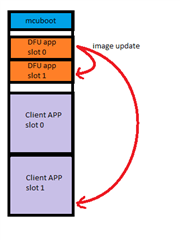
And I'm having problems on undestranding the project configuration and how child image works.

I'm having doubts in 2 different aspects, which are about project configuration and image management.

In order to understand the first one I'm working with the hello world sample with mcuboot enabled and trying to add an additional image to the project. Doing this I have the following doubts:

- Whats the correct syntax in the dts in order to specify my concept?

    As stated in https://developer.nordicsemi.com/nRF_Connect_SDK/doc/latest/mcuboot/readme-zephyr.html#building-and-using-mcuboot-with-zephyr  the first updateable image will go as image_0_primary_partition and image_0_secondary_partition and the second as image_1_primary_partition and image_1_secondary_partition. But when I go to the board dts I find the following corresponding to the hello world first image:
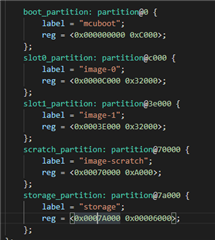
That label confuses me.

- Do I need to modify the flash-map stated in https://developer.nordicsemi.com/nRF_Connect_SDK/doc/latest/mcuboot/design.html#flash-map for multi-image? If so, where is it located in my project?

-Is hello world + mcuboot a multi image build? If so, is mcuboot build in the project as a child? Why I don't find in cmakelists.txt mcuboot child enable and definition as stated in https://developer.nordicsemi.com/nRF_Connect_SDK/doc/latest/nrf/ug_multi_image.html#defining-and-enabling-a-child-image ?

And about the second aspect, image management:

-The smp server example writes the image received in the slot 1 of the current image, is it possible to make it modify the slot 1 of other images? If not, what's the correct approach to my flash structure proposal?

Is there any example or documentation that clarifies what I'm trying to do?

Thanks!

Parents
  • Have you made any progress here?

    - Do I need to modify the flash-map stated in https://developer.nordicsemi.com/nRF_Connect_SDK/doc/latest/mcuboot/design.html#flash-map for multi-image? If so, where is it located in my project?

    No, you should not modify those. Instead use the Partition Manager and Kconfigs (.conf files).

    -Is hello world + mcuboot a multi image build? If so, is mcuboot build in the project as a child? Why I don't find in cmakelists.txt mcuboot child enable and definition as stated in https://developer.nordicsemi.com/nRF_Connect_SDK/doc/latest/nrf/ug_multi_image.html#defining-and-enabling-a-child-image ?

    Yes, hello_world+mcuboot is a multi image build. You need to look at hello_world/build/mcuboot. If you have enabled mcuboot all the mcuboot-related that is generated will be placed there.

    -The smp server example writes the image received in the slot 1 of the current image, is it possible to make it modify the slot 1 of other images? If not, what's the correct approach to my flash structure proposal?

    Could you take a look at the machine learning sample and the configs I linked to and see if you're able to get this to work? If not please get back to me and I will to put off some time and try set up a working example using the nRF52833

  • Hi Simon,

    Thanks for all the information.

    I've read about partition manager in order to understand how multi image works and I have more doubts.

    I'm trying to modify the partitions in the smp server example but I don't know how to shrink the app size, because in partitions.yml the mcuboot + the smp server app is occupying all the flash size.

    Who decides the size of my application? Because the smp example size is 0x37000, knowing this, I cannot fit any more images in my build because the primary and secondary partitions of smp server already occupies all flash.

    Moreover, if I wanted to configure a simple hello world as a child image to another project, what would be the steps to follow in partition manager and in the hello world itself?

    If you could try to set up the example that would be great!

    Thanks

  • pau_vilanova said:
    Who decides the size of my application? Because the smp example size is 0x37000, knowing this, I cannot fit any more images in my build because the primary and secondary partitions of smp server already occupies all flash.

    Actually you don't need to set the size of the application partition. First the Partition Manager will go through all the pm.yml files from all child images and the partitions from the pm_static.yml file if present, then it will set the sizes and addresses of those and lastly it will set the size of the main application dynamically (if not set in pm_static.yml). The less size the child images occupy, the more size the main application partition will occupy, and vice versa. By the way there is a difference between how much memory is allocated to the application and how much memory it actually uses. Even though 230kB is allocated for your application, it may only occupy 100kB. You can use the Programmer app to see how much memory your application actually uses.

    pau_vilanova said:
    Moreover, if I wanted to configure a simple hello world as a child image to another project, what would be the steps to follow in partition manager and in the hello world itself?

    I'll look into this.

    pau_vilanova said:
    If you could try to set up the example that would be great!

    I will try to do this. I will keep you updated on the progress

  • UPDATE 21.01.2022: Added strikethrough to some information I provided, after figuring this is not the best way to go about this. See later reply for more details.


    Hello, I will share my temporary progress. The project attached below is built using NCS v1.8.0 and the nRF52833dk_nrf52833

    2705.multi_img_dfu_833.zip

    I created a pm_static.yml file that would allocate space for the mcuboot_primary_1 (client APP slot 0) mcuboot_secondary_1 (client APP slot 1) partitions. Here is the result from running ninja partition_manager_report in the build folder:

      flash_primary (0x80000 - 512kB):
    +-------------------------------------------------+
    | 0x0: mcuboot (0xc000 - 48kB)                    |
    +---0xc000: mcuboot_primary (0x39000 - 228kB)-----+
    | 0xc000: mcuboot_pad (0x200 - 512B)              |
    +---0xc200: mcuboot_primary_app (0x38e00 - 227kB)-+
    | 0xc200: app (0x38e00 - 227kB)                   |
    +-------------------------------------------------+
    | 0x45000: mcuboot_secondary (0x39000 - 228kB)    |
    | 0x7e000: mcuboot_primary_1 (0x1000 - 4kB)       |
    | 0x7f000: mcuboot_secondary_1 (0x1000 - 4kB)     |
    +-------------------------------------------------+
    
      sram_primary (0x20000 - 128kB):
    +--------------------------------------------+
    | 0x20000000: sram_primary (0x20000 - 128kB) |
    +--------------------------------------------+

    What todo next:

    • Modify the mcumgr libraries such that they will look at the magic value stored in the start of app_update.bin and if the value is equal to e.g. 0x96f31111, it will place the update into "Client APP slot 1" (mcuboot_secondary_1), otherwise if the value is 0x96f3b83d (magic value for normal mcuboot updates, see MCUboot-->Image Format) put it into "DFU app slot 1" (mcuboot_secondary)
      • Then, if you want to update the client APP, you would need to modify the app_update.bin file and swap 0x96f31111 with the default value 0x96f3b83d
    • Modify the size of mcuboot_primary_1 and mcuboot_secondary_1 according to the size of client APP
Reply
  • UPDATE 21.01.2022: Added strikethrough to some information I provided, after figuring this is not the best way to go about this. See later reply for more details.


    Hello, I will share my temporary progress. The project attached below is built using NCS v1.8.0 and the nRF52833dk_nrf52833

    2705.multi_img_dfu_833.zip

    I created a pm_static.yml file that would allocate space for the mcuboot_primary_1 (client APP slot 0) mcuboot_secondary_1 (client APP slot 1) partitions. Here is the result from running ninja partition_manager_report in the build folder:

      flash_primary (0x80000 - 512kB):
    +-------------------------------------------------+
    | 0x0: mcuboot (0xc000 - 48kB)                    |
    +---0xc000: mcuboot_primary (0x39000 - 228kB)-----+
    | 0xc000: mcuboot_pad (0x200 - 512B)              |
    +---0xc200: mcuboot_primary_app (0x38e00 - 227kB)-+
    | 0xc200: app (0x38e00 - 227kB)                   |
    +-------------------------------------------------+
    | 0x45000: mcuboot_secondary (0x39000 - 228kB)    |
    | 0x7e000: mcuboot_primary_1 (0x1000 - 4kB)       |
    | 0x7f000: mcuboot_secondary_1 (0x1000 - 4kB)     |
    +-------------------------------------------------+
    
      sram_primary (0x20000 - 128kB):
    +--------------------------------------------+
    | 0x20000000: sram_primary (0x20000 - 128kB) |
    +--------------------------------------------+

    What todo next:

    • Modify the mcumgr libraries such that they will look at the magic value stored in the start of app_update.bin and if the value is equal to e.g. 0x96f31111, it will place the update into "Client APP slot 1" (mcuboot_secondary_1), otherwise if the value is 0x96f3b83d (magic value for normal mcuboot updates, see MCUboot-->Image Format) put it into "DFU app slot 1" (mcuboot_secondary)
      • Then, if you want to update the client APP, you would need to modify the app_update.bin file and swap 0x96f31111 with the default value 0x96f3b83d
    • Modify the size of mcuboot_primary_1 and mcuboot_secondary_1 according to the size of client APP
Children
Related