I have connected a nRF5340 DK board which the Programmer can connect to. I then drag the two .hex files for the Heart Rate Monitor demo over to the File Memory Layout window, however the following commands are still grayed out:
- Erase all
- Erase & write
- Save as file
- Reset
- Write
- Read
What am I missing please?

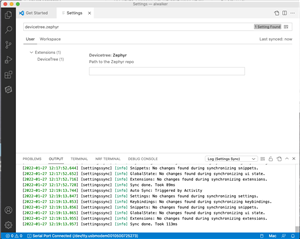
2022-01-24T18:11:10.585Z INFO Application data folder: /Users/alwalker/Library/Application Support/nrfconnect/pc-nrfconnect-programmer
2022-01-24T18:11:10.768Z DEBUG iface: en0
2022-01-24T18:11:10.769Z DEBUG IP4:
2022-01-24T18:11:10.769Z DEBUG IP6:
2022-01-24T18:11:10.769Z DEBUG MAC: f4:5c:89:8a:4c:71
2022-01-24T18:11:10.770Z DEBUG Client Id: 5f1d8708c90a91adf6b1603fb7250edf40e5ca2f
2022-01-24T18:11:10.771Z DEBUG Google Analytics for category pc-nrfconnect-programmer has initialized
2022-01-24T18:11:10.858Z DEBUG App pc-nrfconnect-programmer v2.2.0 official
2022-01-24T18:11:10.859Z DEBUG App path: /Users/alwalker/.nrfconnect-apps/node_modules/pc-nrfconnect-programmer
2022-01-24T18:11:10.859Z DEBUG nRFConnect 3.9.3, required by the app is (^3.9.2)
2022-01-24T18:11:10.859Z DEBUG nRFConnect path: /Applications/nRF Connect for Desktop.app/Contents/Resources/app.asar
2022-01-24T18:11:10.859Z DEBUG HomeDir: /Users/alwalker
2022-01-24T18:11:10.859Z DEBUG TmpDir: /var/folders/gt/fzbprb7j48b7rm6dmdcdx2q00000gn/T/
2022-01-24T18:11:21.384Z INFO Using @nordicsemiconductor/nrf-device-lib-js to communicate with target via JLink
2022-01-24T18:11:21.384Z INFO JLink OB firmware version J-Link OB-nRF5340-NordicSemi compiled Jul  2 2021 10:55:25
2022-01-24T18:11:21.384Z DEBUG Sending usage data...
2022-01-24T18:11:21.385Z DEBUG Category: pc-nrfconnect-programmer
2022-01-24T18:11:21.385Z DEBUG Action: Open jlink OB version
2022-01-24T18:11:21.385Z DEBUG Label: J-Link OB-nRF5340-NordicSemi compiled Jul  2 2021 10:55:25
2022-01-24T18:11:21.385Z DEBUG Usage data has not been sent. isSendingUsageData is set to false.
2022-01-24T18:11:21.385Z INFO Device family
2022-01-24T18:11:21.385Z DEBUG Sending usage data...
2022-01-24T18:11:21.385Z DEBUG Category: pc-nrfconnect-programmer
2022-01-24T18:11:21.385Z DEBUG Action: Open jlink device family
2022-01-24T18:11:21.385Z DEBUG Label: null
2022-01-24T18:11:21.385Z DEBUG Usage data has not been sent. isSendingUsageData is set to false.
2022-01-24T18:11:21.385Z INFO Device version
2022-01-24T18:11:21.385Z DEBUG Sending usage data...
2022-01-24T18:11:21.385Z DEBUG Category: pc-nrfconnect-programmer
2022-01-24T18:11:21.385Z DEBUG Action: Open jlink device version
2022-01-24T18:11:21.385Z DEBUG Label: null
2022-01-24T18:11:21.386Z DEBUG Usage data has not been sent. isSendingUsageData is set to false.
2022-01-24T18:11:21.386Z INFO Board version PCA10095
2022-01-24T18:11:21.386Z DEBUG Sending usage data...
2022-01-24T18:11:21.386Z DEBUG Category: pc-nrfconnect-programmer
2022-01-24T18:11:21.386Z DEBUG Action: Open jlink device board version
2022-01-24T18:11:21.386Z DEBUG Label: PCA10095
2022-01-24T18:11:21.386Z DEBUG Usage data has not been sent. isSendingUsageData is set to false.
2022-01-24T18:11:21.387Z DEBUG Sending usage data...
2022-01-24T18:11:21.387Z DEBUG Category: pc-nrfconnect-programmer
2022-01-24T18:11:21.387Z DEBUG Action: Open device
2022-01-24T18:11:21.387Z DEBUG Label: jlink
2022-01-24T18:11:21.387Z DEBUG Usage data has not been sent. isSendingUsageData is set to false.
2022-01-24T18:11:53.159Z INFO Parsing HEX file:  /Users/alwalker/Desktop/Peripheral_Heart_Rate_nRF5340_DK/peripheral_hr.hex
2022-01-24T18:11:53.173Z INFO File was last modified at  02/12/2020, 09:36:50
2022-01-24T18:11:53.224Z INFO Update files regions according to NRFDL_DEVICE_CORE_APPLICATION core
2022-01-24T18:11:53.224Z INFO Parse memory regions for file
2022-01-24T18:11:53.241Z INFO Parsing HEX file:  /Users/alwalker/Desktop/Peripheral_Heart_Rate_nRF5340_DK/hci_open_amp.hex
2022-01-24T18:11:53.241Z INFO File was last modified at  02/12/2020, 09:36:52
2022-01-24T18:11:53.326Z INFO Update files regions according to NRFDL_DEVICE_CORE_APPLICATION core
2022-01-24T18:11:53.326Z INFO Parse memory regions for file
2022-01-24T18:11:53.326Z INFO Update files regions according to NRFDL_DEVICE_CORE_NETWORK core
2022-01-24T18:11:53.326Z INFO Parse memory regions for file
# nRFConnect System Report - 2022-01-25T07-26-56.445Z
- System: Apple Inc. MacBookPro12,1
- BIOS: Apple Inc. 428.60.3.0.0
- CPU: 1 x Intel Core
Core i7-5557U 3.1 GHz 4 cores (2 physical)
- Memory: 425.4 MB free of 16 GB total
- Filesystem: /dev/disk1s5 (APFS) 931.6 GB 2.2% used
- OS: Mac OS X (10.15.7) darwin x64
- Versions
- kernel: 19.6.0
- git: 2.24.3
- node: 14.16.0
- python: 2.7.16
- python3: 3.8.2
- nrfjprog: 10.15.1
- jlink: 7.58b
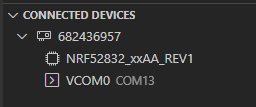
- Connected devices:
- 001050072527 PCA10095: /dev/tty.usbmodem0010500725271, /dev/tty.usbmodem0010500725273
- Current device:
- name: nRF5340 DK
- serialNumber: 001050072527
- cores: 2
- website: www.nordicsemi.com/.../nRF5340-DK