nRF Connect SDK DFU

After reviewing the add DFU support to your application guide

 Add DFU support to your application 

i have several questions:

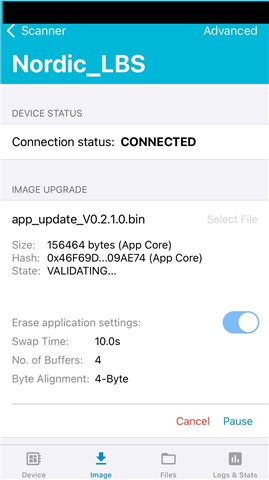
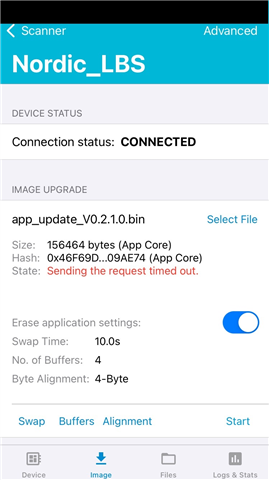
1)What modifications are required for the nRF5340 with an app core and net core?  This example shows using Device Manager to upload a .bin file but that is only one of the app core or net core, not both.  Can Device Manager accept a the generated .zip with the manifest to update both at once?  Could a similar guide be generated for updating both the app and net cores at the same time?  When trying to upload the zip of both, Device Manager shows the hash of both bin files, but when started with confirm only, the state shows VALIDATING… for a while then “Sending the request timed out.”  When using the advanced page, I can manually select the app core and download the bin for it – not the zip.

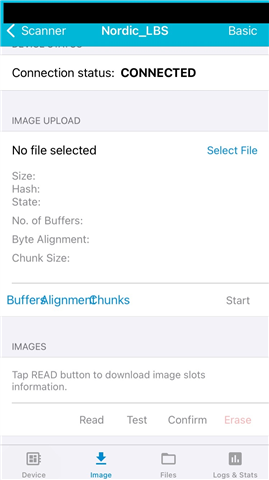
2)In Device Manger, the read, test, confirm, and erase options do not work.  How can they be activated?

3)The guide said that Device Manager will reset the device after the transfer but watching the debug output on the device, this is not the case.  I need to manually press the advanced button to get the reset command to show then issue it.  Is this correct?

4)I have read about encryption and updating keys but in other places it appears it is not supported to encrypt an image:

 Please add/enable support for encrypted images with MCUBOOT 

Is it correct to say signing is supported but encryption is not?  Is there a step by step guide to generate new encryption keys (or signing keys) and update the MCUboot and app for both the app core and net core?

5)If singing is working correctly, is it still possible for a user to upload an image that is not correctly signed, but that the MCUboot will just not swap to it?

Thank you

Parents
  • Thank you for your answers.  I think a large problem is that the nRF Connect Device Manager is not working correctly.  Using the Nordic_LBS example and modifying for the DFU similar to the guide, the iOS version of the Device Manger struggles.  First it validates for a while

    Then it times out

    and the commands to test or confirm do not work after the read is issued:

    I did switch to the android Version and it worked as you showed.  The upload would work along with the commands to read and then test or confirm the firmware.  So there are issued with the iOS version.  However, when switching to the DFU support on our program, the android version would fail to work.

    I went back to the iOS version and it did work correctly.  So the android version would fail on our firmware and the iOS would fail on the Nordic_LBS firmware.  The version of the Device Manager i used are:

    iOS device manager
    V1.2.5
    ~2022-07-07

    Android device manager
    1.4.0
    26.06.2022

    Thank you

  • So there are currently two issues:

    1. Performing DFU using your firmware and the Android Device Manager 1.4.0 fails
    2. Performing DFU using the peripheral_lbs from the DFU guide and the iOS Device Manager v1.2.5 fails

    Regarding 1, would you be able to upload your firmware (or a minimal reproducible sample), so I can reproduce it on my side and investigate it

    Regarding 2, I don't have an iOS device at my home office, but I will ask some colleagues to reproduce this on Monday

    Best regards,

    Simon

  • For anyone else who wishes to use signatures to only load authorized software with a custom signature after DFU support has been added to their project:

    These steps were performed in windows.

    Inside the SDK, go to:

    v2.0.0\bootloader\mcuboot\scripts\

    And then generate a new private key and a public key from the private key.  I have not tested with any other type then rsa-2048. 

    python imgtool.py keygen -k my_private_key.pem -t rsa-2048

    python imgtool.py getpub -k my_private_key.pem > pub_key.c

    Generating the c file is not required but useful for confirmation later.  The placement of the key file seams unimportant but I placed mine in the project directory such as follows:

                    My_Project\Key\my_private_key.pem

    Then create a directory called child_image if it does not already exist as follows:

                    My_Project\child_image\

    Create a file called mcuboot.conf inside the directory as follows:

                    My_Project\child_image\mcuboot.conf

    Add a single line to the file pointing to the absolute path of the key file.  You must use forward slashes.  The line may look such as follows:

    CONFIG_BOOT_SIGNATURE_KEY_FILE="C:/Projects/My_Project/Key/my_private_key.pem"

    Take care not to add any extra spaces or the build will fail.  Go ahead and rebuild your project.  It should succeed and build the bootloader using the private key and build your application with a public key automatically extracted from the private key.  Because of this you are not required to generate a key pair but just a private key.  However, you may verify the project is using your new private key by verifying the public key generated by the build system is the same as the pub_key.c you previously generated.  The build generated public key file is located at:

                    My_Project\build\mcuboot\zephyr\autogen-pubkey.c

    As far as I know, at the time of writing, encrypting your software images is not yet supported but you can prevent software not signed by you from being loaded.

    I have read other methods to add the private key including changing the CMakeList.txt file and a method to manually sign but i wanted to use the build system to handle it.

    I hope this helps anyone else struggling with this.

  • Hello Simon

    The DFU guide has a BLE OTA section but also a serial section:

     Add DFU support to your application 

    Could this documentation be updated or expanded on and instruction given to use mcumgr in windows?  Also could the instructions be updated to build with VS Code?

    Thank you

  • lCannon said:
    Could this documentation be updated or expanded on and instruction given to use mcumgr in windows?

    I don't think the mcumgr commands are any different in Windows than in Linux. The only thing I could think of was the serial port name used with --connstring. However, in the tutorial I added the following note: "Get the development kit’s serial port name (for example, "/dev/ttyACM0"), by running nrfjprog --com" (see Serial DFU -->Testing), which should help you get the serial port name when using both Windows and Linux. 

    lCannon said:
    Also could the instructions be updated to build with VS Code?

    To keep the tutorial concise, short and to the point I just used west. I added the following note in the start:  "The west command is used to build and flash the samples, but if you're not familiar with the command line, you can build and flash the sample using nRF Connect for VS Code instead.". So I added some links that demonstrated how to build and flash usin VS Code.

    Does this seem reasonable? Please let me know if not.

    Best regards,

    Simon

  • Hi Simon,
        I am also encountering this symptom, may I know any progress of the question "Sending the request timed out." ?
        Thank you
    Jason

Reply Children
Related