How to get BH1749 Light sensor RGB values data from mesh sensor along with BME680

Hello

I was trying to add BH1749 I2C Sensor for existing Mesh_Sensor example to get RGB values like shown in this Light_Sensor example. Couldn't decide how to do it and which Sensor_Types (FYI: I used bt_mesh_sensor_present_amb_light_level) and which Sensor_Channels    (FYI: I used SENSOR_CHAN_RED, SENSOR_CHAN_GREEN, SENSOR_CHAN_BLUE) or it really possible? The Things i used so far is unfortunatley not success need a help in this.

Thank You

Regards

Parents
  • Hi,

    Have you tested that you are able to get the sensor values? 

    You do not have to read I2C directly as is done in the light sensor example you are linking to. Instead you should be using Zephyr's sensor driver. To read the sensor values themselves you can use sensor_channel_get, so then you can do something like the following:

    #define SENSOR_NODE DT_NODELABEL(bh1749)
    static const struct device *dev = DEVICE_DT_GET(SENSOR_NODE);
    
    static int red_light_level_get(struct bt_mesh_sensor_srv *srv,
    			 struct bt_mesh_sensor *sensor,
    			 struct bt_mesh_msg_ctx *ctx,
    			 struct sensor_value *rsp)
    {
    	int err;
    
    	sensor_sample_fetch(dev);
    	err = sensor_channel_get(dev, SENSOR_CHAN_RED, rsp);
    	if (err) {
    		printk("Error getting red channel (%d)\n", err);
    	}
    	return err;
    }
    
    static struct bt_mesh_sensor red_light_level = {
    	.type = &bt_mesh_sensor_present_amb_light_level,
    	.get = red_light_level_get,
    };

    Note that this is only for the red channel. This is because bt_mesh_sensor_present_amb_light_level only has one channel, and the sensor value response buffer of the get function (red_light_level_get in this case) holds the same amount of values as the sensor type. So if you want to send a number for all the colors you must create a bt_mesh_sensor for each color. Another option is to combine the light levels of the three channels into one value and send that, for example taking the average of the channels or something:

    #define SENSOR_NODE DT_NODELABEL(bh1749)
    static const struct device *dev = DEVICE_DT_GET(SENSOR_NODE);
    
    static int light_level_get(struct bt_mesh_sensor_srv *srv,
    			 struct bt_mesh_sensor *sensor,
    			 struct bt_mesh_msg_ctx *ctx,
    			 struct sensor_value *rsp)
    {
    	int err;
    	struct sensor_value color_values[3];
    
    	sensor_sample_fetch(dev);
    	err = sensor_channel_get(dev, SENSOR_CHAN_RED, &colour_values[0]);
    	if (err) {
    		printk("Error getting red channel (%d)\n", err);
    	}
    	err = sensor_channel_get(dev, SENSOR_CHAN_GREEN, &colour_values[1]);
    	if (err) {
    		printk("Error getting green channel (%d)\n", err);
    	}
    	err = sensor_channel_get(dev, SENSOR_CHAN_BLUE, &colour_values[2]);
    	if (err) {
    		printk("Error getting blue channel (%d)\n", err);
    	}
    
    	// Do some calculations on the color values to get rsp
    
    	return err;
    }
    
    static struct bt_mesh_sensor light_level = {
    	.type = &bt_mesh_sensor_present_amb_light_level,
    	.get = light_level_get,
    };

    I would recommend taking a look at the BH1749: Ambient Light Sensor IC sample to see how the sensor is used there.

    Best regards,

    Marte

  • Hello Marte

    I really appreciate for your kind help with the example code.

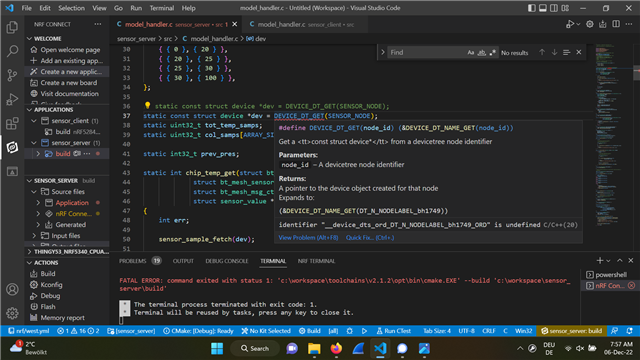
    For the first code i tried it in Sensor_Server example but it gives some error.

    [80/394] Building C object CMakeFiles/app.dir/src/model_handler.c.obj
    FAILED: CMakeFiles/app.dir/src/model_handler.c.obj 
    C:\workspace\toolchains\v2.1.2\opt\zephyr-sdk\arm-zephyr-eabi\bin\arm-zephyr-eabi-gcc.exe -DKERNEL -DNRF5340_XXAA_APPLICATION -DNRF_SKIP_FICR_NS_COPY_TO_RAM -DUSE_PARTITION_MANAGER=1 -DZCBOR_ASSERT -D_FORTIFY_SOURCE=2 -D__PROGRAM_START -D__ZEPHYR__=1 -I../include -IC:/workspace/v2.1.2/zephyr/include/zephyr -IC:/workspace/v2.1.2/zephyr/include -Izephyr/include/generated -IC:/workspace/v2.1.2/zephyr/soc/arm/nordic_nrf/nrf53 -IC:/workspace/v2.1.2/zephyr/soc/arm/nordic_nrf/common/. -IC:/workspace/v2.1.2/zephyr/subsys/bluetooth -IC:/workspace/v2.1.2/bootloader/mcuboot/boot/bootutil/include -IC:/workspace/v2.1.2/bootloader/mcuboot/boot/zephyr/include -IC:/workspace/v2.1.2/zephyr/subsys/usb/device -IC:/workspace/v2.1.2/zephyr/subsys/settings/include -IC:/workspace/v2.1.2/nrf/include -IC:/workspace/v2.1.2/modules/hal/cmsis/CMSIS/Core/Include -IC:/workspace/v2.1.2/modules/hal/nordic/nrfx -IC:/workspace/v2.1.2/modules/hal/nordic/nrfx/drivers/include -IC:/workspace/v2.1.2/modules/hal/nordic/nrfx/mdk -IC:/workspace/v2.1.2/zephyr/modules/hal_nordic/nrfx/. -Imodules/libmetal/libmetal/lib/include -IC:/workspace/v2.1.2/modules/lib/open-amp/open-amp/lib/include -IC:/workspace/v2.1.2/modules/crypto/tinycrypt/lib/include -IC:/workspace/v2.1.2/modules/lib/zcbor/include -IC:/workspace/v2.1.2/nrfxlib/softdevice_controller/include -IC:/workspace/v2.1.2/zephyr/subsys/mgmt/mcumgr/lib/mgmt/include -IC:/workspace/v2.1.2/zephyr/subsys/mgmt/mcumgr/lib/util/include -IC:/workspace/v2.1.2/zephyr/subsys/mgmt/mcumgr/lib/smp/include -IC:/workspace/v2.1.2/zephyr/subsys/mgmt/mcumgr/lib/cmd/img_mgmt/include -IC:/workspace/v2.1.2/zephyr/subsys/mgmt/mcumgr/lib/cmd/os_mgmt/include -isystem C:/workspace/v2.1.2/zephyr/lib/libc/minimal/include -isystem c:/workspace/toolchains/v2.1.2/opt/zephyr-sdk/arm-zephyr-eabi/bin/../lib/gcc/arm-zephyr-eabi/10.3.0/include -isystem c:/workspace/toolchains/v2.1.2/opt/zephyr-sdk/arm-zephyr-eabi/bin/../lib/gcc/arm-zephyr-eabi/10.3.0/include-fixed -isystem C:/workspace/v2.1.2/nrfxlib/crypto/nrf_cc312_platform/include -Og -imacros C:/workspace/sensor_server/build/zephyr/include/generated/autoconf.h -ffreestanding -fno-common -g -gdwarf-4 -fdiagnostics-color=always -mcpu=cortex-m33 -mthumb -mabi=aapcs -mfp16-format=ieee --sysroot=C:/workspace/toolchains/v2.1.2/opt/zephyr-sdk/arm-zephyr-eabi/arm-zephyr-eabi -imacros C:/workspace/v2.1.2/zephyr/include/zephyr/toolchain/zephyr_stdint.h -Wall -Wformat -Wformat-security -Wno-format-zero-length -Wno-main -Wno-pointer-sign -Wpointer-arith -Wexpansion-to-defined -Wno-unused-but-set-variable -Werror=implicit-int -fno-asynchronous-unwind-tables -fno-pie -fno-pic -fno-reorder-functions -fno-defer-pop -fmacro-prefix-map=C:/workspace/sensor_server=CMAKE_SOURCE_DIR -fmacro-prefix-map=C:/workspace/v2.1.2/zephyr=ZEPHYR_BASE -fmacro-prefix-map=C:/workspace/v2.1.2=WEST_TOPDIR -ffunction-sections -fdata-sections -std=c99 -nostdinc -MD -MT CMakeFiles/app.dir/src/model_handler.c.obj -MF CMakeFiles\app.dir\src\model_handler.c.obj.d -o CMakeFiles/app.dir/src/model_handler.c.obj -c ../src/model_handler.c
    In file included from C:\workspace\v2.1.2\zephyr\include\zephyr\toolchain\gcc.h:88,
                     from C:\workspace\v2.1.2\zephyr\include\zephyr\toolchain.h:50,
                     from C:\workspace\v2.1.2\zephyr\include\zephyr\init.h:10,
                     from C:\workspace\v2.1.2\zephyr\include\zephyr\device.h:29,
                     from c:\workspace\sensor_server\src\model_handler.c:7:
    C:\workspace\v2.1.2\zephyr\include\zephyr\device.h:96:39: error: '__device_dts_ord_DT_N_NODELABEL_bh1749_ORD' undeclared here (not in a function)
       96 | #define DEVICE_NAME_GET(name) _CONCAT(__device_, name)
          |                                       ^~~~~~~~~
    C:\workspace\v2.1.2\zephyr\include\zephyr\toolchain\common.h:132:26: note: in definition of macro '_DO_CONCAT'
      132 | #define _DO_CONCAT(x, y) x ## y
          |                          ^
    C:\workspace\v2.1.2\zephyr\include\zephyr\device.h:96:31: note: in expansion of macro '_CONCAT'
       96 | #define DEVICE_NAME_GET(name) _CONCAT(__device_, name)
          |                               ^~~~~~~
    C:\workspace\v2.1.2\zephyr\include\zephyr\device.h:276:37: note: in expansion of macro 'DEVICE_NAME_GET'
      276 | #define DEVICE_DT_NAME_GET(node_id) DEVICE_NAME_GET(Z_DEVICE_DT_DEV_NAME(node_id))
          |                                     ^~~~~~~~~~~~~~~
    C:\workspace\v2.1.2\zephyr\include\zephyr\device.h:296:34: note: in expansion of macro 'DEVICE_DT_NAME_GET'
      296 | #define DEVICE_DT_GET(node_id) (&DEVICE_DT_NAME_GET(node_id))
          |                                  ^~~~~~~~~~~~~~~~~~
    c:\workspace\sensor_server\src\model_handler.c:37:35: note: in expansion of macro 'DEVICE_DT_GET'
       37 | static const struct device *dev = DEVICE_DT_GET(SENSOR_NODE);
          |                                   ^~~~~~~~~~~~~
    [92/394] Building C object zephyr/CMakeFiles/zephyr.dir/lib/os/onoff.c.obj
    ninja: build stopped: subcommand failed.
    FATAL ERROR: command exited with status 1: 'c:\workspace\toolchains\v2.1.2\opt\bin\cmake.EXE' --build 'c:\workspace\sensor_server\build'
    
     *  The terminal process terminated with exit code: 1. 
     *  Terminal will be reused by tasks, press any key to close it. 

    These are the errors. May be same error comes to second code also since we use same code to get SENSOR_NODE

    I would recommend taking a look at the BH1749: Ambient Light Sensor IC sample to see how the sensor is used there.

    I am using thing:53 with nRF5340_DK for Sensor_Server and it looks like BH1749: Ambient Light Sensor IC is compatible only for thingy:91 and Sensor_Server is not compatible with thingy:91.

    How would i proceed?

    Thank You

    Best Regards

  • Hi,

    Try using the following instead of the first two lines in the code in my previous reply:

    const struct device *dev = DEVICE_DT_GET_ONE(rohm_bh1749);

    The light sensor on the Thingy:91, which is used in the sensor server sample, is the same sensor, BH1749. So even if the documentation states that the sample is only compatible with Thingy:91, you should still be able to reuse a lot of the code for communicating with the sensor on Thingy:53.

    SaSu said:
    How would i proceed?

    You should first make sure that you are able to get the sensor data, for example by printing the sensor data to console. When you have managed this, you should change the code related to Bluetooth Mesh so that you send your sensor data.

    Best regards,

    Marte

Reply
  • Hi,

    Try using the following instead of the first two lines in the code in my previous reply:

    const struct device *dev = DEVICE_DT_GET_ONE(rohm_bh1749);

    The light sensor on the Thingy:91, which is used in the sensor server sample, is the same sensor, BH1749. So even if the documentation states that the sample is only compatible with Thingy:91, you should still be able to reuse a lot of the code for communicating with the sensor on Thingy:53.

    SaSu said:
    How would i proceed?

    You should first make sure that you are able to get the sensor data, for example by printing the sensor data to console. When you have managed this, you should change the code related to Bluetooth Mesh so that you send your sensor data.

    Best regards,

    Marte

Children
  • Hello Marte

    Thank You again for the updated code. Looks like with the code update you gave doesn't give any errors but something is missing in device tree or proj.config file. The error is as follows:

    I checked the error in the nordic forum we have undefined reference to `__device_dts_ord_23' for error 23 but we don't have for number 135. You have any idea what is missing?

    Best Regards

  • Hi,

    You need to enable the BH1749 sensor in prj.conf:

    # Light sensor
    CONFIG_I2C=y
    CONFIG_SENSOR=y
    CONFIG_BH1749=y

    In order to test this I made a simple sample myself, for both the sensor and observer. I have attached the examples here so you have a starting point. I removed most of the things related to the other models, so now the sensor only sends the light level of the red light. So right now I have only implemented functionality for one channel/sensor, but I have put the two options I presented previously (treat each channel as one sensor or combine the values to one) in comments in the code, with the required code as comment as well. However, if you go for the option where you combine all the values to one value you will have to figure out how you want to handle the calculation of the value yourself, so I have not added any code for this.

    I tested with the mesh_light_sensor_server running on Thingy:53 and mesh_light_sensor_client running on nRF52840 DK, but the latter should work with any board compatible with the Mesh sensor observer sample. Remember to configure the sensor model as described in the documentation, and the sensor observer/client should start printing the light level from the server.

    Hope this helps you get started Slight smile

    mesh_light_sensor_server.zip

    mesh_light_sensor_client.zip

    Best regards,

    Marte

  • Hello Marte

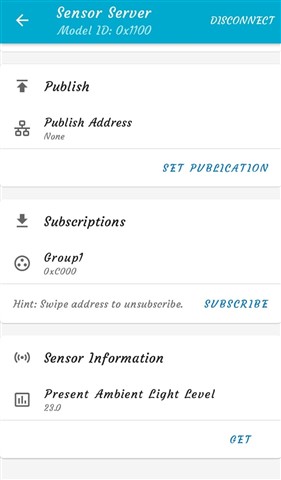
    That's so sweet of you to upload along with examples and Yeah i get value on mobile as i attached in the picture below.

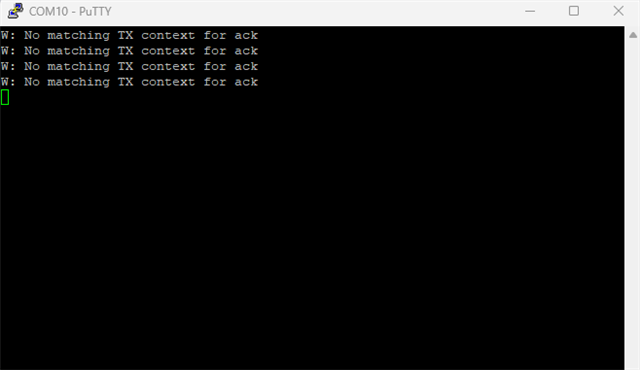
    But I cannot see the values on PuTTY no idea what is the problem attached the picture below. So after i have done the provisioning process it stops and show nothing.

    I have another doubt in Sensors in this link we have sensor channels which we can use to get values according to the sensor we use there we have seperate channels for RED,GREEN and BLUE like SENSOR_CHAN_RED, SENSOR_CHAN_GREEN, SENSOR_CHAN_BLUE but we don't have such type of seperate thing for sensor types as we have in Sensor_Types this link. So how to have some kind of Red value:230 , Green Value:190. Blue value: 150, values these in output?

    Example: We have seperate sensor types for temperature, humidity, air pressure as same as names to identfy easily. So, how do it in similar for RGB Values?

    Thank You for your effort

    Best Regards

  • Hi,

    SaSu said:
    But I cannot see the values on PuTTY no idea what is the problem attached the picture below. So after i have done the provisioning process it stops and show nothing.

    Is this from the sensor client? Are you using the sensor client from the SDK or the one I uploaded here? Also, make sure that you have configured the models in addition to provisioning. You must bind application key 1 to the sensor server and sensor client models, and you must also configure publishing and subscribing on the server as well as subscribing on the client. This is explained under Configuring models in the documentation.

    SaSu said:
    So how to have some kind of Red value:230 , Green Value:190. Blue value: 150, values these in output?

    You will need to treat each channel as a different sensor. However, I realized that doing it as in my example will cause issues on the client side, as the client does not have a way of differentiating between the three sensors, since it only checks the device property ID, which is identical in all three cases.

    For this to work on the client side you need to create an element for each color instead, both on the server and client side. I wanted to test this myself, so I have already made examples for this as well. Be aware that with this method you will have to make sure to select different publish/subscribe address for the different elements, for example unicode or group address, in the nRF Mesh app. You need to do this on both the server and client, and the publish address for the red light on the server needs to be the same as the subscribe address for red light on the client.

    mesh_rgb_light_sensor_server.zip

    mesh_rgb_light_sensor_client.zip

    Best regards,

    Marte

  • Hello Marte

    Is this from the sensor client? Are you using the sensor client from the SDK or the one I uploaded here? Also, make sure that you have configured the models in addition to provisioning. You must bind application key 1 to the sensor server and sensor client models, and you must also configure publishing and subscribing on the server as well as subscribing on the client. This is explained under Configuring models in the documentation.

    The PuTTY Ouput is from Sensor_client i used the client which you have uploaded. Yes I used the configuring models as per the Documentation.

    For this to work on the client side you need to create an element for each color instead, both on the server and client side. I wanted to test this myself, so I have already made examples for this as well. Be aware that with this method you will have to make sure to select different publish/subscribe address for the different elements, for example unicode or group address, in the nRF Mesh app. You need to do this on both the server and client, and the publish address for the red light on the server needs to be the same as the subscribe address for red light on the client.

    Thank You so much for this example i will try and let you know:)

    Best Regards

Related