Thingy 91 GNSS serial_lte_modem

Hello,

I flashed the precompiled hex file, found on the thingy91 product description (https://www.nordicsemi.com/Products/Development-hardware/Nordic-Thingy-91). Also the connectivity bridge is flashed.
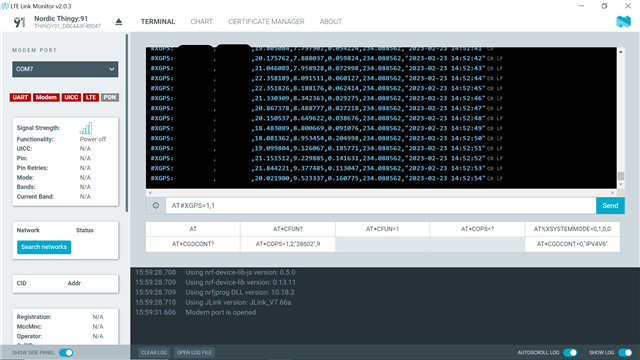
With the NRF LTE link monitor, I got the LTE working. I can send & receive MQTT commands.

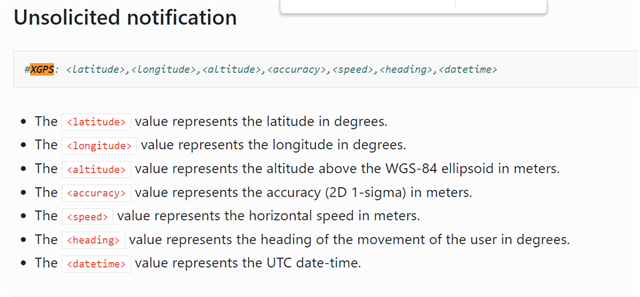
But when I want to get the GPS data, I don't get any location data. I followed this description: https://developer.nordicsemi.com/nRF_Connect_SDK/doc/latest/nrf/applications/serial_lte_modem/doc/GNSS_AT_commands.html

Now I see that the LTE and the GPS shares the same antenna. Does this fimware support GNSS data? Do I have to set any extra configuration? (Thinking COEX or MAGPIO)
Or should this work out-of-the-box?

I tried going outside, but also without luck.

Regards,

Sibrecht

Parents
  • Hello Sibrecht, there was a similar discussion in the iotcreators.com discord community for Thingy 91. I'm pasting it here, I hope it helps. I also suggest you to join the discord community for Thingy 91:

    user1:

    Anyone got a successful GNSS position?
    I go with:
    AT+CFUN=4
    AT%XSYSTEMMODE=1,1,1,0
    AT+CFUN=31
    AT#XGPS=1,100
    and wait for a position notification message.....
    nothing....

    user2:

    I experienced a similar issue earlier, and what I did was I’ve restarted the device, flashed serial lte modem, send #XSYSTEMMODE, #XCOEX0,+CFUN=31 and #XGPS=1,1 commands consecutively, following this tutorial: developer.nordicsemi.com/.../GNSS_AT_commands.html
    in my experience, I've waited a ~minute between each command, at the end, XGPS returned OK, but I didnt see any data. I've continued to wait and didnt interrupt with any other command (this is important otherwise it doesnt work) then I received the data after 5 mins.
    so you need to be very patience and slow in the intitial GPS configuration, I learnt it from the hard way let me know if it works!

    user1:

    ok, works now..

  • Hi Sibrecht,

    Have you tried the steps suggested by  ? Do mentioned steps work for you?

    Best regards,
    Dejan

  • Hi Dejan & drselim,

    We tried with two thingy91, but had no result on any of them.
    I waited a minute between every command and waited for over three hours for data, without anything.

    To be sure: I used this serial_lte fw: https://nsscprodmedia.blob.core.windows.net/prod/software-and-other-downloads/dev-kits/thingy91/thingy91_fw_2022_12_08_188a1603.zip

    And i flashed it with the nrf programmer gui. I used the firmware without the bootloader. I did not flash with the segger. But I don't suspect it would make a difference?

    Regards,

    Sibrecht

  • Hi Sibrecht, I tested and made sure that Thingy:91 gets the GPS coordinates, altitude and speed. Please follow these steps that I went through:

    1) Go to 

    https://www.nordicsemi.com/Products/Development-hardware/Nordic-Thingy-91/Download?lang=en#infotabs

    and download both:

    a) Precompiled application and modem firmware (Latest version is: thingy91_fw_2022_12_08_188a1603.zip) - UNZIP this file 

    b) nRF9160 SiP modem firmware (mfw_nrf9160_1.3.4.zip) - DO NOT UNZIP this file

    2) Open the Programmer Tool from the nRF Connect for Desktop

    3) Put your Thingy:91 in MCUBoot mode (hold the SW3 -the pushbutton on the Thingy- while turning the device ON)

    4)Select the Thingy 91 device in the programmer tool

    5)Click on Add File and choose "mfw_nrf9160_1.3.4.zip" from the folder you downloaded it, click on Write, and confirm by 'write' once again in the pop up window and wait for the upload to complete , it'll take some time.

    6)Once the writing is complete, turn the device off from its switch. Set it into MCU Boot mode once again as in Step 3

    7)Choose your Thingy 91 device in the programmer tool once again

    8)Click on "clear files" if any files are selected in the "File memory layout" window

    9)Click on "add file" and choose "serial_lte_modem_2022-12-08_188a1603.hex" from "..\thingy91_fw_2022_12_08_188a1603\img_fota_dfu_hex" path (where you unzipped the file). Click on "write" and "write" once again in the pop up window and wait for the upload to complete , it'll take some time.

    10) Once the writing is complete, turn the device OFF and ON

    11) Open LTE Link Monitor from nRF Connect for desktop

    12) Select your device: Thingy 91

    13) a) send the following command : AT%XSYSTEMMODE=0,0,1,0 (you should receive OK response) and wait for 1 min

    b) send the following command:  AT%XCOEX0=1,1,1565,1586 (you should receive OK response) and wait for 1 min

    c) send the following command: AT+CFUN=31 (you should receive OK response) and wait for 1 min

    d) send the following command: AT#XGPS=1,1 (you should receive #XGPS: 1,1OK response) and wait for X mins without interrupting  (in my case it took 22 minutes to receive the first output - I recorded my screen through the process) You can wait more or less, I really don't know.

    where the fields in this output are:

    I'm also preparing this process as a video. I'll update the ticket with its URL as soon as I edit it.

    Let me know if this works for you.

    Regards

    Selim

Reply
  • Hi Sibrecht, I tested and made sure that Thingy:91 gets the GPS coordinates, altitude and speed. Please follow these steps that I went through:

    1) Go to 

    https://www.nordicsemi.com/Products/Development-hardware/Nordic-Thingy-91/Download?lang=en#infotabs

    and download both:

    a) Precompiled application and modem firmware (Latest version is: thingy91_fw_2022_12_08_188a1603.zip) - UNZIP this file 

    b) nRF9160 SiP modem firmware (mfw_nrf9160_1.3.4.zip) - DO NOT UNZIP this file

    2) Open the Programmer Tool from the nRF Connect for Desktop

    3) Put your Thingy:91 in MCUBoot mode (hold the SW3 -the pushbutton on the Thingy- while turning the device ON)

    4)Select the Thingy 91 device in the programmer tool

    5)Click on Add File and choose "mfw_nrf9160_1.3.4.zip" from the folder you downloaded it, click on Write, and confirm by 'write' once again in the pop up window and wait for the upload to complete , it'll take some time.

    6)Once the writing is complete, turn the device off from its switch. Set it into MCU Boot mode once again as in Step 3

    7)Choose your Thingy 91 device in the programmer tool once again

    8)Click on "clear files" if any files are selected in the "File memory layout" window

    9)Click on "add file" and choose "serial_lte_modem_2022-12-08_188a1603.hex" from "..\thingy91_fw_2022_12_08_188a1603\img_fota_dfu_hex" path (where you unzipped the file). Click on "write" and "write" once again in the pop up window and wait for the upload to complete , it'll take some time.

    10) Once the writing is complete, turn the device OFF and ON

    11) Open LTE Link Monitor from nRF Connect for desktop

    12) Select your device: Thingy 91

    13) a) send the following command : AT%XSYSTEMMODE=0,0,1,0 (you should receive OK response) and wait for 1 min

    b) send the following command:  AT%XCOEX0=1,1,1565,1586 (you should receive OK response) and wait for 1 min

    c) send the following command: AT+CFUN=31 (you should receive OK response) and wait for 1 min

    d) send the following command: AT#XGPS=1,1 (you should receive #XGPS: 1,1OK response) and wait for X mins without interrupting  (in my case it took 22 minutes to receive the first output - I recorded my screen through the process) You can wait more or less, I really don't know.

    where the fields in this output are:

    I'm also preparing this process as a video. I'll update the ticket with its URL as soon as I edit it.

    Let me know if this works for you.

    Regards

    Selim

Children
Related