
This project was originally made in an outdated version of NCS, but it has now been updated to NCS v1.5.0. The instructions are the same as before, but the code is different.
Disclaimer: This is a student project, and thus we can not guarantee that everything will work perfectly.
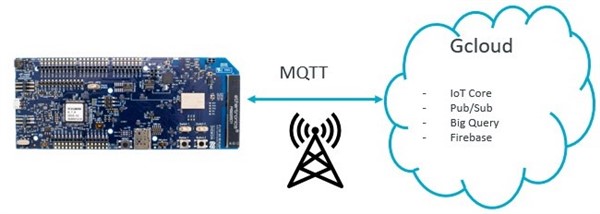
This blog post covers how to connect to Google Cloud with an nRF9160 DK. The nRF9160 DK is using MQTT protocol to communicate with Google Cloud IoT Core, a service that connects to and manages IoT Devices. The project code is attached at the end of this post.
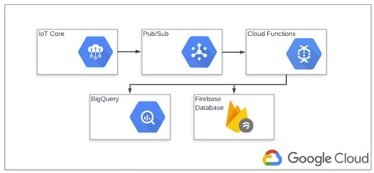
We used the Cloud IoT Core to get data from the nRF9160 DK into Pub/Sub, which is Google Cloud’s internal messaging service that allows us to send and receive messages from and to IoT devices. From here we used Cloud Functions as a functionality to react on, among other things, Pub/Sub events or HTTP triggers.
nRF9160 DK
In order to set up the development environment, follow the Getting Started Assistant in nRF Connect for Desktop. This is a guide on how to install the required tools for this project. In addition, it is recommended to read this tutorial about using the nRF Connect SDK to create an application. This also explains how to build and flash the application.
gcloud library
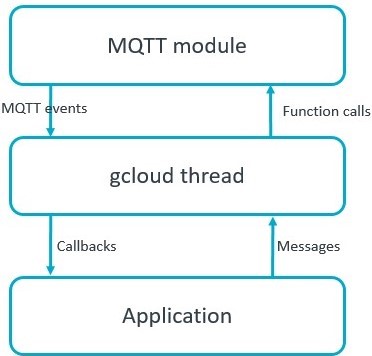
We have developed our own library for interfacing with Cloud IoT Core. It handles most necessary tasks; like provisioning of keys, connection, publishing and receiving. Description for the individual functions are found in the header file. Note that the library runs an infinite while loop polling on data from the cloud, this can interfere with other operations on the sockets.
Configuration
We changed some configurations of the nRF9160 DK so it corresponded with our project. In the file prj.conf, the following was changed:
CONFIG_GCLOUD_PROJECT_NAME="PROJECT_NAME"
CONFIG_GCLOUD_REGISTRY_NAME="REGISTRY_NAME"
CONFIG_GCLOUD_DEVICE_NAME="DEVICE_NAME"
PROJECT_NAME, REGISTRY_NAME and DEVICE_NAME were all replaced with the project name, registry name and device name for our Google Cloud project. The aforementioned device was our nRF9160 DK. We talk more about how these are created on the Google Cloud side further down.
Google Cloud requires the use of TLS in order to secure the connection to IoT Core. Both server side and client side authentication is supported, but only the former is required. To set up server side authentication we needed Google’s root certificate, in order for their server to be authenticated. This was handled by our gcloud library, where we defined GCLOUD_CA_CERTIFICATE. In addition to this, we generated our own keys for client side authentication.
In src\private_info there is a python script to create these keys. To do this we used the command below while in the private_info folder. DEVICE_NAME was replaced with the name of our device.
python create_keys.py -d DEVICE_NAME -e
Here, we used -e to specify that we wanted Elliptic Curve keys, or ECDSA. After running this command we received an ECDSA private key and a self-signed X.509 certificate. More information about creating public/private key pairs for Google Cloud can be found here.
The device would also create a JSON Web Token (JWT) when connecting to Cloud IoT Core, which would then be signed with the newly created private key and authenticated by Cloud IoT Core using the corresponding public key. A JWT consists of some claims, which contains information about the JWT. Google Cloud requires at least the following three claims to be included: iat (“Issued At”), exp (“Expiration”) and aud (“Audience”). The function ntp_get_unix_time() in the ntp library of our project was used to get a unix timestamp, which was used by the gcloud library for the JWT’s iat. The expiration of this JWT was defined by GCLOUD_DISCONNECT_INTERVAL in the gcloud library. This can be changed at will, but Google’s maximum lifetime of a token is 24 hours, and thus it can not surpass this.
How to build and flash
As mentioned above, this tutorial gives a great explanation on how to build and flash an application,using either west or SEGGER Embedded Studio.
Google Cloud
Setting up Google Cloud
We downloaded and installed the Google Cloud SDK in order to set up Google Cloud, which is a set of tools used to manage resources and applications hosted on Google Cloud Platform. This installation need Python 2.7, which can be installed together with Google Cloud Tools as a bundle. It will also include a Google Cloud SDK Shell.
We used the following command in Google Cloud SDK Shell to authenticate Cloud SDK so that it can access Google Cloud Platform.
gcloud auth login
After authenticating we wanted to create a project. This was done by running the following command, but we replaced PROJECT_NAME with the ID of our project. This ID is often the same as the project name.
gcloud projects create PROJECT_NAME
gcloud config set project PROJECT_NAME
Next, we added a policy binding to Identity and Access Management (IAM) policy for the role pubsub publisher.
gcloud projects add-iam-policy-binding PROJECT_NAME --member=serviceAccount:[email protected] --role=roles/pubsub.publisher
We then created a Pub/Sub topic that we wanted our nRF9160 DK to publish to and/or be subscribed to. We replaced TOPIC_NAME with the name of our topic.
gcloud pubsub topics create TOPIC_NAME
Optional: To be able to test for messages on the newly created topic in the Google Cloud SDK Shell, we created a subscription for that topic. TOPIC_NAME corresponds to the topic we made in the last step, and SUBSCRIPTION_NAME is the name of our subscription.
gcloud pubsub subscriptions create --topic TOPIC_NAME SUBSCRIPTION_NAME
In order to use Cloud IoT Core we created a device registry. As before, we replaced the names below with the names for our registry, project and topic.
gcloud iot registries create REGISTRY_NAME --region=us-central1 --event-notification-config=topic=projects/PROJECT_NAME/topics/TOPIC_NAME
Then we created a device that could subscribe to our Pub/Sub topic. When we created this device we gave it its public key. This is the X.509 certified ES256 key we created earlier. The path for the public key must correspond to the path of this key. Since we used an ECDSA key with a self-signed X.509 certificate, we had to specify this as the type when creating the device. Not that this key is the device’s public key and will be added to the device on Cloud IoT Core. Do not use the device’s private key.
gcloud iot devices create DEVICE_ID --project=PROJECT_NAME --region=us-central1 --registry=REGISTRY_NAME --public-key path=DEVICE_NAME-cert.pem,type=es256-x509-pem
Finally, we could check whether the device had successfully connected to Google Cloud. Since we had made a subscription earlier, we could check for messages in Pub/Sub by running the following.
gcloud pubsub subscriptions pull --auto-ack SUBSCRIPTION_NAME
We could also check if Google Cloud had seen our device by going to the Google Cloud Platform Console and going into IoT Core → REGISTRY_NAME → Devices, and check what it says under “Last seen” for our device.
For more information about the Google Cloud SDK, check out this link.
Cloud Functions
We used Firebase as to store the data from the nRF9160 DK. To do this, we used Google Cloud Functions. The firebase command line tools could both build and deploy the Cloud Functions for us.
As in the Getting Started Assistant, Chocolatey was used to install packages for this. Cloud Functions need Nodejs version 8. As of 7/12/2019 Google Cloud use 8.15.0, so we used the same.
choco install nodejs --version 8.15.0
Npm is the package manager for nodejs, and we used it to install firebase and its packages. Npm installs into current folder by default. However, it can be told to install a package globally if used with "-g".
npm install -g firebase-tools
We followed this Firebase Cloud Functions tutorial, but with javascript and installed some extra packages in the functions folder. Observe that these are the same as we included in the top of our index.js file.
mkdir gcloud && cd gcloud
firebase login
firebase init
cd functions
npm install firebase-functions firebase-admin @google-cloud/pubsub @google-cloud/iot node-fetch cors
firebase deploy
Note: On windows it might be necessary to specify the path of the firebase.cmd file found in: C:\Users\<user>\AppData\Roaming\npm
Resources
- Google Cloud
- Cloud Pub/Sub
- Nordic Semiconductor Playground
- nRF9160 DK Get Started
- nRF Connect SDK Tutorial
- Firebase
Project code:
-

mcallistertad
-
Cancel
-
Vote Up
0
Vote Down
-
-
Sign in to reply
-
More
-
Cancel
-

juu
in reply to mcallistertad
-
Cancel
-
Vote Up
0
Vote Down
-
-
Sign in to reply
-
More
-
Cancel
Comment-

juu
in reply to mcallistertad
-
Cancel
-
Vote Up
0
Vote Down
-
-
Sign in to reply
-
More
-
Cancel
Children