

→ Check out the preceding part of this tutorial series before starting on this: nRF Connect SDK Tutorial series - Part 0
This part of the NCS Tutorial series will be short and concise and will get you up and running with NCS and your board as quickly as possible. The first section will demonstrate how to build and run a “hello world” sample on your board, and the second section will provide you with the most vital information for the beginning phase for your particular board.
As mentioned in Part 0, you should choose a board and set <board> and <board_variant> accordingly. This applies to this part as well, and when you see one of these variables use your chosen value instead.
Contents
1 Your first “Hello World”
1.1 Set it up
In this setup, the sample will be put outside the nrf folder. This is a cleaner and more modular approach than building it directly in the nrf folder since you keep the project detached from the nRF Connect SDK.
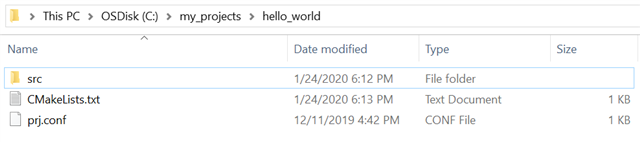
- Start by creating a folder named my_projects inside your folder of choice (e.g. C:/), inside that folder create the folder hello_world.
- Then, create these inside the hello_world folder:
- A folder named src with main.c inside
- CMakeLists.txt
- prj.conf
It should look like this:
- Next up, copy these lines into CMakeLists.txt
cmake_minimum_required(VERSION 3.13.1)
include($ENV{ZEPHYR_BASE}/../nrf/cmake/boilerplate.cmake)
include($ENV{ZEPHYR_BASE}/cmake/app/boilerplate.cmake NO_POLICY_SCOPE)
project(NONE)
target_sources(app PRIVATE src/main.c)
- Inside prj.conf, add these configurations
CONFIG_SERIAL=y
CONFIG_UART_0_NRF_UARTE=y
These lines are required in order to see the logging from a serial terminal and will enable the serial driver and the UARTE peripheral. However, it is actually not necessary to enable these, as they are already enabled by default in NCS for the listed boards. E.g. in the board folder for the nRF9160 DK the configurations are set inside nrf9160_pca10090_defconfig. I included them anyway to make you familiar with the prj.conf file.
The main.c file should look like this:
#include <zephyr.h>
#include <sys/printk.h>

void main(void)
{
	printk("Hello World!\n");
}
1.2 Build and flash - using SEGGER Embedded Studio
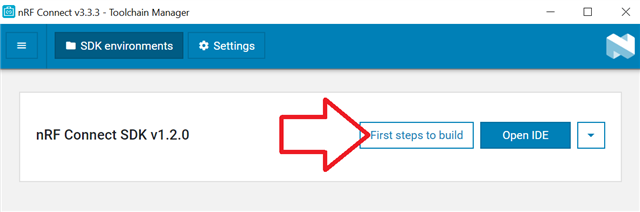
There is a guide in the Toolchain Manager on how to build and run a project, Open Toolchain Manager (TM) app and click on "First step to build" to see it.
For the record, I will go through the process here as well.
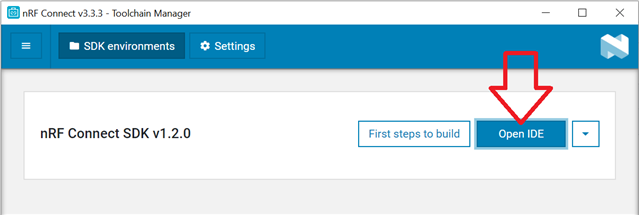
- Open the Toolchain Manager (TM) app and click on "Open IDE" to run SEGGER Embedded Studio (SES) Nordic Edition V4.52:
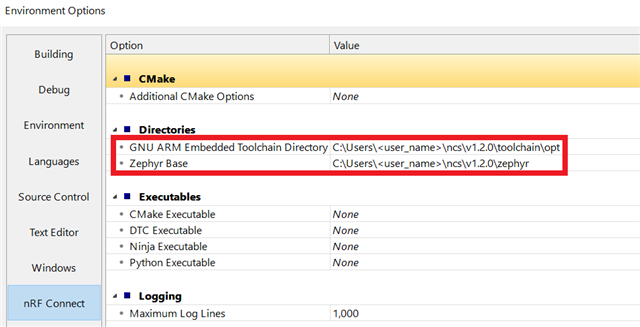
Two important environment variables to set are the Zephyr base and the GNU ARM Embedded Toolchain directory, however, if you've installed NCS through the TM, these will be set automatically. In SES, click on Tools→Options→nRF Connect and you will see the value of these variables:
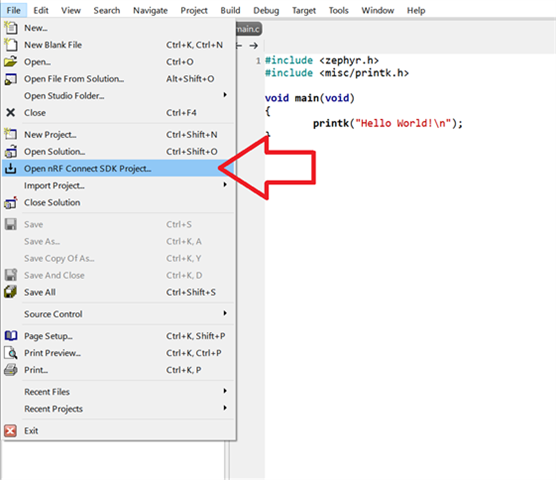
- In order to open the hello_world application in SES, click on File → Open nRF Connect SDK Project...
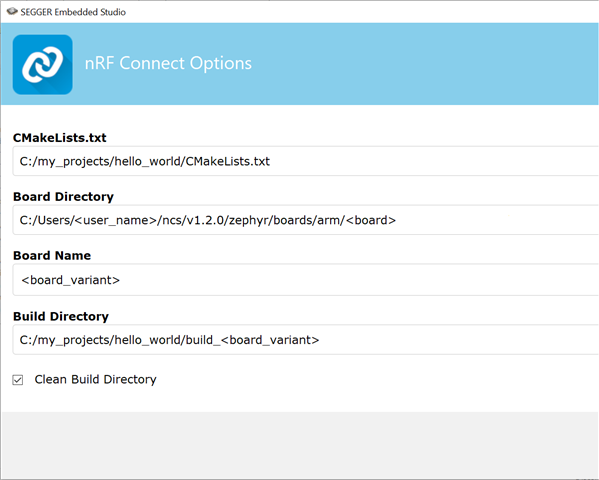
- Choose the following nRF Connect Options:
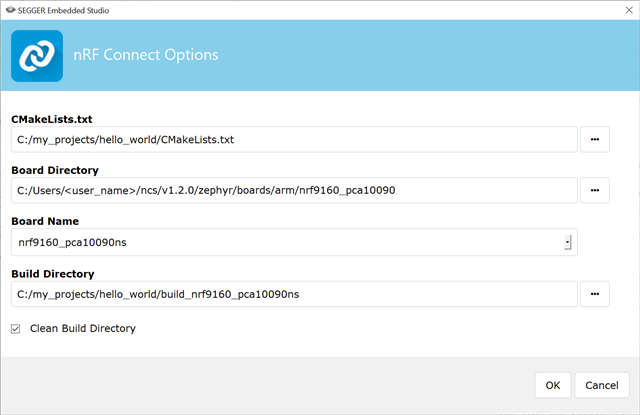
E.g. if you are building with the board variant nrf9160_pca10090ns, it should look like this:
- Connect your chosen board to your computer and turn it on.
If you are using the nRF9160 DK, make sure SW5 is set to nRF91
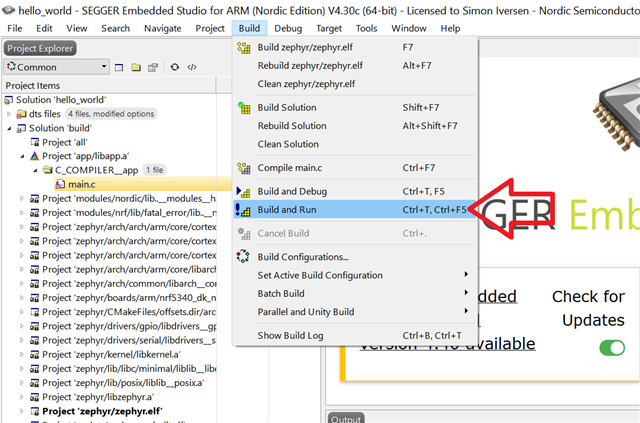
- To build and flash the application, choose Build → Build and Run.
- Then, download, install and start a terminal (e.g. Termite) to show the serial output
- To check what COM port to use: Press the Windows key + Q, search for "Device Manager" and open it. The COM ports are listed under "Ports (COM & LPT)"
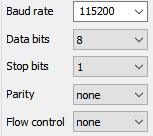
- Open the terminal(s) with the COM port(s) you found and choose the following Port configurations
-
After resetting the board, you should see the following log inside one of the terminals:
*** Booting Zephyr OS build v2.1.99-ncs1  ***
Hello World!
1.3 Build and flash - using west
If you've installed NCS through the Toolchain Manager it is not necessary to set any environmental variables since everything is set automatically upon installation and runs out of the box. Please skip section 1.3.1 and go straight to section 1.3.2 Build and flash if this is the case for you.
1.3.1 Set the environment variables
In order to build the application using west, some environment variables need to be set, specifically the toolchain and the Zephyr base. Even though you're not using the TM and are building any of the samples or applications directly in the nrf folder it is not necessary to set the Zephyr base, since the CMake tool will locate it automatically when building your application through west build. However, in this tutorial, we keep the project detached from the SDK and the environmental variable ZEPHYR_BASE needs to be set (if NCS is installed manually).
If you follow the NCS documentation you'll be told to set environmental variables through the cmd file zephyr-env.cmd. This is a nice way of doing it if you are working with different projects, and don't want the env. variables to interfere, but you'll have to run the cmd file every time you open the command line.
For this tutorial, let's add the toolchain environmental variables to the whole system instead. Follow these steps:
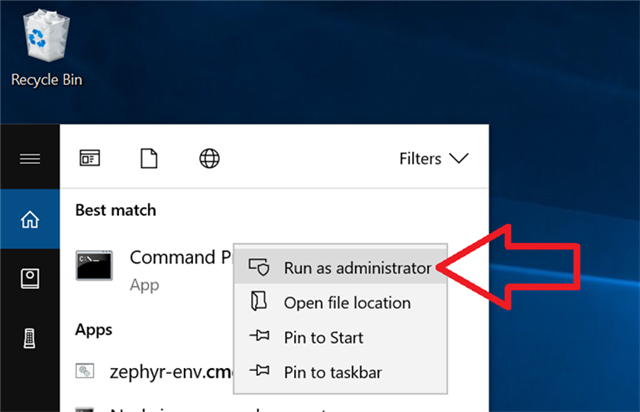
- Open cmd, running as administrator
- Run the following commands:
setx -m ZEPHYR_TOOLCHAIN_VARIANT "gnuarmemb"setx -m GNUARMEMB_TOOLCHAIN_PATH c:\gnuarmemb
C:\WINDOWS\system32>setx -m ZEPHYR_TOOLCHAIN_VARIANT "gnuarmemb" && setx -m GNUARMEMB_TOOLCHAIN_PATH c:\gnuarmemb

SUCCESS: Specified value was saved.

SUCCESS: Specified value was saved.
- Reopen the command line and check that the env. variables are set correctly:
C:\my_projects\hello_world>echo %GNUARMEMB_TOOLCHAIN_PATH% & echo %ZEPHYR_TOOLCHAIN_VARIANT%
c:\gnuarmemb
gnuarmemb
Let's set the Zephyr base.
- Open the command line inside <folder_of_choice>/my_projects/hello_world
- Run the command
set ZEPHYR_BASE=C:\Nordic_SDK\ncs\zephyr(change the path if you have put the nRF Connect SDK somewhere else)
C:\my_projects\hello_world>set ZEPHYR_BASE=C:\Nordic_SDK\ncs\zephyr
- Check that it's set correctly by running
echo %ZEPHYR_BASE%
C:\my_projects\hello_world>echo %ZEPHYR_BASE%
C:\Nordic_SDK\ncs\zephyr
There are mainly two different ways of setting ZEPHYR BASE, by using set or setx. The former one (set), which is used above, will set it temporary and immediately in the current shell and the latter (setx), which was used when setting the toolchain env. variables, will set it permanently with the need to reopen the shell. Pick the option that suits you best.
1.3.2 Build and flash
Let's get the sample running.
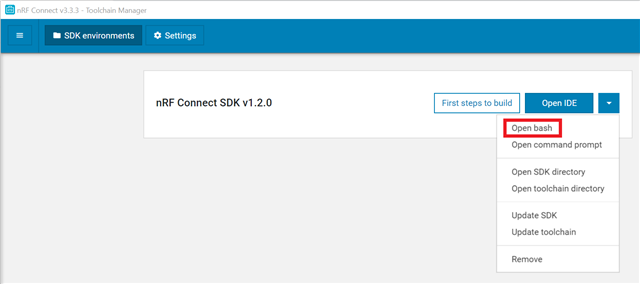
- Open the TM Bash shell by clicking on the downward pointing arrow and "Open bash":
It is important to open the shell (either bash or the command prompt) from the Toolchain Manager when building your project, since all the tools from C:\Users\<user_name>\ncs\v1.2.0\toolchain will only be accessible then.
- In the bash shell, run
cd C:/my_projects/hello_world, just to make sure you're in the right folder. - Run the command
west build -b <board_variant>to build the application with west:
... MINGW64 /c/my_projects/hello_world
$ west build -b <board_variant>
-- west build: build configuration:
       source directory: C:\my_projects\hello_world
       build directory: C:\my_projects\hello_world\build (created)
.
.
.
If the build process was successful, you should see a folder named build inside the hello_world folder:
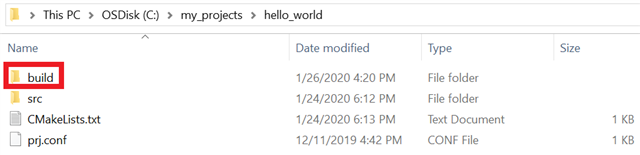
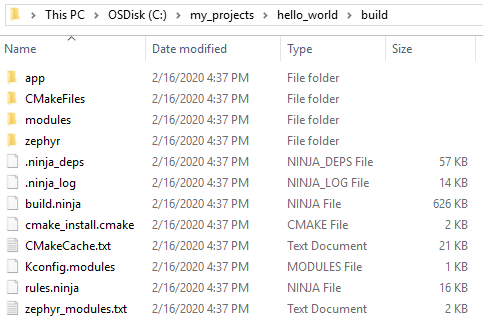
The build folder should contain the following files and folders (it may vary slightly depending on the choice of <board_variant>):
- Connect your chosen board to your computer and turn it on.
If you are using the nRF9160DK, make sure SW5 is set to nRF91
- The flashing is done by running the command
west flash, either from the project folder or the build directory. - Verify that everything works by checking that the terminal outputs "Hello World!"
2. Board-specific
2.1 nRF9160 DK
2.1.1 Build a Cellular IoT example
The nRF9160 SiP incorporates an LTE modem, which makes it possible to run cellular IoT applications. The modem always operates in a non-secure domain (read more about this in External domain access control on the infocenter), and the application must do the same in order to communicate with it. Therefore, all the samples in <..>/nrf/samples/nrf9160 as well as the asset_tracker, have to be built as nonsecure in order to work.
To build a sample as non-secure, the board nrf9160_pca10090ns (corresponds to <board_variant>) must be used. When building an application using this board, the following configurations will be set:
→ CONFIG_TRUSTED_EXECUTION_NONSECURE: This will make the application non-secure and make it run in the non-secure domain
→ CONFIG_SPM: This will build the SPM sample.
To get a deeper understanding of secure/non-secure environments, jump forward to section 1.6 Secure vs. nonsecure in part 2 of this tutorial series.
After the build process is complete, the file merged.hex (<..>nrf\samples\nrf9160\<sample>\build\zephyr\merged.hex) is generated, which contains both the SPM sample in addition to the application. When running west flash, this hex file will be chosen and get programmed onto the chip. Similarly in SES Nordic Edition, if you program the chip through Build→Build Solution, the merged.hex file will get flashed.
Let's try to build the AT Client sample on the nRF9160 DK using SES. It is demonstrated how to build this sample in the NCS documentation as well as the nRF9160 Getting Started Guide, but for the record, let's do it again:
- Follow section 1.2 Build and flash - using SEGGER Embedded Studio and program the AT Client sample onto the nRF9160. Choose these nRF Connect Options (make sure SW5 is set to nRF91):
- CMakeLists.txt: C:/Users/<user_name>/ncs/v1.2.0/nrf/samples/nrf9160/at_client/CMakeLists.txt
- Board Directory: C:/Users/<user_name>/ncs/v1.2.0/zephyr/boards/arm/nrf9160_pca10090
- Board Name: nrf9160_pca10090ns
- (remember ns at the end!)
- Build Directory: C:/Users/<user_name>/ncs/v1.2.0/nrf/samples/nrf9160/at_client/build_nrf9160_pca10090ns
Your ncs location may differ, open the Toolchain Manager app and click on settings to see the location.
- When you've flashed the sample, open a terminal, reset the chip and verify that you see the following output:
*** Booting Zephyr OS build v2.1.99-ncs1  ***
Flash region		Domain		Permissions
00 0x00000 0x08000 	Secure		rwxl
01 0x08000 0x10000 	Non-Secure	rwxl
.
.
.
24 NRF_GPIOTE1          Non-Secure	OK
25 NRF_REGULATORS       Non-Secure	OK

SPM: NS image at 0xc000
SPM: NS MSP at 0x20026fb8
SPM: NS reset vector at 0xd1d9
SPM: prepare to jump to Non-Secure image.
*** Booting Zephyr OS build v2.1.99-ncs1  ***
The AT host sample started
Check out the section AT Client→Building and running for more generic explanations and instructions on how to test the example to see if everything works as expected.
If you would like to use west instead, follow the steps below
- Open the TM bash shell, redirect to <..>\ncs\v1.2.0\nrf\samples\nrf9160\at_client and run the command
west build -b nrf9160_pca10090ns - Connect and turn on the nRF91 DK and make sure SW5 is set to nRF91
- From <..>\ncs\nrf\samples\nrf9160\at_client, run
west flash - Use a serial terminal to verify that the program works
2.1.2 Common issues
→ If you are encountering any errors, you may have to update the modem firmware to the latest version, check out Getting Started with nRF9160 DK→Updating the Modem for instructions on how to do this.
→ If you have problems connecting the nRF9160 to nRF Connect for Cloud, you may have to update the nRF for Cloud certificates, check out the guide nRF Connect for Cloud Certificate Update for guidance on how this can be achieved.
→ Be aware that PSM and/or eDRX is not supported on all networks yet, or that some networks do not allow roaming SIM cards to use those features. As a consequence, applications such as the Asset Tracker won't work correctly.
2.1.3 Further reading
→ Getting Started with nRF9160 DK (some of the content in this tutorial is outdated, and if you are encountering any problems, please create a Devzone ticket)
→ nRF Cloud Certificate Update
2.2 nRF5340 PDK
2.2.1 Build a BLE example
The nRF5340 SoC incorporates two processors, the network core and the application core. The BLE controller has to run on the network core while the BLE host usually runs on the application core in addition to the application (Read more about the BLE Stack Architecture and the BLE Layers in the Zephyr documentation). As mentioned in the NCS documentation, Working with nRF5340, the network core has to be programmed with the Bluetooth: HCI RPMsg sample in order to run a BLE sample on the nRF5340. If that is done, the application core can be programmed with any of the samples in <..>\nrf\samples\bluetooth.
Let's demonstrate how to build the BLE Peripheral LBS sample on the nRF5340 PDK using SES:
- Connect the nRF5340 PDK to your computer and turn it on
- Follow section 1.2 Build and flash - using SEGGER Embedded Studio and program the HCI RPMsg sample onto the nRF5340 network core. Choose these nRF Connect Options:
- CMakeLists.txt: C:/Users/<user_name>/ncs/v1.2.0/zephyr/samples/bluetooth/hci_rpmsg/CMakeLists.txt
- Board Directory: C:/Users/<user_name>/ncs/v1.2.0/zephyr/boards/arm/nrf5340_dk_nrf5340
- Board Name: nrf5340_dk_nrf5340_cpunet
- Build_Directory:_C:/Users/<user_name>/ncs/v1.2.0/zephyr/samples/bluetooth/hci_rpmsg/build_nrf5340_dk_nrf5340_cpunet
- Follow section 1.2 Build and flash - using SEGGER Embedded Studio and program the Peripheral LBS sample onto the nRF5340 application core. Choose these nRF Connect Options:
- CMakeLists.txt: C:/Users/<user_name>/ncs/v1.2.0/nrf/samples/bluetooth/peripheral_lbs/CMakeLists.txt
- Board Directory: C:/Users/<user_name>/ncs/v1.2.0/zephyr/boards/arm/nrf5340_dk_nrf5340
- Board Name: nrf5340_dk_nrf5340_cpuapp
- Build_Directory:_C:/Users/<user_name>/ncs/v1.2.0/nrf/samples/bluetooth/peripheral_lbs/build_nrf5340_dk_nrf5340_cpuapp
Your ncs location may differ, open the Toolchain Manager app and click on settings to see the location.
- Open a terminal, reset the chip and verify that you see the following output:
*** Booting Zephyr OS build v2.1.99-ncs1  ***
Starting Bluetooth Peripheral LBS example
I: 6 Sectors of 4096 bytes
I: alloc wra: 0, fd8
I: data wra: 0, 1c
I: No ID address. App must call settings_load()
Bluetooth initialized
Advertising successfully started
- To check that the BLE application is working and advertising, install nRF Connect for Mobile on your phone and check for an advertising device with the name "Nordic_Blinky"
If you would like to use west instead, follow the steps below
- Open the TM bash shell, redirect to <..>\ncs\zephyr\samples\bluetooth\hci_rpmsg and run the command
west build -b nrf5340_dk_nrf5340_cpunet && west flash - Open the TM bash shell, redirect to <..>\ncs\nrf\samples\bluetooth\peripheral_lbs and run the command
west build -b nrf5340_dk_nrf5340_cpuapp && west flash - Verify that the sample is working by checking the serial output
2.2.2 Further reading
If you have any questions regarding this tutorial, please create a ticket in DevZone.
→ Check out the next part of this tutorial series: nRF Connect SDK Tutorial - Part 2
-

Andrey Dodonov
-
Cancel
-
Vote Up
0
Vote Down
-
-
Sign in to reply
-
More
-
Cancel
-

Simon
in reply to Andrey Dodonov
-
Cancel
-
Vote Up
0
Vote Down
-
-
Sign in to reply
-
More
-
Cancel
Comment-

Simon
in reply to Andrey Dodonov
-
Cancel
-
Vote Up
0
Vote Down
-
-
Sign in to reply
-
More
-
Cancel
Children