can't find board nrf52833dk_nrf5283 in bluetooth DTM sample

Hello,

I have a project in Visual studio code and Nrf connect.
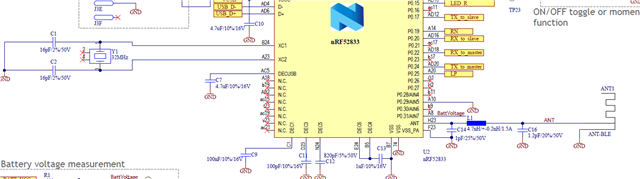
MCU is a NRF 52833.

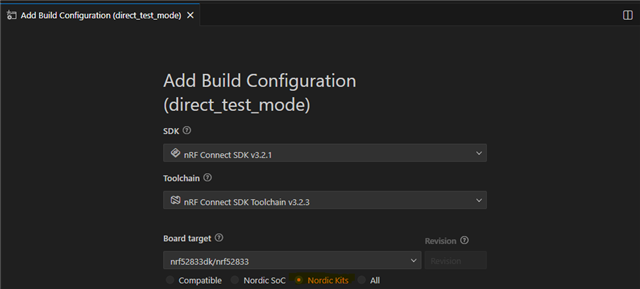
For the certicications, the lab request me the DTM mode.

I tried the use the Sample - Direct-test-mode Firmware

However I'm not able to find eht board "nrf52833dk_nrf5283" in the NCS folder.

I tried to install several SDKs (2.2.0 / 2.3.0 / 2.4.2 / 2.7.0 / 2.9.2 / 3.2.4 ) but none includes the 833 board. I can find and compile with the 840, but no options for the 833.

Please can sombody help me ? I need to use and compile the DTM for the 52833.

Thanks in advance

Parents
  • Hi,

    If you choose Nordic Kits you can build for nRF52833dk like this:

    But I assume you are not using direction finding, so you need to disable it by either adding to app.overlay:

    &radio {
    	/delete-property/ dfe-supported;
    };

    Or build as described here: 
    https://docs.nordicsemi.com/bundle/ncs-latest/page/nrf/samples/bluetooth/direct_test_mode/README.html#disabling_direction_finding_feature 

    Kenneth

  • hello, thanks for your reply, however, with the Nordic Kit selection, (and not the Compatible), impossible to compile the code...

    I can compile selecting the nRF52840 only...

    how to get just a simple code for DTM for the 833 ?

    Also don't you have example with the USB communication ?

    I can't understant how all people using nrf devices have to certificate them then every body have to use the DTM too... nothing is proposed for this ? I mean PC software - USB control and DTM for most nrf devices ?

    So in my case, I need to create a new board to use with the DTM as the 52833 is not available...right ?

  • Hi again,

    unfortunatly, it is still not working...

    I compiled the radio_test on sdk_2.7.0, with the nrf52833dk/nrf52833.

    It is building.

    1- as I use my specific PCB and not the DK, I need to change the UART to pin 22(Rx) and 24(Tx).

    Assuming the control line is the uart0, I did it in the overlay : 

    /* overlay-dt.dts */

    &uart0 {
        status = "okay";
        tx-pin = <24>;
        rx-pin = <22>;
        current-speed = <115200>;
    };

    &radio {
        /delete-property/ dfe-supported;
    };
    and activated in prj.conf:
    CONFIG_UART_CONSOLE=y
    CONFIG_SERIAL=y
    CONFIG_UART_INTERRUPT_DRIVEN=y
    CONFIG_UART_ASYNC_API=y  # souvent nécessaire pour TX sur pins non-standard


    However Nothing wirking on the pin 22 and 24.
    2- can you tell me, in this code, there are 2 configured UART ?  one for control and another for debug ?
     where is printed the  "printk("Starting Radio Test example\n");" ? and on which UART my I send and receive commands ?
    Sorry about all my questions, but I really need the FW test, as the certification LAB is waiting on it...
    BR
  • Do you have external 32kHz crystal in your design? If not also set:

    CONFIG_CLOCK_CONTROL_NRF_K32SRC_XTAL=n
    CONFIG_CLOCK_CONTROL_NRF_K32SRC_RC=y

    christopheMon said:
    and activated in prj.conf:
    CONFIG_UART_CONSOLE=y
    CONFIG_SERIAL=y
    CONFIG_UART_INTERRUPT_DRIVEN=y
    CONFIG_UART_ASYNC_API=y  # souvent nécessaire pour TX sur pins non-standard

    Default settings should work.

    Kenneth

  • that's right, I don't have the 32k, only have the 32M

    However It still don't work, see the pin voltage on the scope, yellow is the Tx from computer (MCU P0.22), sending a single char and purple is the MCU TxD P0.24 (= Computer RxD). Level of MCU TxD is not good ... and not working..

    How can I debug it ?

  • Do you have a DK for comparison? then you can just connect a wire between p0.22-p0.08 and p0.24-p0.06 to test the setup on a DK, the wires will connect the pins to the UART of the DK, and you can for instance open a virtual comport on the PC for testing.

    Kenneth

  • Also, you can't set the pins like you have done, you need to use pin control, e.g.

    &pinctrl {
    	uart0_default: uart0_default {
    		group1 {
    			psels = <NRF_PSEL(UART_TX, 0, 24)>;
    		};
    		group2 {
    			psels = <NRF_PSEL(UART_RX, 0, 22)>;				
    			bias-pull-up;
    		};
    	};
    
    	uart0_sleep: uart0_sleep {
    		group1 {
    			psels = <NRF_PSEL(UART_TX, 0, 24)>,
    				<NRF_PSEL(UART_RX, 0, 22)>;				
    			low-power-enable;
    		};
    	};
    };

    And keep pinctrl-0 = <&uart0_default>; and pinctrl-1 = <&uart0_sleep>; in &uart0.

    Kenneth

Reply
  • Also, you can't set the pins like you have done, you need to use pin control, e.g.

    &pinctrl {
    	uart0_default: uart0_default {
    		group1 {
    			psels = <NRF_PSEL(UART_TX, 0, 24)>;
    		};
    		group2 {
    			psels = <NRF_PSEL(UART_RX, 0, 22)>;				
    			bias-pull-up;
    		};
    	};
    
    	uart0_sleep: uart0_sleep {
    		group1 {
    			psels = <NRF_PSEL(UART_TX, 0, 24)>,
    				<NRF_PSEL(UART_RX, 0, 22)>;				
    			low-power-enable;
    		};
    	};
    };

    And keep pinctrl-0 = <&uart0_default>; and pinctrl-1 = <&uart0_sleep>; in &uart0.

    Kenneth

Children
Related