This post is older than 2 years and might not be relevant anymore
More Info: Consider searching for newer posts

I need help with converting any example from Keil to SES

Hello,

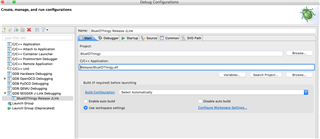
I've been trying for days to convert any example from Keil to SES, I have road probably every question here on the dev zone but I am unable to fix this, I ever specially install windows on my mac to try if there it would work.

So, I have done everything from official nordic documents, I've been through several problems which I happily solve, but that I'm not able to.

I get those errors:


unplaced section: .log_dynamic_data_app [nrf_log_frontend.o], size=12, align=4

undefined symbol: __SRAM_segment_end__

undefined symbol: __start_log_const_data

undefined symbol: __start_log_dynamic_data

undefined symbol: __stop_log_const_data

I'm working on latest SEGGER, I have tried latest SDK, also 14.2 . The same errors. 

Thanks for reply

Parents Reply
  • Ok now I see what you are doing.  To use nrfjprog to flash BlueIOThingy.hex, you need first use mergehex to merge both hex files into one.  then use nrfprog to flash.  It cannot be flashed in 2 passes.

    Other option is to use debug config in Eclipse to launch BlueIOThingy.  To use that you only need to use nrfjprog to flash softdevice only.  Then Eclipse will take care of the BlueIOThingy.  In this mode, you only need to flash softdevice once. Unless it got erase by other firmware such as Blinky (non ble).

Children
  • Okay so I Did what you have recommend:

    I merged softdevice as recommended here:
    https://devzone.nordicsemi.com/f/nordic-q-a/16088/merge-hex-files

    So I did that:

    mergehex -m BLE.hex s132.hex -o comb.hex // to merge hex files 

    Parsing input hex files.

    Merging files.

    Storing merged file.

    nrfjprog --eraseall // to erase all 

    Erasing user available code and UICR flash areas.

    Applying system reset.

    nrfjprog --family NRF52 --program comb.hex --verify // to flash

    Parsing hex file.

    Reading flash area to program to guarantee it is erased.

    Checking that the area to write is not protected.

    Programming device.

    Verifying programming.

    Verified OK.

    nrfjprog --reset // to reset 

    Applying system reset.

    Run.


    And still I didn't make it to advertise, I assume for sure its not a problem with example, so I don't know what else I should do. I would try to debug the example to see what's wrong, but I don't know how to solve that I did not see JLINK option in my eclipse preferences -> debug/run ->


  • Did you compile Debug build ? The debug build needs to run within the debugger.  Compile the Release build instead.

  • I did that:

    1. in Eclipse, Project -> Build configurations -> set active -> 1 Debug 
    than Project -> Build All

    and I have outcome: 

    Build Finished. 0 errors, 2 warnings. (took 3s.169ms)

    2.  in Eclipse, Project -> Build configurations -> set active -> 2 Release
    than Project -> Build All

    and I have outcome: 

    Build Finished. 0 errors, 0 warnings. (took 81ms)

    Firstly I merged BlueIOThingy.hex file from Debug folder (in BlueIOThingy example project) it it of course do not worked.


    Now I merged BlueIOThingy.hex file from Realese folder (in BlueIOThingy example project) and still I am not able to see it advertise but I see a change, On dev Board: LED2, LED3, LED4 is on and LED1 is blinking very very quickly. I do not know if it means something, but this is the difference from now and before. 

    Is the debug need to be run with JLINK option in Eclipse ->Preferences->Run/Debug->JLINK ? Because if Yes maybe that is the problem? Cause it is not there, I don't know why. 

  • To run from Eclipse debugger, first select the project BlueIOThingy.  Then select from the menu "Run/Debug Configurations...".  You'll see a popup.  From the left you see a list of selections.  look for JLink.  Create a new configuration.    You see 

    Browse and select your BlueIOThingy.elf you want to use. Then select Debugger tab

    Set NRF52832_XXAA in the device name box.  Then click debug.  It will flash and start debugging mode.

    The BlueIOThingy firmware is made for this board.

    It's available at https://www.crowdsupply.com/i-syst/blyst-nano

    To use it on a different board. You need to modify the code for your own board.  The current board uses the BME680 and the ICM-20948 sensors.

  • I got this from debug session:

    assertion "s" failed: file "/Users/jacobbudny/Desktop/DEVELOPMENT/external/Invn/Devices/Drivers/Icm20948/Icm20948Serif.h", line 78, function: inv_icm20948_serif_read_reg


    Okay so maybe I did not understand from the begining..

    To be fully cleared:

    What I have:
    nrf52 DK this one: https://www.nordicsemi.com/Software-and-Tools/Development-Kits/nRF52-DK
    MPU9250 this one: https://www.sparkfun.com/products/13762

    What I want:
    I want to connect MPU9250 (GND,VDD,SCL,SDA) (or another 9axis sensor, I can also get another sensor if its necessary, if with ICM-20948 its simpler or better that's not problem for me.) to nrf52 DK and get raw data from MPU9250 (accx,accy etc.(9 of those)) over bluetooth to computer/phone/tablet and receive them in real time. And I've been fighting with it for a month now.

    Where should I start? Or If its even possible?

    As you said in your first answer:
    "Example source code using MPU-9250 and stream data to Thing App.

    https://github.com/IOsonata/IOsonata/tree/master/ARM/Nordic/exemples/BlueIOThingy "

    I was convinced that its possible? But now I am not exactly sure ;/ Where should I start then?


    Thanks anyway for your help, you've been so helpful, can't thank you enough...


Related