

nRF Util is Nordic's command line utility for Nordic products. You can easily use it to flash applications onto your Nordic device through a terminal. In the most recent major version update, v7.0.0, we saw major changes to the architecture and functionality, which added a lot more features. This blog will first introduce the new features of nRF Util in detail, and cover some use-cases. Then it will take you through how to install nRF Util, and set up auto-completion, one of the new features of the tool. Lastly, we will get familiar with the tool - learn how to discover connected devices and flash/program them, and how to script using nRF Util.
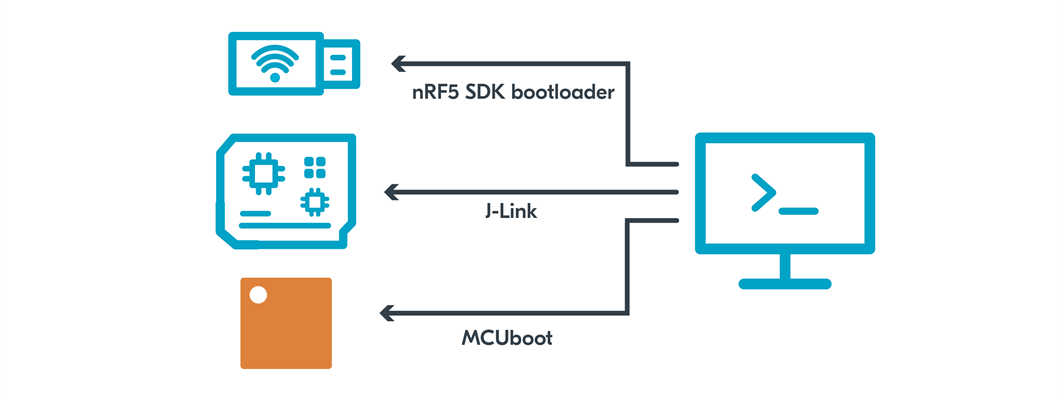
We will show you how to set it up and use nRF Util to flash three different Nordic devices with different programming capabilities:
- nRF52833 DK, which has an onboard J-Link debugger.
- Thingy:91, which has support for programming over MCUboot.
- nRF52840 dongle, which comes factory-shipped with an nRF5 bootloader.
Feel free to watch the video below or read through the rest of the blog post.
Table of Contents
Overview
nRF Util is a command line utility that has been around since 2015, and versions (v0.2.1 - v6.1.7) have supported the nRF51 and nRF52 Series through Device Firmware Update (DFU) and secure DFU packages generation for applications based on the nRF5 SDK and its bootloader.
The upgraded version (v7.x.x) of nRF Util brings a lot of new features and still maintains 100% backward compatibility with previous versions of nRF Util.
New features in nRF Util v7.x.x:
- Windows, macOS, and Ubuntu support
- Support for the nRF53 Series and nRF91 Series
- Support for J-Link
- Support for MCUboot
- Backward compatible with versions < 7.0.0 (For nRF52 and nRF51 Series)
- Auto-completion
nRF Util is now a unified command line utility for Nordic products. The new version includes support for programming all Nordic devices using programming probs (for example J-Link). It also has support for MCUboot DFU, thereby supporting nRF Connect SDK applications. You can use it to list (discover), flash, recover, erase, and do various operations on Nordic devices, including development kits, dongles, Nordic Thingies, or your own Nordic-based board.
In addition to that, for multicore devices like the nRF53 Series, you can specify which core you want to program (application core, network core) and you can also use nRF Util to flash the modem or the application core for the nRF91 Series.
One major factor that differentiates nRF Util v7.x.x from previous versions is that the new version is shipped as a binary file, while previous versions of nRF Util were shipped as python packages. This relieves developers from having to worry about Python package dependencies.
Setup and install commands
The steps below show how to set up nRF Util v7.x.x .
- Download the binary compatible with your OS from here and store it somewhere on your disk drive (For example C:\nordic_tools\nrfutil.exe for Windows).
If you are running on macOS or Linux, you can store it in a folder that is already added in the system’s PATH (Ex: /usr/bin/ ), so that you can skip step 2. Also, keep in mind that nrfutil has some prerequisites that are listed on the same download page. Make sure you also download them, if you don't have them on your machine already. - (Windows) Update your system’s PATH to include the location where nrfutil is stored. Open Edit environment variable for your account and add the path where you stored the nrfutil binary, as shown below:
Your shell can now locate nrfutil.
3. The nrfutil binary you just downloaded does not come with any pre-installed commands. Therefore, the first time using nrfutil, you need to search for available commands and then install commands of interest, as the functionalities of nrfutil in v7.x.x are offered as separate commands.
In your preferred terminal, type:
nrfutil search
to search available commands served on an online central package registry.

At the time of writing this blog post, there are three available nrfutil commands:
completion: makes it easier for users to interact with nrfutil and find available commands, subcommands, and flags.device: can list, program, recover, erase, and do various operations on Nordic devices. It supports MCUboot and J-Link.nrf5sdk-tools: provides all functionality available in previous versions of nrfutil (< 7.0.0) . In other words, it has support for nRF5 SDK bootloader.
For the sake of demonstration, we will install all commands by typing,
nrfutil install completion device nrf5sdk-tools
Now we have the three nRF Util commands completion, device, and nrf5sdk-tools installed on our machine.
Setup auto-completion
One of the new features of nRF Util is auto-completion. You will only need to set this up only once.
In the setup process of the auto-completion, you need to specify the shell that you are using. The completion features are currently only supported on the following shells: bash, powershell, zsh.
In this guide, we are using Windows Powershell V7.3.0 from within VS Code. Therefore, we will specify powershell in the setup:
nrfutil completion install powershell

Notice that you need to create a user shell profile first if you don’t have one already, and you have to manually copy the provided code snippet inside it.
Type echo $profile to locate where the user shell profile. If the file doesn’t exist, you need to create it and name it exactly as specified by the output of the command (echo $profile). Then add the code snippet provided to the file.
Note for powershell only: To add menu completion, add the following line to the user shell profile.
Set-PSReadlineKeyHandler -Key Tab -Function MenuComplete
Make sure to save the changes and close and re-open your terminal. In our case, we will close and open VS Code
Getting familiar with nRF Util v7.x.x
Now that we have installed all available nrfutil commands and setup the auto-completion, let’s try a few commands to familiarize ourselves with nrfutil v7.x.x.
The command below will let you view all nrfutil commands and get info on each one.
nrfutil --help
Let's test out auto-completion, by typing nrfutil and pressing the Tab or Ctrl+Space keys to discover available commands and flags.
To get help on the command device’s sub-commands, use the following line:
nrfutil device --help
And same for the command nrf5sdk-tools’s sub-commands:
nrfutil nrf5sdk-tools --help
Discover connected devices
Let’s list all connected devices and discover their capabilities by typing:
nrfutil device list
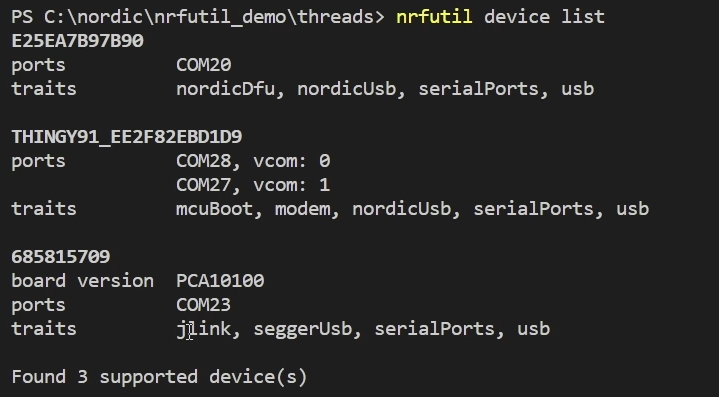
As seen in the output above, the command lists the connected devices to your machine and discovers their capabilities. In this case, there are three Nordic devices connected to my PC:
- nRF52833 DK, which has an onboard J-link debugger (
jlink). - Thingy:91, which has support for programming over MCUboot (
mcuBoot). - nRF52840 dongle, which comes factory-shipped with an nRF5 bootloader (
nordicDfu).
The ports entry will list the available serial ports and their numbers, while traits represent the device traits. A device trait is a general property or capability a device has. All devices are annotated with traits, which are used to determine whether a device supports a given device operation or programming method.
Here are some examples of device traits and what they mean:
mcuBoottrait: The device has support for programming over MCUboot.jlinktrait: The device has a J-Link probe and supports operations like programming over jlink, erase, recover.nordicDfutrait: The device has support for programming over nRF5 bootloader.serialPortstrait: The device has serial ports.nordicUsbtrait: USB devices (with VendorID 0x1915).seggerUsbtrait: Segger USB devices (with VendorID 0x1366).no
For a full list of available traits and descriptions, use nrfutil device list --help and it should be listed under --traits.
Programming connected devices
There are different commands when flashing hardware with different traits. As we've stated earlier, we will go through how to program the following devices:
- nRF52833 DK, which has an onboard J-link debugger (
jlink). - Thingy:91, which has support for programming over MCUboot (
mcuBoot). - nRF52840 dongle, which comes factory-shipped with an nRF5 bootloader (
nordicDfu).
nRF52833 DK (J-Link)
To flash devices with J-Link support (i.e. the board has an onboard J-Link debugger), you will use the nrfutil device program command. The program subcommand needs the binary file that the device expects based on its programming capabilities (in our case the file zephyr.hex for J-Link devices). It also expects you to specify the device(s) you want to program. You can either do that using the --serial-number flag or by using the --traits flag.
Program a specific J-Link-supported device with serial number 000683298616:
nrfutil device program --serial-number 000683298616 --firmware path_to_some_firmware.hex
Program all connected devices with J-Link support:
nrfutil device program --traits jlink --firmware path_to_some_firmware.hex
You can also specify whether you want to reset your board after flashing through the --options flag as shown in the line below:
nrfutil device program --firmware zephyr.hex --traits jlink --options reset=RESET_PIN
Thingy:91 (MCUboot)
To program the Thingy:91, which has MCUboot support, we must first put the device in DFU mode(Press SW3 while switching SW1 to the ON position).
Then, as we did with the J-Link supported device, we use the nrfutil device program command, but in this case, the device is expecting app_signed.hex.
Send the following command to program the Thingy:91:
nrfutil device program --firmware app_signed.hex --traits mcuBoot
nRF52840 dongle (nRF5 bootloader)
To program an nRF52840 dongle, we need to first generate the firmware package that is compatible with the nRF5 bootloader using the nrfutil nrf5sdk-tools pkg subcommand (or its aliases). See the example below:
nrfutil nrf5sdk-tools pkg generate --hw-version 52 --sd-req=0x00 --application zephyr.hex --application-version 1 app.zip
Keep in mind, nrfutil nrf5sdk-tools provides aliases for subcommands that were expected in nrfutil prior to v7.x.x (for backward compatibility):
nrfutil dfu → nrfutil nrf5sdk-tools dfunrfutil keys → nrfutil nrf5sdk-tools keysnrfutil pkg → nrfutil nrf5sdk-tools pkgnrfutil settings → nrfutil nrf5sdk-tools settingsnrfutil zigbee → nrfutil nrf5sdk-tools zigbee
Therefore, it’s completely OK to use the syntax below which is backward compatible with older nrfutil versions (v0.2.1 - v6.1.7):
nrfutil pkg generate --hw-version 52 --sd-req=0x00 --application zephyr.hex --application-version 1 app.zip
The command above generates the firmware package app.zip which is ready to be flashed/programmed on the dongle.
To flash the new firmware onto the dongle use the command below. Remember to first put your dongle in DFU mode(Press the RESET button)
nrfutil dfu usb-serial -pkg app.zip -p COM24
Alternatively, you could also use the device program command as shown below:
nrfutil device program --firmware app.zip --traits nordicDfu
Scripting with nRF Util v7.x.x
Scripting gives great flexibility when it comes to task automation. nRF Util provides the option for machine-readable JSON output, meaning you can write all sorts of scripts with it.
The following command lists all connected devices as JSON:
nrfutil --json device list
This command programs all devices that have nRF5 bootloader support and shows the progress information as JSON messages:
nrfutil --json device program --traits nordicDfu --firmware path_to_some_dfu_package.zip
Here is an example of a simple Python script that uses nRF Util to program all connected J-Link supported devices with a file firmware.hex and print the results:
import json
import subprocess

firmware_path = "firmware.hex"

# Program all connected jlink devices and collect the output
output = subprocess.run(["nrfutil", "device", "program",
                         "--json", "--traits", "jlink",
                         "--firmware", firmware_path],
                        capture_output=True)
stdout_as_lines = output.stdout.decode("utf-8").split("\n")[0:-1]

for line in stdout_as_lines:
    parsed_line = json.loads(line)

    # Find the lines indicating that a task ended
    if parsed_line["type"] == "task_end":
        # Print the results of the operation
        print("{}: {}".format(parsed_line["data"]["task"]["description"],
parsed_line["data"]["result"])) 
Top Comments
-

Shahar
-
Cancel
-
Vote Up
+1
Vote Down
-
-
Sign in to reply
-
More
-
Cancel
-

Ali Aljaani
in reply to Shahar
-
Cancel
-
Vote Up
0
Vote Down
-
-
Sign in to reply
-
More
-
Cancel
Comment-

Ali Aljaani
in reply to Shahar
-
Cancel
-
Vote Up
0
Vote Down
-
-
Sign in to reply
-
More
-
Cancel
Children