Beware that this post is related to an SDK in maintenance mode
More Info: Consider nRF Connect SDK for new designs
This post is older than 2 years and might not be relevant anymore
More Info: Consider searching for newer posts

Package for BLE Secure DFU bootloader step by step guide for S132 PCA10040

Hi There,

I was trying to understand the step to create a test app for dfu bootloader update via BLE for PCA10040. Below is the documentation I read.

http://infocenter.nordicsemi.com/index.jsp?topic=%2Fcom.nordic.infocenter.sdk5.v14.2.0%2Fble_sdk_app_dfu_bootloader.html

I'm interested to further explore the Testing part by create my own firmware package for testing, and I not sure which example I could use for putting public key and generate the programming zip package.

Can I use the below package?

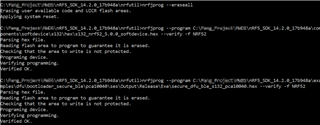
By the way, I tested flashing the dfu bootloader firmware which i have my public key place before generate the hex file.

Guide: https://infocenter.nordicsemi.com/index.jsp?topic=%2Fcom.nordic.infocenter.sdk52.v0.9.2%2Fbledfu_example_running.html

Example: 

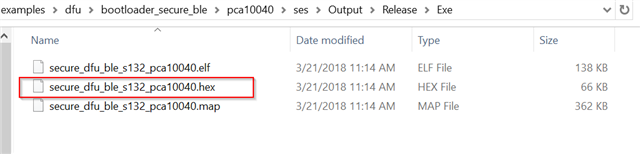
I received flashing error as below.

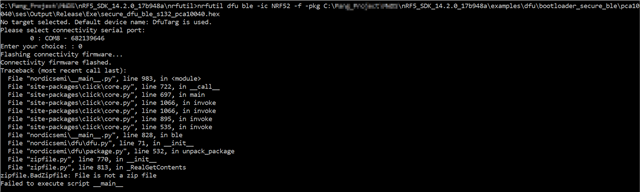
Mind to share similar document as the following link for S132 PCA10040? It would be much appreciated.

devzone.nordicsemi.com/.../getting-started-with-nordics-secure-dfu-bootloader

Parents
  • I would suggest following the secure dfu blog post that you posted at the bottom. It works for your PCA10040 board. An easy way to get started is just by updating the application on the nrf52 PCA10040 DK. The application you could update could be the Blinky example located at: nRF5_SDK_14.2.0_17b948a\examples\peripheral\blinky\pca10040\s132\ses\

    Just follow the blog post & finish steps A to D. At the end, you should notice that the LEDs on your board start blinking one after the other in a loop. Then, you know that the DFU has been successful. 

  • Hi 

    I test the step and program the softdevices using the following command.

    nrfjprog --program C:\nRF5_SDK_14.2.0_17b948a\components\softdevice\s132\hex\s132_nrf52_5.0.0_softdevice.hex --verify --chiperase -f NRF52
    nrfjprog --program C:\nRF5_SDK_14.2.0_17b948a\examples\dfu\bootloader_secure_ble\pca10040\ses\Output\Release\Exe\secure_dfu_ble_s132_pca10040.hex --verify -f NRF52

    I notice the DfuTarg won't appear if I use nrfjprog to program the bootloader, while the dfutarg works for segger build and run option.

  • Hi

    I can flash the hex now but the ble blinky cannot detected/appear if I flash using the generated hex file(it only works if I use Build and Run only). Mind help test out my generated hex file? Thanks

    secure_dfu_ble_s132_pca10040.hex

  • Just tested your hex file. I received a weird error when I flashed the softdevice with nrfjprog (ERROR: The file specified could not be open for read.). Where you able to flash the softdevice to your device with nrfjprog?

    The steps I took were: nrfjrprog --eraseall (erases all flash, including UICR)

    flash sdk 14.2 softdevice with nrf go studio

    nrfjprog --program secure_dfu_ble_s132_pca10040.hex --verify

    Then, LEDs 1 & 3 turned on, indicating that the device is in bootloader mode. The nrf52 dk also started advertising as DFUTarg on nrf connect, so it seems everything worked like it should. If you are having difficulties with this, it seems there might be something wrong with nrfjprog (like mentioned before, maybe you are using the wrong JLINK version).

  • Hi 

    Thanks for the update. I have check my jlink version. BLE DFUTarg still not working, do you think its caused by segger project compiler setting? I use the default DFUTarg project.

    Here is the programming step

    nrf Connect on my phone with BLE enable, no DFUTarg appear.

  • That's weird. It should work out of the box. Did you generate the hex file that you uploaded (i.e. secure_dfu_ble_s132_pca10040.hex) with segger embedded studio. I tested that file & it worked out of the box.

    Another thing you can do is to compare the flash memory of the nrf52 dk when you program with segger embedded studio & using nrfjprog. 

    You can read the memory by using the following command:

    nrfjprog --memrd 0x000000 --n 0x080000 > test.txt

    Check how much flash memory your chip has at this link. If you have the 512 kB version, check this link. There, you can see that you want to read 0x000000 to 0x080000. That is why the command above looks like it does. The last part of the command writes the content to a text file instead of to the command window.

    Then, you can open up the two txt files using Notepad++ for example, go to Plugins -> Plugin Manager & download the Compare feature. Finally, you can compare the two text files & see if you notice any differences between the two files.

    Kind Regards,

    Bjørn Kvaale

  • Bjørn ,

    I am having the same issue where the bootloader doesn't advertise, the only difference is that I am using a Raytac MDBT42Q nRF52832 module on a custom board (without leds). The set up I have is functional because when I flash the Espruino for MDBT42Q firmware, it works. So I am missing something but can't figure it out.

    I am using GCC and SES to build projects and for flashing, I am using Jlink, nRFgo and nrfjprog.

    nrfjprog version: 9.7.3
    JLinkARM.dll version: 6.40

    nRF SDK 15.2

    SD s132_nrf52_6.1.0_softdevice.hex

    Do I need to adjust the bootloader project to bypass any check?

    Thanks

Reply
  • Bjørn ,

    I am having the same issue where the bootloader doesn't advertise, the only difference is that I am using a Raytac MDBT42Q nRF52832 module on a custom board (without leds). The set up I have is functional because when I flash the Espruino for MDBT42Q firmware, it works. So I am missing something but can't figure it out.

    I am using GCC and SES to build projects and for flashing, I am using Jlink, nRFgo and nrfjprog.

    nrfjprog version: 9.7.3
    JLinkARM.dll version: 6.40

    nRF SDK 15.2

    SD s132_nrf52_6.1.0_softdevice.hex

    Do I need to adjust the bootloader project to bypass any check?

    Thanks

Children
Related