This post is older than 2 years and might not be relevant anymore
More Info: Consider searching for newer posts

NRF24LE1 how to set PWM frequency?

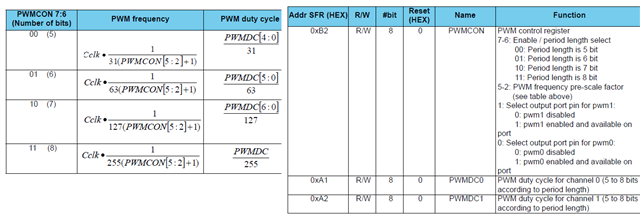
To what values should I set the PWMCON register to so that the PWM0 and PWM1 frequency is output at 20Khz with duty cycle varying between 1 to 2ms. Now specifically I am asking this after reading the data sheet because the tables mentioned are not clearing giving information. How do I decipher the table given here:

Please clearly disclose information in the data sheets. Also give an example to show how to set to particular frequency and pulse width.

Let me tell you how I decipher this as a newbie. Now CCLK is 16,000,000 for 16Mhz clock. I chose PWM0 as output so bit 0 is 1 and bit 1 is 0. Now I need to find out what PWMCON is so the formula for PWMCON for 20Khz PWM freq will be. (16000000/(255 x 20000))-1 = 160/51 -1 which is approximately 2. Hence PWMCON[5:2] will be 0010. There fore PWMCON will be 11001001 which is 0xC9. But this dint work when I put in this value for PWMCON as the servo did not rotate. Here is my code.

#include "reg24le1.h" // I/O header file for NRF24LE1
#include "hal_delay.h" // header file containing delay functions
 
// main function
void main()
{
int i = 0, j = 0; // loop variable
P0DIR = 0; // Port 0 as output
PWMCON = 0xc9; // enable PWM1
 
// infinte loop
while(1)
{
for(i= 180; i--; i > 0)
{
PWMDC0 = i ; // change duty cycle
delay_ms(10); // delay of 10 ms
}
 
 
}
 
}

Parents
  • How do we get a 50Hz PWM wave? What changes should I make to the code.

  • It does not go that far down. From the documentation:

    The following table shows how the PWM frequency (or period length) and the PWM duty cycle are controlled
    by the PWM SFR registers. PWM frequency range is approximately 4 kHz-254 kHz.

  • The above signal is the arduino servo signal on which the servo works.

    The below signal is from the NRF24LE1 from the code you provided. It always appears that the duty cycle is 50%. How do I get it to 1 to 2ms Pulse width at 20 Hz frequency. Are you able to read the frequency of the the above signal?

    Give above is the NRF24LE1 PWM signal and it appears that the duty cycle is always 50%. Why?

  • Why do your waves always have 50% duty cycle? I am waiting for your reply. I posted more queries and some oscilloscope shots.

  • I will try to modify my own AVR code for this and develop a library. I need you to tell the equivalent statements for the timers in NRF24LE1.

    1st section of code

    void servoStart(void) 
    { 
        // Outputs 
    	//if(servouniv<=7)
        SERVO_DDR |= SERVO_MASK; 
    	//if(servouniv>7 && servouniv<=15)
    	SERVO_DDR1 |= SERVO_MASK;
        // Setupt a first compare match 
        OCR1A = TCNT1 + US2TIMER1(100); 
        // start timer 1 with no prescaler 
        TCCR1B = (1 << CS10);       
        // Enable interrupt 
        TIMSK |= (1 << OCIE1A); 
    } 
    

    2nd section of code

    ISR(TIMER1_COMPA_vect) 
    { 
        static uint16_t nextStart; 
        static int servo=-1; 
    	static uint8_t servo1;
        static bool outputHigh = true; 
        uint16_t currentTime = OCR1A; 
        uint8_t mask = servoOutMask[servo]; 
    //	uint8_t mask1 = servoOutMask1[servo]; 
        
    	servouniv=servo;
    	
        if (outputHigh)
    	{ 
    
    		if(servo>=6)
    		SERVO_PORT1|= mask;
    		if(servo<=5)
            SERVO_PORT |= mask; 
    		
    		
    		//}
    		/*if((servo>7)&&(servo<=15))
    		{
    		SERVO_PORT1 |= mask1;
    		}*/
            // Set the end time for the servo pulse 
    		
            OCR1A = currentTime + servoTime[servo]; 
    		//if((servo>7)&&(servo<=15))
    		//OCR1A = currentTime + servoTime[servo]; 
            nextStart = currentTime + US2TIMER1(SERVO_TIME_DIV); 
        } 
    	
    else
    	{ 
    		//.....// 
            OCR1A = nextStart; 
        } 
        outputHigh = !outputHigh; 
        }
        

    Please let me know the equivalent statements

  • For the first section of the code I did this.

    // Setupt a first compare match 
        //OCR1A = TCNT1 + US2TIMER1(100);
        short combined = (TH1 << 8 )| TL1;
    	  //CC1S = (CCH1 << 8) | CCL2;
        short CC1S = combined + US2TIMER1(100); 
        // start timer 1 with no prescaler 
        //TCCR1B = (1 << CS10);
    		TR0 = 1;	
        // Enable interrupt 
        //TIMSK |= (1 << OCIE1A);
    		ET0 = 1;	

    Is this right?

  • Hi,


    If you want to generate a 1 ms pulse then wait 20 ms, you can do something like this in your ISR routine:

    void t0_interrupt(void) interrupt 1
    {       
      // Timer increments every 2*12 CPU clock cycles
      // Timer starts counting down from 65535
      // 666 * 1,5 us = 999 us
      static bit timer_state;
      static bit gpio_is_set;
      uint16_t timer_val;
      
      if (timer_state == false)
      {
        timer_val = 0xFFFF - 666;
        
        if (gpio_is_set == 1) 
        {
            timer_state = true;
        }
        gpio_is_set ^=1;
        P10 ^= 1;
      }
      // Wait a given time, in this case 19 ms, before pulsing the pin again.
      else
      {
        // Need to adjust for the prior timer event
        timer_val = 0xFFFF - 13333 + 2*666;
        timer_state = false;
      }
      TL0 = (uint8_t) (timer_val & 0xFF);
      TH0 = (uint8_t) ((timer_val >> 8) & 0xFF);
    }

    You need to set the LED, wait x ms, then turn it off. Then you extend the timer to be 18 ms (20 ms total), then re-do the whole procedure.

    Could you try that?


    Kind regards,

    Håkon

Reply
  • Hi,


    If you want to generate a 1 ms pulse then wait 20 ms, you can do something like this in your ISR routine:

    void t0_interrupt(void) interrupt 1
    {       
      // Timer increments every 2*12 CPU clock cycles
      // Timer starts counting down from 65535
      // 666 * 1,5 us = 999 us
      static bit timer_state;
      static bit gpio_is_set;
      uint16_t timer_val;
      
      if (timer_state == false)
      {
        timer_val = 0xFFFF - 666;
        
        if (gpio_is_set == 1) 
        {
            timer_state = true;
        }
        gpio_is_set ^=1;
        P10 ^= 1;
      }
      // Wait a given time, in this case 19 ms, before pulsing the pin again.
      else
      {
        // Need to adjust for the prior timer event
        timer_val = 0xFFFF - 13333 + 2*666;
        timer_state = false;
      }
      TL0 = (uint8_t) (timer_val & 0xFF);
      TH0 = (uint8_t) ((timer_val >> 8) & 0xFF);
    }

    You need to set the LED, wait x ms, then turn it off. Then you extend the timer to be 18 ms (20 ms total), then re-do the whole procedure.

    Could you try that?


    Kind regards,

    Håkon

Children
  • If I have to control two servos with a single timer then how do I do that? Please let me know. I am trying to get a second servo working. Now the pulse width for both of the servos should be unique so that I can hold these servos at independent angles..

  • Will this code do the trick

    void t0_interrupt(void) interrupt 1
    {       
      // Timer increments every 2*12 CPU clock cycles
      // Timer starts counting down from 65535
    	
      // 666 * 1,5 us = 999 us
      static bit timer_state1;
      static bit gpio_is_set1;
      uint16_t timer_val1;
    	
    	static bit timer_state1;
      static bit gpio_is_set1;
      uint16_t timer_val2;
      
      if (timer_state1 == 0)
      {
        timer_val1 = 0xFFFF - 666;
        
        if (gpio_is_set1 == 1) 
        {
            timer_state1 = 1;
        }
        gpio_is_set1 ^=1;
        P01 = 1;
      }
    	// 666 * 1,5 us = 1500 us
    	if(timer_state2 == 0)
    	{
    		timer_val1 = OxFFFF-666-999;
    		if (gpio_is_set2 == 1) 
        {
            timer_state2 = 1;
        }
        gpio_is_set1 ^=1;
    		PO2 = 1;
    	}
      // Wait a given time, in this case 19 ms, before pulsing the pin again.
      else
      {
        // Need to adjust for the prior timer event
        timer_val1 = 0xFFFF - 13333 + 2*666;
    		P01 = 0;
        timer_state1 = 0;
    		
    		timer_val1 = 0xFFFF - 13333 + 2*666 *2*999;
    		P02 = 0;
        timer_state2 = 0;
      }
      TL0 = (uint8_t) (timer_val1 & 0xFF);
      TH0 = (uint8_t) ((timer_val1 >> 8) & 0xFF);
    }

  • I would recommend that you try a bit to see if you can fit this to your needs. Use a logic analyzer or a 2 ch oscilloscope to see if it pulses the way you want it to. Note that P02 should be writted with numbers, not letters (it seems like you have written it with an "O" instead of a "0")


    Kind regards,

    Håkon

  • I did not understand this part of the code, especially the numbers and the calculations you are doing with them.

    if (timer_state == false)
      {
        timer_val = 0xFFFF - 666;
        
        if (gpio_is_set == 1)
        {
            timer_state = true;
        }
        gpio_is_set ^=1;
        P10 ^= 1;
      }
      // Wait a given time, in this case 19 ms, before pulsing the pin again.
      else
      {
        // Need to adjust for the prior timer event
        timer_val = 0xFFFF - 13333 + 2*666;
        timer_state = false;
      }
      TL0 = (uint8_t) (timer_val & 0xFF);
      TH0 = (uint8_t) ((timer_val >> 8) & 0xFF);
    }

    Could you please let me know how the logic is working here...

  • The "timer_state" toggles between creating a 1 ms pulse (if timer_state == false), and a 19 ms pulse (timer_state == true).

    As explained earlier, the timer peripheral starts counting down from 0xFFFF, with a frequency of 16M divided by 24 (equals to a period of 1.5 us per tick).

    You can then calculate the timer_val in each state.


    Kind regards,

    Håkon

Related